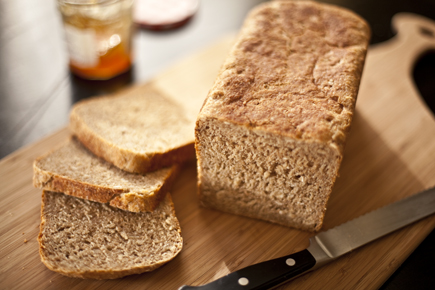
Pullman Loaf – perfectly shaped sandwich bread
The beauty of a pullman loaf is the perfectly shaped slices. If you don’t want to take a chance on a loaf that has a slightly irregular shape, then this is the pan for you. It makes for a perfectly square sandwich loaf or movie-worthy toast. Any of our bread doughs will work in this pan, but some rise more than others, so you will have to adjust the amounts. In this post I used a 100% whole grain oat bread from The New Healthy Bread in Five Minutes a Day, which will rise less than our recipes using only white flour from The New Artisan Bread in Five Minutes a Day. You may need to experiment a little, but I will walk you through the process below.

Pullman Loaf
What you will need:
1 to 3 pounds of dough: This will depend on the size of your pan and the type of dough. (Whole grain dough will rise less, which means you need more to fill the pan. Doughs made only with white flour will rise more, so it will take less dough to fill the pullman pan.)
Pullman Pan (this is the one I used in the post. It is 9x4x4. If you have a larger pullman pan then you will need more dough.
To make the loaf: Butter the loaf pan and lid very well. Fill the pan 2/3 full if using whole wheat dough (this took 3 pounds of dough for the 100% whole grain oat dough). Fill the pan just shy of 2/3 full if using doughs made with white flour.

Allow the chilled dough to rest for about 1 1/2 hours (unless your pan is much smaller).

Slide the cover on the loaf.

Preheat the oven to 450F and bake the loaf for about 45 to 60 minutes, depending on the type of dough and size of pan. My 100% whole grain oat bread took 55 minutes.

Turn the loaf out of the pan and allow to cool completely.

Enjoy!
Note: BreadIn5.com is reader supported. When you buy through links on the site, BreadIn5 LLC earns commissions.
My aunt introduced us to your style of bread baking about 6 years ago and we’ve mostly stuck with the original master recipe, up until now. Just picked up the healthier bread book a few weeks ago.
Using the New Healthy Bread in Five Minutes a day book and the Ten Grain Bread recipe. Using Sprouted Whole Wheat as the Whole Wheat Flour and including the Vital Wheat gluten…what would be a guesstimate on the amount of dough, temp and bake time needed?
I did a test run by halving the recipe and to use for two small free form loaves for my college kid and he was really pleased with it…but, asked it I could make it higher to use for a sandwhich. Thinking that a pulman loaf pan, would be the way to go…though I think he might miss the crunchy crust, that he’s used to
I’m deciding what pans to get… probably will get the one you used 9x4x4 and one of the chefsmade cubed pans. If making for my son, he won’t get through a large loaf fast enough and if for my husband and I, we try to limit our bread…though it’s a weakness of mine so, a smaller loaf would be better.
How do I form the dough for the Pulman style pan?
I’m looking at ordering 2 or 3 of these
•9″x4x4 pulman pan (3-4 cups of flour) I think you used 3pds for this pan?
•7.3″x4x4.3 chefsmade pulman pan (1pd capacity)
•8.1″x2.8×2.8 chefsmade pulman pan(.66pd capacity)
•4.1″x3.9×3.9 chefsmade pulman pan (.55pd capacity)
•5.2″x5.1×5.1 chefsmade pulman pan (1pd capacity)
I have an AGA oven (still learning to use, came with our home) and for the free formed mini loaves (about 1pd each) I placed in my Roasting Oven for 40 minutes. Might have been ok at 35 minutes, but it was my first time making a whole wheat bread and I worried about under cooking. The AGA has three ovens with variable temperatures (no dialing in an exact temperature, it’s a weird oven) The Roasting Oven temperature range is 450-500°. I also have a baking oven that lands between 350-400° and a simmering oven 225°-275° assuming I should still use my Roasting Oven?
By swapping in a flour that I didn’t test with (the Sprouted product)… I can’t guess how it’ll change the water requirement or how it’ll bake. There’s always the chance that there’ll be more bran or gluten than in commercial WW, in which case it’d take more water. So you’ll have to experiment if you want to use the sprouted stuff. In a 9x4x4 pan, which I prefer (and it doesn’t have to be a pullman to get a nice high loaf–the pullman gives the square flat top if you want that), I use a little under 2 pounds, not 3, but that depends on the measurement of your pan. Fill it about 2/3’s full, that’s why this is approximate. I’ve never used an AGA, sounds like they’re a lot of fun (but will require a lot of testing and experimentation to see whether roasting’s better than the baking function. Since this recipe calls for 450F, sounds like you need to start with the Roasting oven.
The best way I found to freeze sliced bread is to first place individual slices on a baking sheet in the freezer. After about 1 hour or until mostly frozen, place the slices into a zip-loc bag, This keeps them from sticking together.
Sure, that works and you don’t have to chisel off the slices the way I do!