Grilled Pizza On A Charcoal Grill

We’ve made a lot of grilled pizzas here at Bread in Five, but almost all of them have been on a gas grill. If you’ve ever attempted a pizza on a charcoal grill you know why this is: the pizza is much easier to manage, and there is less change of burning when it’s not over flaming hot coals. However, many people do not own a gas grill, and so we set out to figure out some helpful tips and tricks in making a charcoal grilled pizza a little bit easier. Twenty pizzas later, and we finally have something for you.
There were quite a few things we learned along the way: bread flour makes a nice, sturdy dough, olive oil in the dough keeps the pizza from sticking to the grill, building a hot and cool side in the grill is a must, and keeping the pizzas on the small side makes them easier to manage.
First of all, it’s important to have everything ready to go. Toppings should be nearby, pizza dough rolled, and an oven mitt and grill spatula handy.
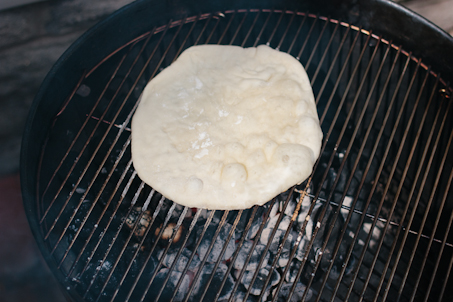
Using a floured pizza peel, place the pizza over the hot coals. When you build your grill, you will create a hot and cool side (directions below) and your pizza will start out on the hot side. Let it cook there until the top starts to bubble and the bottom creates a char to your liking.

When the bottom side is cooked as you like, removed the pizza from the grill and place on a nearby work surface, cutting board, or pizza peel.
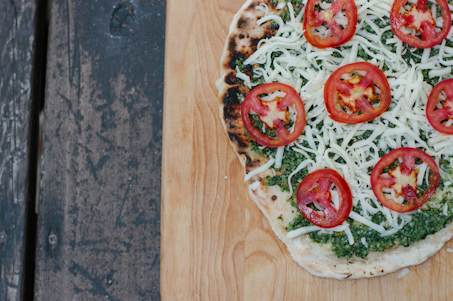
Making sure the charred-side is up, top your pizza. Remember, less is more here – too many toppings and your pizza will be soggy.
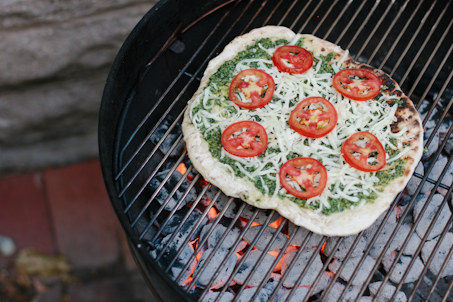
Using your pizza peel, bring the pizza back to the grill, and finish cooking. Place over the hot coals again, keeping a very careful watch. As soon as your char-marks look great, slide the pizza over to the the cool side and cover the grill. Let cook for 2-3 minutes, until the cheese has melted. Remove your pizza from the grill, let cool for a minute or two, slice, and eat!
Grilled Pizza On A Charcoal Grill
I’d like to give a nod to America’s Test Kitchen for a few of the tips and tricks we learned – their grilled pizza episode was very helpful. I tried making these pizzas with our Pizza Dough For Throwing (page 76 in Artisan Pizza and Flatbread), but had trouble with the pizzas sticking to the grill and burning. I found our Olive Oil Dough (page 61 in Artisan Pizza and Flatbread) replaced with Bread Flour worked the best in this application. Keep a very careful watch on your pizza! If at any point it is getting too charred, slide it immediately over to the cool side. Also, if you do find your pizza sticking, clean your grate in between pizzas, and oil the grate if needed.
Olive Oil Dough (page 61 in Artisan Pizza and Flatbread) (1 pound of dough will make three pizzas – divide dough into 3 even pieces. If you only want to make one pizza, your dough ball should be between 5-6 ounces. Directions below are for one pizza, you will need to increase the toppings if you make more).
1 roma tomato, sliced
2-3 ounces mozzarella, cut into 1/2 inch chunks
fresh basil
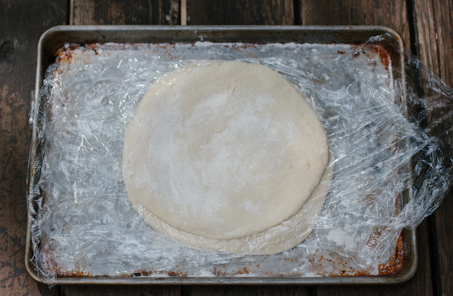
Roll dough into a 9-10 inch circle, 1/8 inch thick. Place on a baking sheet, lightly flour the top of the dough, and cover with plastic wrap until ready to use (if making more pizzas, you can stack them on top of each other, making sure each round is covered in plastic).
To build the grill: Light coals. When coals are ready to use, arrange them evenly over the bottom three-quarters of the grill, leaving the rest of the grill free (this creates the hot and cool spots). Put the cooking grill back on, cover the grill, and let heat for about 5 minutes (clean the grill with a grill brush at this point if needed).
Using a floured pizza peel, place the pizza over the hot side. Let it cook there until the top starts to bubble and the bottom creates a char to your liking. Remove the pizza from the grill and place on a nearby work surface. Making sure the charred-side is up, top your pizza. Then, using your pizza peel, bring the pizza back to the grill, and finish cooking. Place over the hot side again, keeping a very careful watch. As soon as your char-marks look great, slide the pizza over to the the cool side and cover the grill. Let cook for 2-3 minutes, until the cheese has melted. Remove the pizza from the grill, let cool for a minute or two, and serve.
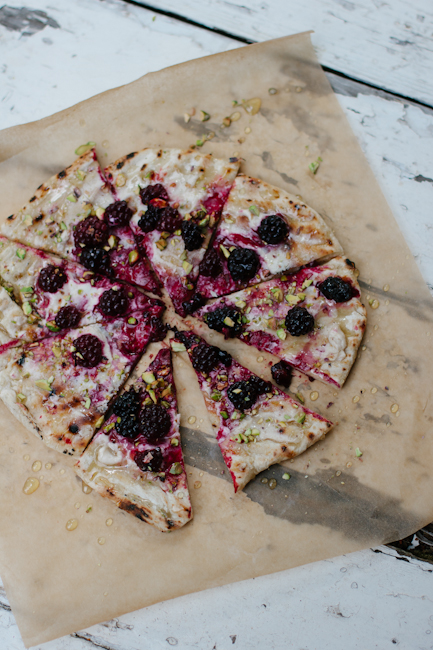
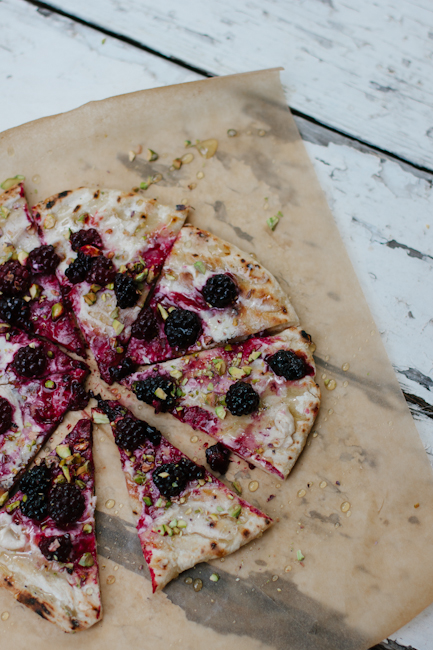
Grilled Blackberry Pizza with Goat Cheese, Pistachios, and Honey
1 1/2 ounces goat cheese, soft
1 tablespoon honey, plus more for drizzling
pistachios, chopped
1/2 cup blackberries
Mix together the goat cheese and honey. When pizza is ready to be topped, spread the goat cheese mixture evenly over your pizza. Sprinkle with blackberries. When pizza is finished cooking, sprinkle evenly with pistachios and drizzle with a little more honey.
Other grilled pizza and outdoor summer baking ideas? Click here…
Cut the corners off a square ceramic tile so it will be an octagon shape. Put it on the grill with the bare side up (like a pizza stone). Distribute the coals around the circumference of the tile, not underneath, otherwise the bottom of the pizza will burn. Cover the grill and let it get hot. Now have a beer while you are cooking your pizza outdoors.
I make my pizza on the grill out of the olive oil bread recipe too. Just made a great one Saturday. I love the Margherita but I have to have onions and garlic on the dough before I put on the rest of the ingredients. A couple of changes to the above instructions is, I put about 1 1/2 teaspoons of olive oil on each side spreading with my hands on the raw dough so it won’t stick to the grill. I made mine smaller as suggested but in an oblong shape and it’s easy to move from the hotter or cooler area with the spatula on the grill. I thought I’d save some for the next day but it was so good I ate it all! I’ve been practicing grilling pizza for a few years but this was the best yet and it was a very thin crust this time. I like thick and thin crusts so either way is great. Love the ABin5 books and this website!
Hi Ileana,
Thank you for the tips, so glad you are enjoying the pizza!
Cheers, Zoë
You don’t know how many times I have tried this on a charcoal grill — total disaster! This excellent article has totally changed my perspective — I am going to succeed this weekend! Thanks, and ditto re: your great ABin5 books — indispensable (although I confess to being a out of the closet bread machine user!).
Hi Bre,
Since you are an out of the closet bread machine user, I wonder if you have ever tried our dough in the machine? We get questions about it, but neither of us have one to test it. Just curious. 🙂
Enjoy your pizza! Zoë
Well, it probably would’nt work, since the bread machine will knead the dough and knock out the gasses…
My mother has used bread machines for about 20 years and the main advantage I find with your method over the machines is the no kneed part: whichever machine you use (I think mom used at least 5 different machines over the years), the kneeding part is always very noisy and seems more energy consuming than refrigerating dough.
Another advantage is the cost: 5 machines in 20 years of daily bread, plus replacing parts, way more $$ than replacing a pizza stone once in a while…
All true, and I’m the last one to advocate for bread machines. But, what I think Zoe meant was to try it for the initial mix (before there’s gas in the dough to knock out). I’m sure that would work, but it’s certainly unnecessary. My other problem with the machines is that I have no extra counter-space for something like that.
If you want to use a bread machine for the initial mix and rise, as you would a food processor, you can use the “pizza dough” setting on the machine, which mixes ingredients and rises once. I guess you could just stick the container in the fridge with a loose plastic wrap after rising. Probably don’t need to use lukewarm water either, as the machine produces heat for rising.
My only concern would be about over mixing the dough. Abin5 technique says to just mix ingredients and not knead. Is this to keep active time down or because kneeding will change the structure of the dough (create gluten stands)? Precious leavening gases are not there to be knocked out yet…
It’s to keep down active time. There isn’t any harm in kneading before the initial rise and as you say, no gas to knock out.
I used the basic recipe that I found on this blog, and I used that to make flat bread pizza on my charcoal grill. I was a little scared to try, but I was glad I did it. It was awesome. I made an alfredo grilled chicken pizza with grilled bell peppers. I thought my boyfriend was going to propose to me after he ate it 😛 I made the dough last night, but I haven’t made the bread yet, only pizza. I’m excited to try it. I’m so glad I found your blog. 🙂
Hi Kimmy,
That is terrific, so glad you enjoyed the pizza!
Cheers, Zoë
Wow good for you. It’s so much fun on the grill. I feel like I’m creating something brand new! Enjoy you pizza!
YUM! This looks so delicious. And, that blackberry pizza is genius. I’m going to have to try it!
I have and enjoy your first two books. I haven’t found a “Cuban bread”…aka Pan Cubano recipe yet :(. Have you created one with your quick method? Old recipe I use has a starter made 24 hours prior to starting bread, ugh! Any suggestions?
Sincerely,
Elizabeth
Our doughs develop some sourdough character over their storage life, so you might enjoy our basic loaf from Artisan Bread In Five (on Amazon at https://bit.ly/cNtfJI or the new Edition available for pre-order at https://amzn.to/17Rw23Y), shaped like a Cuban loaf (elongated but a little flat). A sample recipe’s at https://artisanbreadinfive.com/?p=1616 and you could sweeten it a bit (1/4 cup sugar), and swap a quarter cup of oil or melted butter for 1/4 cup of the water, for a closer approximation of pan cubano. It’ll get better over the storage life of the batch, one recipe makes four 1-pound loaves. Much less work than dealing with starters and pre-ferments.
Heading to the kitchen now to start my bread! Thanks!!! Should be great with my Moros y Cristianos 🙂
… which is? Can you point me to a recipe online?
Ah, never mind, I see that it’s black beans and rice. Still, have a recipe you like?
Tasty simple recipe on Putumayo Presents Cuba cd:
2 cans black beans, drained
1 lg onion, diced
3 garlic cloves, crushed
1/2 c chopped green bell pepper
Olive oil to saute
2 c chicken (or veggie) broth
3T tomato paste
1c long-grain white rice
Salt & pepper to taste
In a large covered pot… Saute onion, garlic and green pepper in olive oil until tender. Add tomato paste, black beans and broth. Add rice, cover & cook over low heat, stirring occaisonally until liquid is absorbed and rice is tender. Add salt and pepper to taste.
Husband and kids ate it up along with the yummy bread!
fantastic elizabeth, will try this!
Camping pizza- a friend who had frozen some pizza dough I’d given her wrapped it in foil and took it camping, (still frozen). It defrosted, and was put ON THE CAMPFIRE in the foil, cooked, flipped, had toppings added and cooked… successfully !
frozen, wrapped in foil, no pan— seems genius, and hope it inspires some others.
Hi Wendy,
What a brilliant idea!
Cheers, Zoë
This is the ONLY method i use for pizza. In fact i won a $500 first place award for my wood fired pizza on a weber grill. It was a pesto, blue cheese and grape pizza. Easy on the pesto though.
In fact, i have designed my own baking steel to fit on the charcoal grill. Its kinda cool. Its in the shape of a capital D and it sits right on the cooking grate. Then another right above it by about 4 inches so it will brown the top so it cooks more evenly.
If you cant use a grill, put two stones in the oven. One for the pizza and one right above it to brown it. Haha
fantastic matt!
About trying this method to make flat burger buns on a charcoal, do I need the hotter and cooler sections to cook the breads through?
(camping with small children, failure is not an option)
If you keep the buns flat (really more like pita), this will be pretty easy. No matter what though, hot and cool sections are always helpful.
Update on results:
Modified olive oil dough flat burger buns, shaped in the air with flour, no rolling pin, on hibachi charcoal (3 griddle heights), set on the highest position, about 3 minutes per side, burned a little but cooked through and were happily eaten by everyone!
Thanks!
Sounds great Laura,
Thanks for the update, good to know the charcoal worked out.
Cheers, Zoë
I just made a grilled blackberry, strawberry, and brie pizza! This sounds even better! Thanks for sharing!