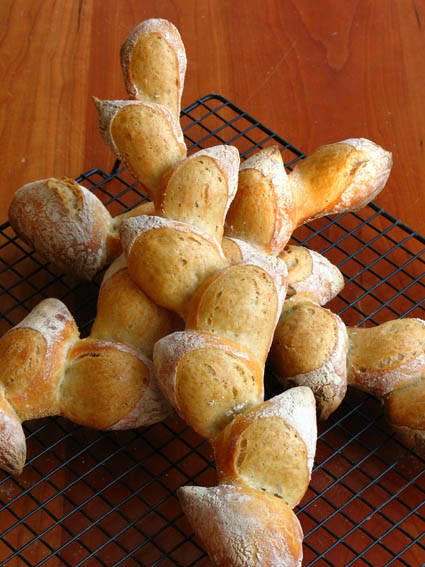
How to Form the Pain d’Epi (wheat stalk bread)
Print
|
Email
|
by Zoe, February 22, 2008
Filed Under Special techniques, bread questions |

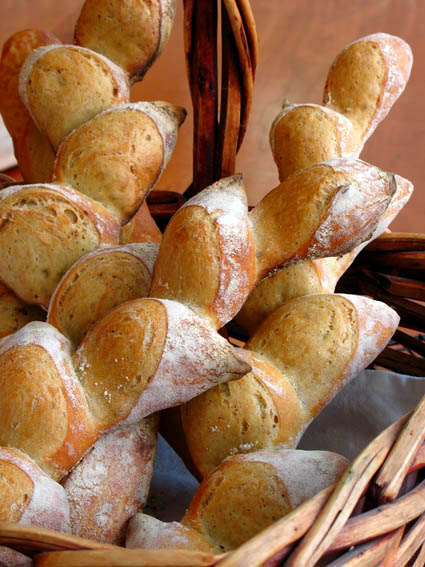
The classic wheat stalk shaped bread is impressive and somewhat intimidating, until you see how easy it is to make. We love the Pan d’Epi not only for its gorgeous appearance but because it is the crustiest loaf there is. All of those cuts and angles leave more surface to crisp in the oven. Something a little more sophisticated to serve with dinner than ordinary rolls but just as easy!
Here’s how it is done:
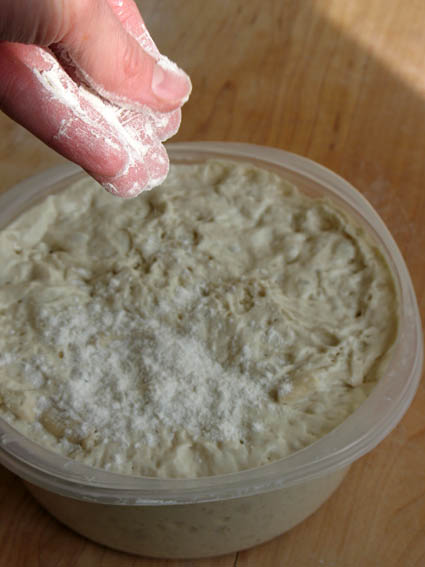
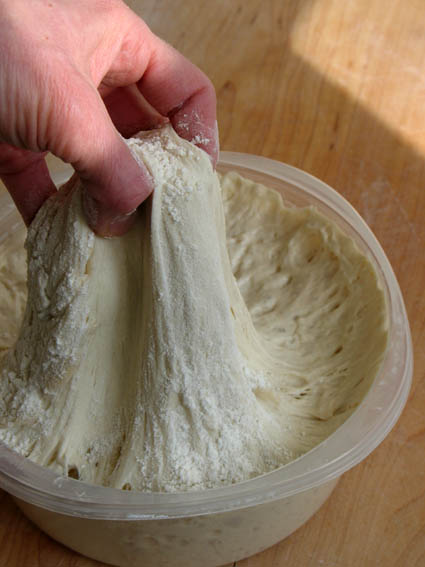
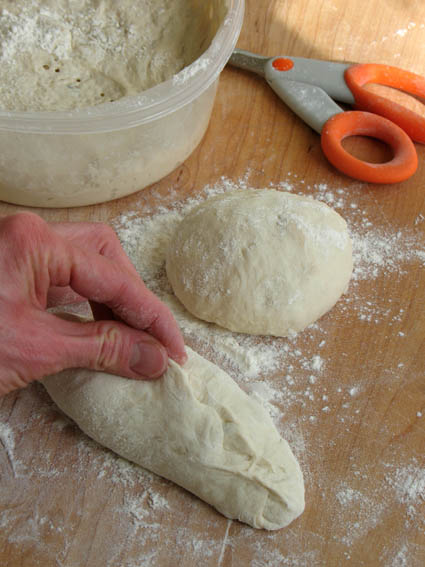
Start by sprinkling the surface with flour so it won’t stick to your hands. Take a peach sized piece of dough from your bucket (master dough (page 26), Pan d’Epi dough (page 41), European Peasant dough (page 46), really anything but the enriched doughs will work.

Pull up the amount you want and cut with a pair of kitchen scissors or a serrated knife.


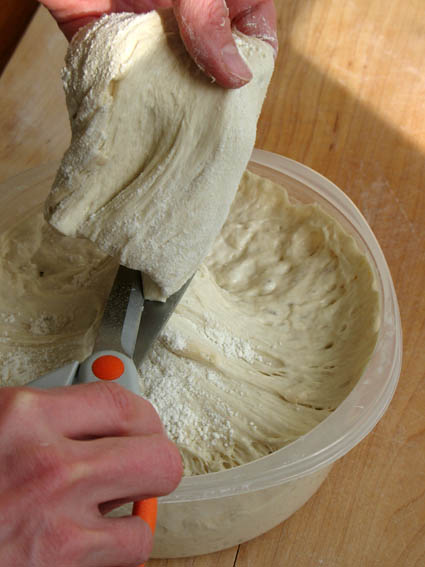
Sprinkle with more flour so the cut edges won’t be too sticky,

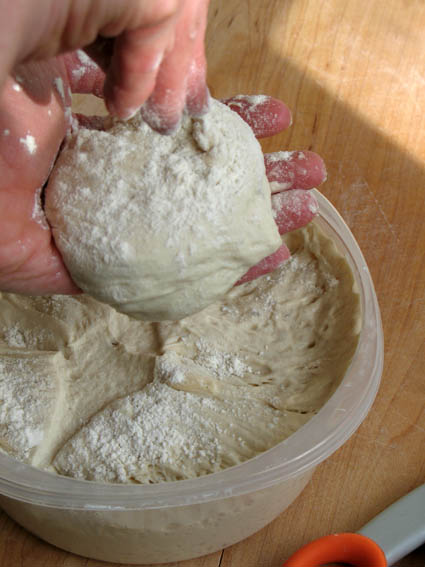
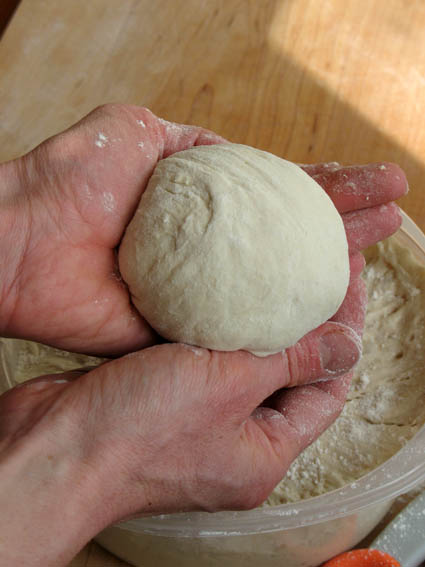
quickly form into a loose ball. This should take about 30 seconds.

To form the Pan d’Epi we are first going to make a baguette. To get a really nice shaped baguette we start by gently stretching the dough slightly into an oval.

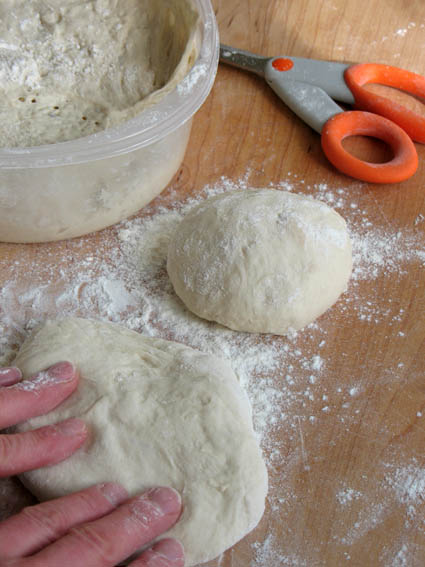
Next you want to fold the dough in thirds, like a letter. Bring in one side and gently press it into the center.

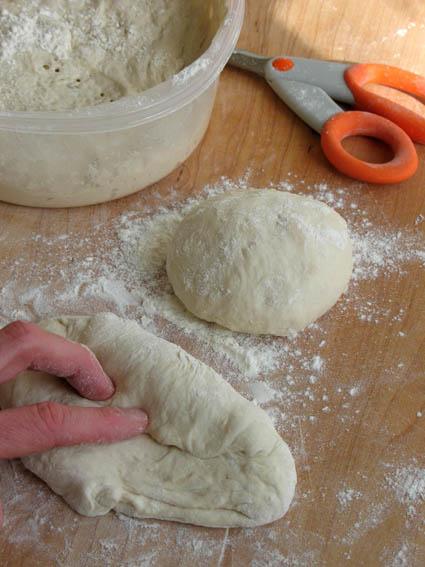
Bring up the other side and pinch the seem closed. This will help you to get a tapered end on your baguette or Pan d’Epi.

Stretch the dough very gently into a log. You don’t want to compress the air out of the dough. If it resists your pulling on it then let it rest for just a moment to relax the glutens.

Continue to work the dough until you have a nice thin baguette. It is okay if you let the dough rest a few minutes and then come back to it to give it a gently stretch. No need to fight the dough.

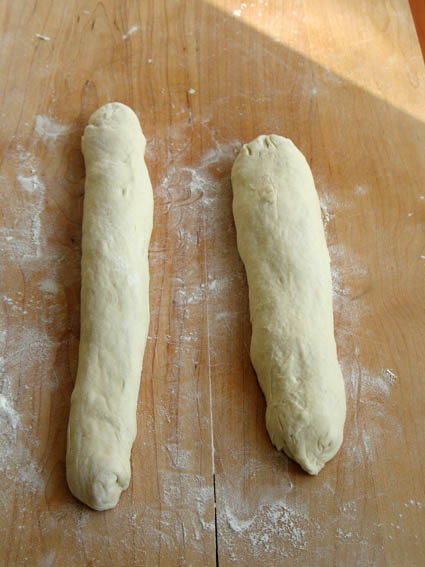
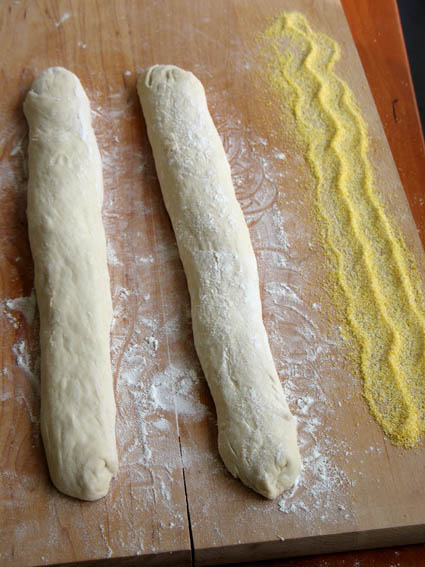
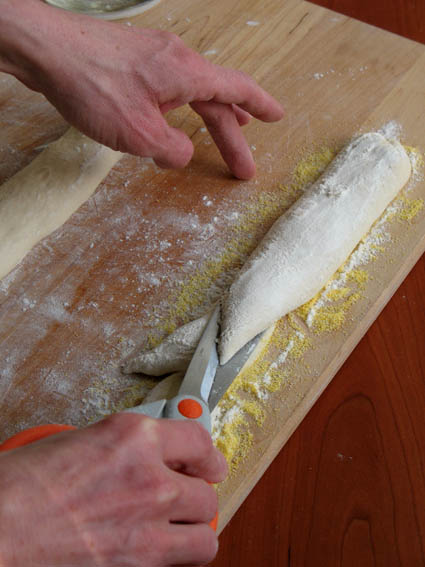
Once your dough is the length and thickness you want, this will depend on the size of the ball of dough you started with and how thick you want your bread. Mine are about 15″. Lay the baguette on the edge of your cutting board, or whatever surface you intend to use to get the bread in the oven. Doing the following steps on a piece of parchment will reduce the chances of the dough sticking as you put it in the oven.

With your kitchen scissors cut the dough from one end at a 45 degree angle until you are about a 1/4″ from the cutting board. Being careful not to cut all the way through the dough.

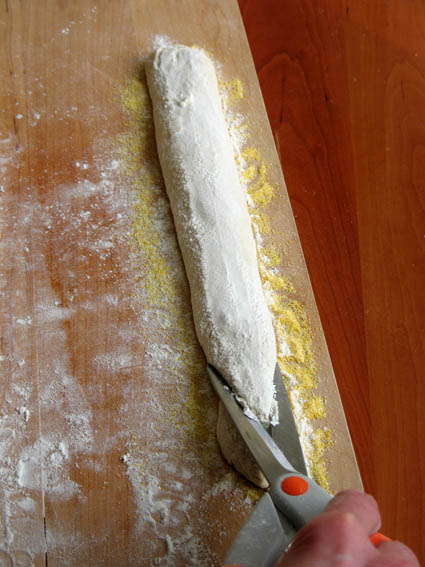
Lay the piece you’ve cut over to one side. Continue to cut in this fashion until you’ve reached the other end.


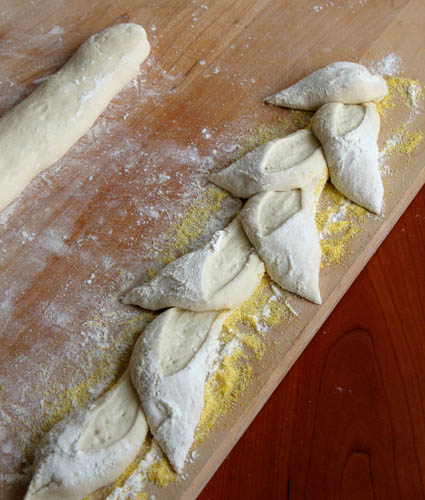
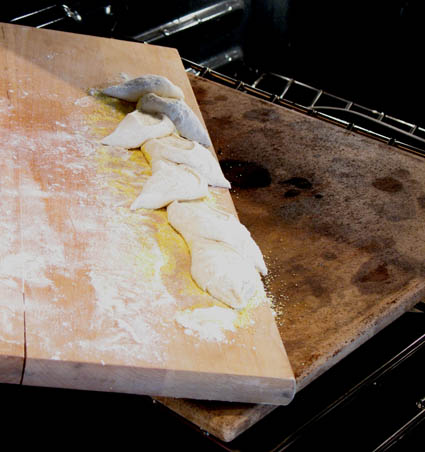
Before you slide the cut dough into the oven, make sure that it has not stuck to the board. If it has gently pry it up and put more cornmeal under the stuck parts. Because this Pan d’Epi is longer than my stone is wide, I slide the oven rack out and put the dough in at an angle so it will fit on the stone.

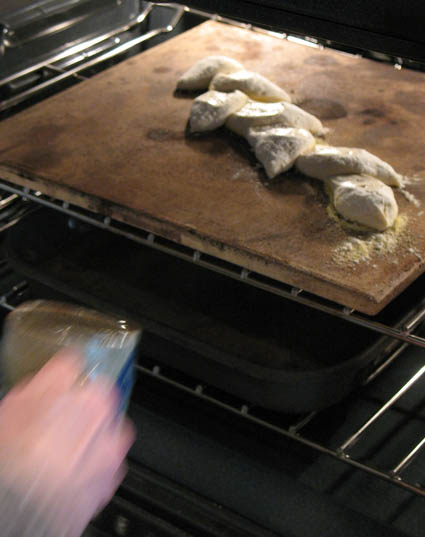
Put a cup of hot water into the broiler tray below the baking stone and quickly shut the door. Bake for about 30 or until it is nicely browned.


Comments
zoe said...
February 22, 2008 at 1:05 pm
Hi Bubbles,
It is the traditional way of shaping the bread. It gives you a more tapered end to your loaf and a cleaner line to the baguette. (I can guarantee you that Jeff has never, and will never do this extra step!!! He like to stream line the process.) I thought I’d show it for anyone who wants to get a more striking point to their Pan d’Epi!
Let me know how yours come out!
Thanks, Zoë
jeff said...
February 22, 2008 at 1:23 pm
Having been challenged in this way, I will, this very weekend, try this exact method. This folding-into-thirds maneuver.
And we shall see.
Jeff
PS: Zoe, your pictures are beautiful with that little camera of yours, as usual.
zoe said...
February 22, 2008 at 2:05 pm
Thanks Jeff!
I look forward to seeing your Pan d’Epi. I hope you didn’t take this as a challenge!
Zoë
Gretchen Noelle said...
February 22, 2008 at 7:22 pm
Thanks! I wanted to do this this very weekend! These pictures and description are very helpful!
cookworm said...
February 22, 2008 at 8:23 pm
Brilliant photo tutorial! This was immensely helpful and I will try it this weekend.
zoe said...
February 22, 2008 at 9:53 pm
Hi Gretchen and cookworm,
When Jeff and I do book signings and tastings we always create this bread during the demo. Everyone is amazed at how easy it is! I’m so glad the pictures help and I look forward to hearing how it goes!
Thanks, Zoë
DocChuck said...
February 23, 2008 at 8:22 am
Wonderful post. Although my wife is a bit hesitant to try “from scratch” baking recipes, I have talked her into giving this one a whirl.
Beautiful bread!!
zoe said...
February 23, 2008 at 8:39 am
Hi DocChuck,
I hope she tries it! We really developed this method for home cooks who are afraid to bake. It is that easy!
Thanks, Zoë
Lauren said...
February 23, 2008 at 1:32 pm
Mine never turn out so beautifully, but I’m alright with that. It’s the magic of having a string of dinner rolls that appeals to me. Every serving has tons of delicious crust! Thanks for sharing this great info!
zoe said...
February 23, 2008 at 3:59 pm
Hi Lauren,
You’ve got it right, it is all about the crustiness!
Thanks, Zoë
jeff said...
February 24, 2008 at 4:47 pm
HONEST DISCLOSURE MOMENT:
So, in front of 21 witnesses at Cooks of Crocus Hill, where Zoe and I were teaching a bread class (www.cooksofcrocushill.com/) this past Saturday, I honored my pledge to attempt Zoe’s letter-folding trick with dough, in order to more artfully shape my loaf. And gratefully, I must ackowledge that the loaf was beautifully shaped. Zoe was kind enough to shape a loaf my way and say that it was almost perfect and didn’t even mention the forked-tongue effect on the left end of the baguette.
Even bread can be a humbling experience.
Jeff
raisdbywolvz said...
February 24, 2008 at 6:03 pm
The forked-tongue effect is my favorite part!
Jeff, you’re such a good sport.
Zoe, you’re quite the diplomat! And thank you for demonstrating the folding-in-thirds maneuver. The epi has become my favorite bread to make — it’s so beautiful and everyone loves to break off chunks of their very own. I can’t wait to try this method and get the nice tapers on the ends.
Ron said...
February 25, 2008 at 5:44 am
Thanks for the great photos and description,it’s really helpful. I’ll be trying it out this week. I am loving the book. I bought some rye flour over the weekend so I could make the deli rye loaf, and some pecans for the pecan sticky rolls. There’s just so much to try, it’s wonderful. My pizzas have been so good and a few of my friends have bought the book. Thanks again.
jeff said...
February 25, 2008 at 6:04 am
Thanks for your enthusiasm Ron, let us know how the Deli Rye and the Pecan Rolls turn out. Jeff
Lisa said...
February 25, 2008 at 7:25 am
I too am loving the book. I have made bread for years and this is by far has the easiest method of prep with fantastic results. I tried Zoe’s suggestion in another thread about shaping a loaf and then letting it rest in the fridge overnight to then pop into the oven cold - had the best oven spring so far! Have made the basic formula, Vermont Cheese, Rye, and Pumpernickel so far and the book only arrived last week!
jeff said...
February 25, 2008 at 9:47 am
Thanks for your enthusiasm Lisa. Keep us posted as you work your way through the more complicated recipes (assume that’s next?). Jeff
zoe said...
February 25, 2008 at 9:53 am
Hi Lisa,
The overnight rise is great!
Sounds like you have lots of buckets going. You’ll need one more for the brioche once you get to the back of the book!
Thanks, Zoë
Laura said...
February 25, 2008 at 8:49 pm
Last night I mixed up a batch of dough for the bread. Baked too loaves today. Thanks to the pictures I was able to shape it pretty good. Got to tell you though, it came out to be the
CRISPIEST bread I have ever had. It wasn’t burnt or anything. The crust was a nice light brown as in the picture but, very crunchy. I thought it tasted very good especially
with an italian bread dipping sauce I made. Just to let you know I did want it crunchy to hold the aujus from the italian beef I made today that
we are going to have tomorrow.
jeff said...
February 25, 2008 at 9:24 pm
Laura: Crisp is good! Sounds like you’re getting a sense of the difference between thick hard crust (not what you want), and thin crispy crust (exactly what you want). Thin-crispy is the result of a nice gluten-cloak plus the effect of steam in the very hot oven on a stone, with the excess moisture wicking away into the stone.
So nice to hear! Jeff
Lisa said...
February 26, 2008 at 6:32 am
Made this one last night and it tasted fantastic - love all of the crust! Didn’t look so swell though. Question - there is no mention here of a 30 minute rest after shaping into baguette - step 6 in the book. Maybe not necessary if it rests a bit here and there as you are shaping?
jeff said...
February 26, 2008 at 7:49 am
Lisa: go to page 42 of the book; step 6 calls for the 30-minute rest, yes? Jeff
zoe said...
February 26, 2008 at 7:57 pm
Hi Lisa,
It needs a total of 30 minutes of rest time. If you are shaping it during that time it is ok.
Thanks, Zoë
Nancy Felknor said...
February 27, 2008 at 11:34 am
I, too love this book. I have become a bread baking fiend. It’s addicting! One suggestion for buckets I have not seen, and which work very well for one recipe of four loaves is an ice cream bucket (5 quart) and it’s cover. the bread seems to rise as much as it wants to, and it doesn’t take alot of awkward room in the fridge…….
zoe said...
February 27, 2008 at 11:41 am
Hi Nancy,
So glad you are enjoying all the fresh bread!
Just in the past week several people have mentioned using ice cream buckets. Great minds think alike!
Thanks, Zoë
cris said...
March 3, 2008 at 5:25 am
Is it ok to bake this on an inverted cookie sheet? I don’t have a baking stone. If so, what adjustments would I need to make with regards to baking time and/or temperature, if any?
zoe said...
March 3, 2008 at 3:32 pm
Hi Cris,
You can bake it on a cookie sheet lined with parchment. I would just make the loaf on the parchment and slip the whole thing onto the preheated cookie sheet. It won’t have quite the same crispy crust but it will be very close.
Don’t forget to use the steam to get a nice crust.
Let me know how it goes! Zoë
Rosemary C said...
March 22, 2008 at 6:35 pm
Today was crazed baking day in preparation for Easter. I made two beautiful panettones for gift giving and then tried my hand at the epi shaping. Yikes!!! I need Zoe, or I need to practice a bunch. The fold over shaping is brilliant and I had this nice 15″ shaped baguette, but my cutting technique was so lame that I folded everything back on top of the loaf. It actually turned out to be a quite charming baguette. But…can’t tell you how much I love this book and recipe. I am baking every day and my husband is so thrilled that he came home with unbleached flour the other day that was on sale for 2 for $3. He is singing your praises, and mine, now that bread prices are rising (pun intended) Thanks to you both
Florence said...
March 25, 2008 at 12:58 pm
Ah, I’m finally going to be able to shape a satisfying Pain épi (that’s the way we call it here, in France). Thanks.
zoe said...
March 25, 2008 at 2:01 pm
Hi Florence,
So glad to hear from you! I’m thrilled that you are trying the bread in France. I look forward to hearing your experience.
Enjoy the Epi!
Zoë
zoe said...
March 25, 2008 at 2:03 pm
Hi Rosemary,
The Epi will come with practice! Perhaps someday we will come to your town to teach a class and then I will show you step by step. Until then keep trying, it will come!
Thanks! Zoë
Monet said...
March 28, 2008 at 1:45 pm
Zoë & Jeff,
Read an excellent review of your book in the Chicago Tribune a couple of months ago, which included your basic recipe. It sounded so unique (and easy) that though I wasn’t a breadmaker I thought I’d give it a try. (My husband is Dutch and there is nothing Wooden Shoes enjoy more than bread, particularly homemade). We couldn’t believe the success I had from the start. The boule was gorgeous in appearance and taste — what a thrill. Eight loaves of boule later and the purchase of Artisan Bread in Five Minutes a Day I decided to try the deli-style rye. Oh my gosh, such bliss, so eight loaves of deli-rye later I became enamoured with my success and went for the gold. I told our Easter dinner hostess that we would bring the bread and thought nothing would be more fitting than pain d’epi. Oh that I had first seen this web site and your terrific photos. My bread came out shaped like a disgruntled crocodile, but I braved the anticipated chortles and prettily wrapped it up in Easter colors. Our darling hostess opened the bread, clapped with glee and said “Oh, look, you made a bunny.” But, the end result was a fantastic crispy bread.
When and where will you be in the Chicago area?
P.S. - Didn’t even know what a peel was — of course now I own one!
zoe said...
March 28, 2008 at 3:15 pm
Hi Monet,
What a wonderful story! I hope you continue to make the Pan d’Epi in its many forms. It is one of my favorites because it is so crusty!
Here is a list of our events coming up and we will be in Chicago in June.
http://www.artisanbreadinfive.com/?page_id=3
Thanks, Zoë
Karen Kuhta said...
April 4, 2008 at 4:26 pm
Zoe & Jeff
I have had so much fun with your bread. The basic recipe was printed in our local paper, I tried it and was hooked.
As we have visited our kids and g-kids
here in WA State and Denver, I have baked a batch for each family. (have pizza stone will travel) The 5 year-olds in Denver took one taste and said “Mommy can you do this?” They loved it.
Right now I have 3 recipes going - will try bagels for first time in the morning, the light whole wheat is our favorite, and also trying Italian semolina this week.
Thank you both so much. Would love to see you in Seattle - 3 hour drive, however - but you never know!!.
P.S.- i used Hungarian flour in Denver - it is made for high altitude - and it worked very well with no changes to the recipe.
jeff said...
April 5, 2008 at 4:39 am
Karen: You’re travelling with your pizza stone? Wow.
We will be in Seattle to promote the book 6/19 through 6/22; please stay tuned to our “Events” page inside this website for details of where we’ll be teaching, and what our media appearances will be.
Can you give any details on your “Hungarian” flour? Jeff
Karen Kuhta said...
April 5, 2008 at 10:39 am
No - the traveling pizza stone is my silly joke. The “Hungarian Flour” is what my daughter-in-law uses because her Mom did. She is not home right now so I “googled” it and this is
what http://www.sourdoughhome.com says:
Interesting Vendor Story: The name confuses everyone. Many people here in Gunnison, Colorado, at an altitude of 7,700 feet (2,346 meters) above sea level, think this flour is good to use at high altitudes. Actually, it’s no better than any other flour at high altitudes. And they are confused about the “Hungarian” part too.
The “Hungarian” part of the name comes from the process used to mill the flour, which was developed in Hungary in the 1800’s. It was brought to Colorado by J.K. Mullen in 1875, and is still used on this flour. The flour is milled from hard wheat from Colorado, the Dakotas, and Montana, so the “high altitude” refers to where the grain is grown.
So much for “high altitude” flour.
jeff said...
April 6, 2008 at 10:26 am
Thanks for straightening us out on that one, Karen!
Lynn Blessing said...
May 20, 2008 at 9:45 am
Found out about you and your book while on aol reading about how to save money! Strange turn of events (or clicks) leads me right to your website and WOW! I’m going out to buy your book today. Can’t wait to try it out. I am one of those that quit making fresh bread because of the time and energy it takes. Wore me out. You are absolutely awesome to have created such an easy way for anyone to have fresh breads every day! I would love to see bread shops sprout up that sold artisan breads at reasonable prices for people that can’t cook. Your recipes may have just solved the problems and eliminated the issues that have prevented making that a reality. I may just look into that myself.
Thanks again for making my life a little easier.
jeff said...
May 20, 2008 at 10:02 am
Lynn: You are so welcome! Let us know how you make out with the recipes. Jeff
linda anderson said...
June 4, 2008 at 9:40 am
since hearing about this bread on showcase minnesota this morning, i have been reading comments like crazy to find out what a pizza peel is. is it just cornmeal with a wavy line made with fingers? i am anxious to try this bread and get the book!
zoe said...
June 4, 2008 at 11:33 am
Hi Linda,
So glad you saw the show. Here is a link to a pizza peel. I had one on the show but we never got around to talking about it. Too much stuff for our 5 minute segment.
Thanks, Zoë
Laurraine said...
June 25, 2008 at 11:51 am
These are beautiful!
amalapropos said...
July 10, 2008 at 10:09 am
wow… that WAS a fast answer! i’m fascinated by the book (a definite must read slash review) and am probably going to take up baking pan d’epi this weekend. props for good bread!
jeff said...
July 10, 2008 at 10:12 am
Amalapropos: Well, I’m working on the manuscript for the second book and for better or worse, I can see when Google notices our book’s been mentioned, pretty much in real time. Works as a great procrastination tool. Check out the alligator bread on Amalpropos’s site: http://amalapropos.blogspot.com/2008/07/i-need-more-carbs-in-my-life.html
Jeff
audrey said...
September 23, 2008 at 11:30 am
LOVE your book and recipes. Tried to get into classes, but they sell out, I’ll keep trying. Is there a way to make your bread in a small toaster oven? I have mini stone, but no second shelf for the water to sit and steam on?
HELP!
jeff said...
September 23, 2008 at 11:42 am
Audrey: I assume you’re in the Twin Cities, and you’re finding that the Cooks of Crocus Hill classes with Zoe sell out fast. We’re also starting some classes at Chef’s Gallery in Stillwater, but the first is already sold out on 10/11. There’ll be a second one, probably after the New Year, but maybe sooner (I’ll be doing that one). Check our Events page from time to time.
I think the toaster oven will work… do you have a metal cup for holding a little water. That little stone will probably do the trick but let us know. If you don’t have a metal cup try an aluminum foil roasting pan propped over the loaf as it sits on the stone. That traps steam coming off the loaf and gives a reasonable approximation of steam bath. Jeff
audrey said...
September 23, 2008 at 11:47 am
Wow! You’re fast! I will try it and let you know.
Duck Duck Grey Duck said...
October 25, 2008 at 10:03 am
[...] celebrated Friday by baking my very first pain d’epi, which was deformed but delicious. I ate it instantly, so I didn’t have time to photograph [...]
jeff said...
October 25, 2008 at 10:50 am
Hi Duck– yeah, the pain d’epi is awesome even when it’s not cosmetically perfect! Jeff
Aurea-Vicenta said...
November 17, 2008 at 2:12 am
Muchas gracias por la descripción tan detallada del hermoso pan Epi.
Las fotografías son valiosísimas para el proceso.
Saludos.
jeff said...
November 17, 2008 at 8:02 am
Aurea-Vicenta:
Gracias por tu visita. De donde viene? Jeff
nads said...
December 23, 2008 at 2:28 am
still amazed by the whole process. can’t believe how fast and easy it is to make truly delicious bread. the crust has always been my favorite part. ive always enjoyed the kneading process involved with breadmaking but as a mother of two boys under the age of two it is rare that i get to play around with dough. on first seeing ur segment on showcase minnesota i couldn’t wait to find the master recipe and give it a go. my first bucket was used up in one go the first morning. my secon, i restrained myself to two loaves in a day i was so proud i had to take before and after shots with my phone. im looking for ur book but can’t seem to find it in australia. q: wht would happen if i added sugar or honey to master recipe? sorry i went on a bit but i jus recently stumbled upon ur method so still too excited.
jeff said...
December 23, 2008 at 6:55 am
Nads: Our book is available online in Australia from http://www.thenile.com.au/search.php?sid=6e443b30729fa9f8a9cb0c4a87cacc74&s=artisan+bread+in+five.
Sugar or honey is fine but decrease the oven temp or it will burn– to about 350 or 375 degrees F.
Aces Full of Links said...
January 5, 2009 at 12:09 am
Got a new book for Christmas, and it’s made it even easier for me to bake yummy bread. Artisan Bread in Five Minutes a Day: The Discovery That Revolutionizes Home Baking Pain d’Epi You know, I like to try……
Elvira said...
January 30, 2009 at 5:16 pm
The bread reminds me of the bread I ate growing up in Germany. Thank You!
Can I pour the water in the pan while preheating the oven or do I have to wait until I place the bread into the oven?
jeff said...
January 30, 2009 at 8:19 pm
Elvira: Wait till it’s hot, then you get more of a burst of steam.
Elvira said...
January 31, 2009 at 6:58 am
Thank you, Jeff.
I ordered your book on amazon. Four agonzing long days and I’m still waiting for delivery. To pass the time, I’m using the recipes I found on your web site. At this moment, I just pulled out a loaf of bread from the oven, am preparing the Superbowl loaf, and am planning to try out the bagel recipe. Imagine, what my life will be like once I have the book (smile).
My mother passed away a few years ago and I’m using the bowl she used for preparing bread. Because of you, she is smiling down at me. Again, thank you.
jeff said...
January 31, 2009 at 7:54 am
Wow.
Thanks for the note, Elvira. A lot of people say that the bread brings back great memories of baker-mothers, grandmothers, and others who once baked great breads for them.
It’s made doing this blog all the more worthwhile.
Megan said...
February 1, 2009 at 11:23 am
Just a little tip on the cutting of the individual rolls; when you cut into the loaf, use the scissors to guide the top part to the opposite side. It’s so sticky sometimes and ruins the look of you play with the “leaves” too much. Hope that makes sense and can help someone.
Patty said...
February 1, 2009 at 1:48 pm
Love the book and I’m working my way though the recipes (light whole wheat and cheddar bread today). I am trying to master the Pain d’Epi, but my baguettes always seem to flatten too much to get that nice look. Same thing with my master boule baguettes. Is my dough too wet? Is that even possible with this dough? The book says to let the dough rest 30 minutes between shaping the baguette and cutting it, but Zoe’s instructions on the website don’t include that step. My loaves taste great, but you can’t really pull off a roll neatly.
Whole wheat is not working too well for me either, but I’ll keep playing with the gluten flour additions and water content and will be running to the book store when your new book hits the shelves!! The Rye was fabulous!
jeff said...
February 1, 2009 at 3:13 pm
Megan: I’m making some today, I’ll try your idea. Sounds helpful.
Patty: Sounds like either:
1. Your dough is too wet OR
2. You’re using bleached flour OR
3. You’re not gluten-cloaking enough (see our videos at http://www.artisanbreadinfive.com/?page_id=63)
You do need to let these rest; try a 20-minute rest if you’re using white flour and they won’t have spread quite so much. And do the letter-fold, which the book didn’t get into but the post above did.
What’s happening with your wheat breads? Jeff
Edward said...
February 2, 2009 at 2:27 pm
Jeff,
Have you developed a rule of thumb correction for using bleached flour similar to the one you give for using finely ground salt (reduce salt by 25%)?
jeff said...
February 2, 2009 at 2:55 pm
No, I haven’t tested with bleached at all. Protein’s too low so the “chew” won’t be there even after you correct the moisture. Easiest way to experiment is to just increase the flour by 1/8 cup at a time and see what it looks like. Jeff
Patty said...
February 2, 2009 at 6:16 pm
Jeff,
Thanks for the quick reply! I’ve watched all the videos and I think I do OK with the cloak, and I use unbleached flour, so I think too much water is my problem, and maybe too long rise time – I’ll experiment with the next batch.
My whole wheat doesn’t rise well after shaping or in the oven. Not quite a brick, but close. I used WW bread flour (can’t remember the brand) and added 1 teaspoon Vital Wheat Gluten per cup of flour. Added about ¼ cup extra water as well. Did about a 2 hour rise after putting in the pan. I know you say to add 1-2 teaspoons VWG per cup, but now that I am reading the package of gluten, it says 1 Tablespoon per cup (Bob’s Red Mill VWG Flour). I will try upping the VWG.
Your website has so much great information on it, I am spending way more than my allotted 5 minutes a day on bread, but I’m loving it!!
Patty
jeff said...
February 2, 2009 at 7:43 pm
Yes, push the VWG and see what you think. Keep in mind that wheat breads just don’t rise quite so high, especially if you’re making 100% whole wheat.
Hey, this doesn’t count towards your 5 min/day allottment! Jeff
Jeanette Krippner said...
February 15, 2009 at 12:16 pm
I just got your book and am enjoying it. I do not have a baking stone, and until I get one, I was wondering if I could bake bread in a clay cooker. It’s the kind that you soak in water for ten minutes before adding food. If used with the cover that is also soaked in water, would one need to use water in a broiler pan on won’t this cooker work for baking bread. I’m anxious to try your recipes and am looking forward to your upcoming book as we love the whole grain breads. Jeanette
jeff said...
February 15, 2009 at 8:30 pm
Jeanette: Yep, the clay cookers work. No need to wet them first for bread, but you’ll need to experiment to see how to keep it from sticking. Lots of cornmeal is probably the best bet. No need for the broiler pan water if you do this. Jeff
Winner of Artisan Bread in Five Minutes a Day giveaway « Cheap Like Me said...
March 19, 2009 at 5:00 am
[...] stalk of wheat. (”Epi” in French means “ear” or “point.”) The authors’ blog has terrific detailed instructions for shaping the bread. And of course, their bread looks [...]
Winner of Artisan Bread in Five Minutes a Day giveaway | Cheap Like Me said...
March 25, 2009 at 9:09 am
[...] stalk of wheat. (”Epi” in French means “ear” or “point.”) The authors’ blog has terrific detailed instructions for shaping the bread. And of course, their bread looks [...]
Rhonda said...
April 9, 2009 at 7:37 pm
I live in a high altitude city and learned a lot from your high altitude thread. Cloaking the ball of dough and resting it in the fridge overnight has made a wonderful difference in the bread’s rise and texture. when making pain d’Epi, would I still need to rise the dough in the fridge overnight after cloaking? Would I do the envelop fold and the shaping of the baguette the night before and the cutting just prior to baking the next morning. What would you suggest?
I love the book. I haven’t bought bread in over a month, since I got the book as a gift from my mother in law. My family is in bread heaven, and I have been able to give bread as gifts to busy friends. I’m hoping to make pain d’Epi for Easter. Thanks
zoe said...
April 9, 2009 at 9:38 pm
Hi Rhonda,
Thank you so much for letting us know that you are having success baking at high altitudes. I do think that if you follow that same cold rise method you will have a wonderful epi.
Enjoy and Happy Easter!
middle of no where! said...
April 16, 2009 at 7:46 pm
I just made this tonight and it had a wonderful taste, and the shape was not so great, so I did a google and found you guys! Oh I am so glad I found you!
The pictures and write up helps alot, I think tomorrow I will do better after all I have three more tries on this batch! Mine was not alagator but a snake that may have eaten to many rats!
I made the briosche and took it to our church easter breakfast, Most people had no clue what briosche was but they did like it!
I made it in a regular brioshes pan and also some mini pans. The mini are really cute!
I have not had the book long but I have loved evetything I have tried.
Thank you so much for a wonderful book that even this non bread person can love and do!
jeff said...
April 17, 2009 at 5:36 am
Middle: Thanks for all the kind words. As you practice more, your epis will get more and more professional-looking. Cut at a very shallow angle–that’s the key.
Toby said...
June 7, 2009 at 11:18 am
My pain d’eppees look like a ladder designed by Gaudi. Oh well, will keep tryoing
Ashcroft said...
June 8, 2009 at 7:23 am
Nice post! Really enjoyed the blog you got so far up on here
Khalaf said...
June 9, 2009 at 7:00 am
nice blog, keep it up. I just subscribed to your RSS feed.
Testing my Baker’s Scissors « Sotsil said...
July 17, 2009 at 8:32 am
[...] pain d’epi recipe and want clear instructions on how to shape it, go to this link: http://www.artisanbreadinfive.com/?p=152. ; The owners of this web site wrote Artisan Bread in Five Minutes a Day which I enjoyed. [...]
Sue said...
September 7, 2009 at 10:11 pm
can you bake two loaves of the wheat stalk bread at the same time on the stone?
zoe said...
September 8, 2009 at 7:59 am
Hi Sue,
Yes, you can bake as many as will fit on the stone. I do them on parchment so that I can slide them around on the stone more easily. If you lay them on parchment together, be sure they have plenty of room for the oven spring that will occur.
Enjoy! Zoë
Rachel said...
October 1, 2009 at 7:31 pm
What about other free form loaves at once? Do you need to adjust baking time? And how about baking more than one loaf pan at a time? Thanks!
jeff said...
October 2, 2009 at 9:47 am
Rachel: I’ve found that except for the smaller ovens, two loaves doesn’t make much difference, maybe a five minute increase in timing. Same for loaf pans. If you really stuff the oven with loaves, the bigger problem is that they brown differently on different shelves and you have to play musical chairs with them. Maybe a 10-minute increase if the oven is really, really full.
Bigger loaves cause a much more dramatic increase in baking times; a 3 or 4 pound loaf takes 45 to 60 minutes, not 30. Jeff
stanley said...
October 6, 2009 at 1:24 pm
This recipe is what I aspire to! My husband said his mother used to make some sort of cinnamon buns in this similar manner but after she had cut the pieces like the pain d’epi she would fashion the bread into a circle and when it baked it looked like a wreath. She is no longer with us so I was wondering if you had any suggestion as to how to do this. Thanks!
zoe said...
October 6, 2009 at 9:50 pm
Hi Stanley,
It is really quite easy and is such a beautiful bread. Here is a post about that very shape. http://www.artisanbreadinfive.com/?p=464
Enjoy! Zoë
Hilde said...
October 18, 2009 at 8:47 am
I’ve been baking from your book since the summer, and it’s been truly life-changing! I always loved baking before, but never bread. Having the wet dough always on hand makes it so much easier to bake bread during the week without having to stay home with my 4yo all afternoon!
I just made two pain d’epis for a potluck. Success! So glad I found this post, as I didn’t quite “get” it from the book’s instructions.
jeff said...
October 18, 2009 at 11:33 am
So glad that worked for you, Hilde! Thanks for the kind words. Jeff
Tami said...
November 4, 2009 at 11:52 pm
Thank you so much for the detailed pictures. They are very helpful. Would love to see detailed pictures or videos on shaping for other loaves also.
jeff said...
November 5, 2009 at 8:22 am
Assume you’ve clicked on our “Videos” tab on this website?
Linda R. said...
November 22, 2009 at 8:04 pm
Thanksgiving here we come! Pain d’epi for the rolls and regular loaves for the stuffing!
Katrina said...
November 25, 2009 at 9:14 am
Hello–Considering making this today as to be ready by tomorrow. Do you recommend making this in advance or will it stale easily?
jeff said...
November 25, 2009 at 10:16 am
Katrina: This one stales pretty easily, I wouldn’t make it in advance. Jeff
Trazee said...
December 24, 2009 at 4:40 pm
Thank you, I have made this, but your photos and extra hints were VERY helpful. Off to try again.
Merry Christmas.
T
Brent said...
January 4, 2010 at 8:19 pm
Just found the website after living with the book for a while. Thanks for the great method. Not sure where to post this question, but will do it here — the first book mentioned that both of you lived briefly in Philadelphia. Any suggestions, tips or links to previous discussions on how to fashion Philly-style hoagie or cheesesteak rolls with the Master recipe?
jeff said...
January 5, 2010 at 12:09 pm
Brent: Basically, you need a soft roll. Options include anything with enrichment (Buttermilk Bread, for example) but not eggs, which isn’t quite right for Phillie-style sandwiches. Or, start with whatever you like but paint the top surface with any fat (butter, oil). It will stay soft and that’s what you’re looking for here. Jeff
Amanda said...
January 29, 2010 at 8:23 am
Beautiful! Think I will try this today.
Question: Is one pound of dough really enough to make a pain d’epi?
zoe said...
January 29, 2010 at 10:42 am
Hi Amanda,
A 1-pound pain d’epi is really quite large. I usually cut that in half and make two. you want to start with a rather thin baguette so that the cuts don’t appear to look bloated.
Enjoy! Zoë
Amanda said...
January 29, 2010 at 1:32 pm
Oops! I didn’t notice that you said “peach sized” dough - now that I’ve tried making one it makes sense. Left you a question on twitter - was wondering why it might be splitting in the oven. Probably as a result of not resting it. However, I’m not sure if I should let it rest as a baguette or as a pain d’epi.
Thanks so much!
Amanda
jeff said...
January 29, 2010 at 9:09 pm
Amanda: Rest it as a baguette, then cut it and put it in the oven right after the cuts. Jeff
Algis Morales Mickunas said...
February 6, 2010 at 2:46 pm
Hi Zoe, hi Jeff!
I hope my message finds you well. I just wanted to let you know that I’ve tried your recipe by making pain d’epi (the wreath version) here in Bogotá, Colombia, at 2640 meters above sea level (8,660 ft !~), and you know what? Not a problem! I brought it to a friend’s house who was having a party the other night, and your bread made me an instant hero/celebrity! I’m sure that happens a lot to all those in ArtisanBreadInFiveMinutes-Land who have followed you, doesn’t it? I’ll send photos the next time!
I started baking about a year ago when I discovered my mom’s clipping of Jim Lahey’s No Knead Bread article from the New York Times, and although I love it and make it a lot, I discovered your website not long after, bought your book, and now keep my bucket of dough in the fridge for our daily bread.
You two are so wonderful and fun and I love watching your videos over and over.
Your pizza on a stick also made me a hero among the kids!
My thanks and very, very best wishes to you both!
Algis
jeff said...
February 6, 2010 at 5:15 pm
Algis: Gracias por todo!
You know, I can’t figure it out, but some people have no problem at high altitude, and others need to make adjustments, see our post on this at our FAQs tab above. Jeff
Valentina said...
February 7, 2010 at 2:24 pm
Baguette pan sticking problem!
Based on the master recipe of a whole grain loaf in your last book, I’ve made great baguettes. Just one major problem: they keep on sticking to the metal pan. It’s almost painful to see my baguettes destroyed when I had to remove them from the pan. I’ve been trying to remedy this by oiling the pan with some olive oil. It helps but not much especially if the dough has been in the fridge for more than 1 week. Any suggestions?
jeff said...
February 7, 2010 at 3:47 pm
Valentina: They make non-stick versions, and even a silicone (soft) version. Those will probably work better. If you’re really excited by the older doughs, you may be happier with free-form baguettes. Our dough is wetter, and therefore stickier than most. Jeff
Valentina said...
February 7, 2010 at 5:19 pm
Jeff: Thank you so much for your advice! My baguette pan is supposed to be nonstick but it performs as such only with relatively young dough (up to 3 days). Today, my dough was about 10 days old and extremely sticky. You are right, I like the taste of the relatively old dough and plan to experiment with my sourdough starter. Can you please clarify what you meant under free-form baguette?
ChefDylan - From Cook to Chef Blog said...
February 7, 2010 at 7:00 pm
Having just discovered this site I haven’t got a prefement and used another recipe… however the shaping of the Epi was awesome and I did that with my dough….
http://fromcooktotrainedchefandbeyond.blogspot.com/2010/02/homemade-baguettes-easy-awesome_07.html
Dylan
Algis said...
February 7, 2010 at 9:27 pm
No Jeff; gracias por todo a TI y a Zoe por el entusiasmo que ustedes dos inspiran en todos nosotros que estamos descubriendo la panaderia!
Baking bread is so fun, and the way you and Zoe transmit your enthusiasm and passion for it is incredibly contagious.
Los mejores deseos y exitos para los dos.
Algis
zoe said...
February 8, 2010 at 9:37 am
Hi Valentina,
Jeff means a baguette that is baked directly on the stone and not in a baguette pan. You can also use parchment to bake on the stone or in your baguette pan to insure that it will come out well. I do this all the time when I am using my baguette pan, just for some insurance. I’ve had trouble with older doughs sticking as well.
Thanks, Zoë
zoe said...
February 8, 2010 at 9:46 am
Thank you so much Algis!
Happy baking! Zoë


Follow us on Twitter 
Bubbles LaTour said...
February 22, 2008 at 12:53 pm
Zoë! What a fabulous series of photographs! Thank you so much. They are beautiful.
Question: What is the value of folding the dough in thirds?
-Bubbles