Back to Basics ~ tips and techniques to create a great loaf in 5 minutes a day.
Print
|
Email
|
by Zoe, February 9, 2010
Filed Under Recipes, Special techniques, bread questions | 372 Comments

Some people get excited by a football game or a new pair of shoes, but for me it is finding fresh cake yeast at my local grocery store. I haven’t played with fresh yeast since I was in culinary school many years ago. I certainly hadn’t tested the recipes in our books with it, because I assumed it was too difficult to find. There it was sitting next to the cream cheese in the dairy section of the store. I admit I yelped and did a little dance right there in the aisle. I will most certainly continue to use granulated yeast, but thanks to Red Star there is a fresh option available for those of you who want to give it a try. It is very easy to use and for those with a sensitive palate you may detect a difference in the flavor. I loved working with it and the bread was wonderful. The only draw back is that fresh yeast has to be used when it is FRESH. Most only survives about 10 days in your refrigerator and Carol at Red Star Yeast says that freezing it is tricky business. For those of you who get excited about trying new techniques and ingredients I highly recommend you give it a go.
Recently we have seen lots of new readers on the website who are asking wonderful questions about how to perfect their loaves. First I’d like to say welcome to the site and thank you for trying the bread. As I bake through the basic Master recipe from ABin5 I will try to answer some of the most frequently asked questions and also introduce you to a few new pieces of equipment I’ve recently started to use that make the whole experience just a little easier.

Master Recipe from Artisan Bread in Five Minutes a Day:
3 cups lukewarm water (you can use cold water, but it will take the dough longer to rise. Just don’t use hot water or you may kill the yeast)
1 1/2 tablespoons granulated yeast ( you can use any kind of yeast including: instant, rapid rise, bread machine, active dry or cake yeast*. I buy the 2-pound bulk package of Red Star Yeast to drive down the cost. You can also decrease the amount of yeast in the recipe by following the directions here. Or you can bake with a sour dough starter, see instructions here.)
*If you use cake yeast you will need 1.3 ounces.
1 1/2 tablespoons Morton’s Kosher Salt (use less salt to suit your taste or eliminate it all together. Find more information here.)
6 1/2 cups (2-pounds) unbleached all-purpose flour (we tested the recipes with Gold Medal and Pillsbury flour. If you use King Arthur or other high protein flour check here.)
Mixing the dough:

In a 5 or 6 quart bowl or lidded Food Storage Container, dump in the water and add the yeast and salt. Because we are mixing in the flour so quickly it doesn’t matter that the salt and yeast are thrown in together.

(If you are using the fresh cake yeast break it up like I did above.)

Dump in the flour all at once and stir with a long handled wooden spoon or a Danish Dough Whisk, which is one of the tools that makes the job so much easier!

Stir it until all of the flour is incorporated into the dough, as you can see it will be a wet rough dough.

Put the lid on the container, but do not snap it shut. You want the gases from the yeast to escape. (I had my husband put a little hole in the top of the lids so that I could close the lids and still allow the gases to get out. As you can see it doesn’t take much of a hole to accomplish this.)

Allow the dough to sit at room temperature for about 2 hours to rise. When you first mix the dough it will not occupy much of the container.

But, after the initial 2 hour rise it will pretty much fill it. (If you have decreased the yeast you will have to let it go longer than 2 hours.)

The dough will be flat on the top and some of the bubbles may even appear to be popping. (If you intend to refrigerate the dough after this stage it can be placed in the refrigerator even if the dough is not perfectly flat. The yeast will continue to work even in the refrigerator.) The dough can be used right after the initial 2 hour rise, but it is much easier to handle when it is chilled.

The next day when you pull the dough out of the refrigerator you will notice that it has collapsed and this is totally normal for our dough. It will never rise up again in the container.

Dust the surface of the dough with a little flour, just enough to prevent it from sticking to your hands when you reach in to pull a piece out.

You should notice that the dough has a lot of stretch once it has rested. (If your dough breaks off instead of stretching like this your dough is probably too dry and you can just add a few tablespoons of water and let it sit again until the dough absorbs the additional water.)

Cut off a 1-pound piece of dough using kitchen shears* and form it into a ball. For instructions on how to form the ball watch one of our videos. Place the ball on a sheet of parchment paper… (or rest it on a generous layer of corn meal on top of a pizza peel.)
*I actually use a pair of Sewing Shears because I like the long blade. I just dedicated a pair to the kitchen.

Let the dough rest for at least 40 minutes, (although letting it go 60 or even 90 minutes will give you a more open hole structure in the interior of the loaf. This may also improve the look of your loaf and prevent it from splitting on the bottom. ) You will notice that the loaf does not rise much during this rest, in fact it may just spread sideways, this is normal for our dough.
preheat the oven to 450 degrees with a Baking Stone* on the center rack, with a broiler tray on the bottom, which will be used to produce steam. (The tray needs to be at least 4 or 5 inches away from your stone to prevent it from cracking.)
*(or Cast Iron Pizza Pan- which will never crack and conducts heat really well. Be careful to dry it after washing rinsing with water or it will rust)

Cut the loaf with 1/4-inch slashes using a serrated knife. (If your slashes are too shallow you will end up with an oddly shaped loaf and also prevent it from splitting on the bottom.)

Slide the loaf into the oven onto the preheated stone (the one I’m using is the cast iron) and add a cup of hot water to the broiler tray. Bake the bread for 30-35 minutes or until a deep brown color. As the bread bakes you should notice a nice oven spring in the dough. This is where the dough rises. To insure that you get the best results it is crucial to have an Oven Thermometer to make sure your oven is accurate.

If you used parchment paper you will want to remove it after about 20-25 minutes to crisp up the bottom crust. Continue baking the loaf directly on the stone for the last 5-10 minutes.

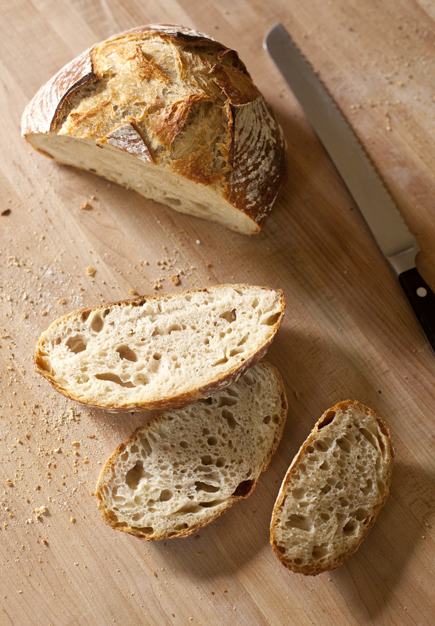
Allow the loaf to cool on a rack until it is room temperature. If you cut into a loaf before it is cooled you will have a tough crust and a gummy interior. It is hard to wait, but you will be happy you did! Make sure you have a nice sharp Bread Knife that will not crush the bread as you cut. Or you can tear it apart as they do in most of Europe.

If you have any leftover bread just let it sit, uncovered on the cutting board or counter with the cut side down. If you cover a bread that has a crust it will get soggy.
Enjoy and have fun baking. Bread that is made with love and joy tastes better!
Comments
Elle said...
February 9, 2010 at 9:49 am
I’ve been making your bread for quite a while now, but it’s always nice to read up on the technique again. I’ll have to see if I can let the formed loaves rest the 60/90 minutes for better texture. So hard to wait, though, hehe!
I’ve recently been using this recipe to make sandwich rolls. Nothing beats an amazing sandwich on fresh, homemade bread. And you can get the rolls ready so quickly, too!
Joan Vibert said...
February 9, 2010 at 10:10 am
Help! I have a class scheduled for 9:30 am Saturday morning and we’re using the Whole Wheat Brioche dough to make the Honey Caramel Sticky Nut Buns, Cinnamon Crescent Rolls, and Fruit-filled Pinwheels. All for Valentine’s treats. I just realized that I can’t get up early and make the dough that morning because it HAS to chill. If I make the dough the day before and take it out early that morning to warm up a little, do you think I could shorten the rest times on these?
Sherry said...
February 9, 2010 at 10:13 am
DUH!!!!! Poking a hole in the lid is genius!!!!!!! Why did I not think of that????? (Excuse me while I sheepishly go poke a hole in the top of my plastic ice cream container!)
Tracy said...
February 9, 2010 at 10:23 am
I have a question. Lately my bread dough has not been rising well at all. Someone told me that it’s probably because of the lack of humidity during the winter. My hubby and I tried turning up the humidity via our furnace, but it didn’t seem to help with the bread too much. Is there anything else I can do??
Thanks!
Megan said...
February 9, 2010 at 10:28 am
Awesome turorial! Thanks for the reminder. I hope my pudunk grocery store will get in some fresh yeast soon-can’t wait to try it!
kimberly said...
February 9, 2010 at 11:22 am
Thank you for the great refresher! It was simple and inspiring. I have a question – is that a black baking stone or is it cast iron?
Daily Kitchen said...
February 9, 2010 at 11:23 am
Bread in 5 minutes? Sounds about right for my house!
Robyn said...
February 9, 2010 at 11:47 am
I’d like to use one of the basic dough recipes (right now I have European peasant dough in my bucket, I think–the one with 1/2 cup whole wheat flour and 1/2 cup rye flour). What shaping/resting/baking time adjustments would I have to make to make these, or the master recipe for that matter, into simple rolls or buns?
David said...
February 9, 2010 at 11:53 am
I am really happy you posted this. I have been a long time fan and and use your book but I got turned off each time I took a hiatus from breadmaking and came back only to find I had to spend an hour figuring out hydration, how much yeast, gluten values for a particular type of flour, etc. I know baking is science but it’s not always fun and enough to turn me off. I feel like I can get back into it again thanks to this post.
zoe said...
February 9, 2010 at 12:33 pm
Hi Mardi,
Thanks for the note and be sure to let us know how it is going with the bread!
happy baking! Zoë
zoe said...
February 9, 2010 at 12:34 pm
Hi Elle,
That is a great point about the smaller loaves being a speedier option!
Enjoy, Zoë
zoe said...
February 9, 2010 at 12:37 pm
Hi Joan,
Yes, I think you can “cheat” the resting times a bit if you start with a dough that is not completely chilled.
Have fun! Zoë
zoe said...
February 9, 2010 at 12:41 pm
Hi Tracy,
The dry weather will make your flour absorb more water than it will if it is humid. It could just be that your dough is too dry and you need to add a bit more water. Does your dough look stretchy like mine does in these pictures?
Thanks, Zoë
zoe said...
February 9, 2010 at 12:51 pm
Hi Kimberly,
That is the Cast Iron Pizza pan, which I love!
Enjoy, Zoë
Kristen said...
February 9, 2010 at 1:00 pm
Just tried this for the first time, and the results were delicious, with a great crust & crumb, but I had an incredibly difficult time shaping the loaf. My dough was VERY sticky, almost like glue, and I could not get enough flour on my hands or the dough to keep it from coating my fingers. I hastily shaped the loaf and put it down on the peel, but my hands were coated in dough. I had to use soap & water to get it all off. Did I do something wrong with my dough, or is it supposed to be that sticky, and I just need more practice in handling it?
Thanks, Kristen
zoe said...
February 9, 2010 at 1:07 pm
Hi Robyn,
Here is a basic soft bun: http://www.artisanbreadinfive.com/?p=443
Here is a crusty version: http://www.artisanbreadinfive.com/?p=536
Enjoy, Zoë
zoe said...
February 9, 2010 at 1:08 pm
Thank you David,
Feel free to ask us any questions and we will help you bake a great loaf!
Enjoy, Zoë
zoe said...
February 9, 2010 at 1:11 pm
Hi Kristen,
The dough is very soft compared to traditional dough, but once it has been chilled it should be easier to handle. You just need to make sure that you have lots of flour. I usually have a small bowl of flour to dip the dough in as I am shaping if it starts to get sticky.
Did you check out the videos to see how we handle the dough? It may be helpful! http://www.artisanbreadinfive.com/?page_id=63
Thanks, Zoë
Tracy said...
February 9, 2010 at 1:26 pm
Zoe – No, it isn’t. How much extra water should I add?
zoe said...
February 9, 2010 at 1:33 pm
Hi Tracy,
I’d add up to 1/4 cup of additional water to the full batch. If you have already taken some of the dough out of the bucket then just a few tablespoons. If it seems hard to incorporate then try doing it in a stand mixer with the paddle attachment. Let the dough rest after to allow it to absorb into the flour, about 1-2 hours.
Thanks, Zoë
Helen in CA said...
February 9, 2010 at 1:47 pm
Could y’all do the same tutorial (w/pictures of course) now for the HB5 master dough?
Since wwflour handles somewhat differently
It’d really help
Many thanks
Ken said...
February 9, 2010 at 2:54 pm
“Cast Iron Pizza Pan- which will never crack and conducts heat really well. Be careful to dry it after washing or it will rust”.
Wait…this may be a difference between cooking schools and cooking grandmas but she always said, “Never wash your cast iron cuz you’ll cut right through the seasoning and have to re-season it.”
janknitz said...
February 9, 2010 at 4:18 pm
Thanks for this. Whenever I get frustrated with one of your doughs I go back to the master recipe and almost always find something I need to be doing to improve my technique. The master recipe makes me feel like I have some “mastery” over my bread baking ;o)
elana said...
February 9, 2010 at 4:53 pm
hi! i’m so excited to start making bread. we have a big snowstorm headed our way tomorrow and my kids are really excited for some “real” bread. i have a couple of questions before i start:
1. my broiler pan is nowhere to be found. can i use a couple of square cake pans for the water?
2. i only have ceramic mixing bowls, no bowls with lids or anything. can i cover with plastic wrap and poke holes? or does that not work?
Ginny said...
February 9, 2010 at 6:50 pm
I recently made the rye bread from the Healthy Bread book. As we were eating it, my daughter wondered aloud whether the same dough could be baked in a loaf pan, instead of as a free-formed loaf. We’d love to use it for sandwiches.
jeff said...
February 9, 2010 at 7:53 pm
Helen: It does handle a little differently— have you seen the discussion of the new recipe at http://www.artisanbreadinfive.com/?p=1087 ?
jeff said...
February 9, 2010 at 7:54 pm
Ken: If you’re careful about heating the pan after washing, and oiling it when it looks dry, it won’t rust. But in general you’re on the right track. These certainly shouldn’t be cleaned with steel wool or you’ll take off all the “seasoning.” Jeff
jeff said...
February 9, 2010 at 7:57 pm
Elana: The cake pans are fine, though they may warp or get calcium deposits on them. Just don’t use glass for this purpose, or they can shatter.
The bowls are just fine, with plastic wrap. Probably don’t even need the holes, it’s leaky enough. Jeff
jeff said...
February 9, 2010 at 8:03 pm
Ginny: Sure could, baking time will probably increase, assuming that the loaves in the pan are bigger than the freeforms you’ve been enjoying. There’s a chance you may find this particular loaf a little over-moist and over-dense when baked this way, may want to decrease the temp 25 degrees and go longer to dry it out (but not certain of that). Jeff
Sarah said...
February 9, 2010 at 8:52 pm
I am wondering if you have heard or done much research on phytic acid? I was reading recently about it and am finding some mixed information. Sounds like seeds, nuts, etc contain this “anti-nutrient” but you can soak your grains to take care of it…wondering if the wet dough accomplishes the same thing? Just curious what your take is on this. Thanks!
Sarah said...
February 9, 2010 at 9:27 pm
Sorry, I felt it necessary to add a bit more info to my above question. I am using the HBin5 recipes, and grinding from wheat berries and working into other grains as well. Still researching the ins and outs of this phytic acid issue to find out if it is indeed necessary to soak grains, legumes, etc and how that would affect the bread ultimately, but thought I would see if you have any insight. Thanks again.
Brenda said...
February 9, 2010 at 9:54 pm
I have your book but all these pictures gave me some tips I might have been missing. These would be great in the book.
I had to take a little break in bread making because my husband and I put on 10 lbs in the 3 months after I got the book, I was making bread nonstop. I still make it, but only when we have people over and I hardly ever have leftovers.
Frydel said...
February 9, 2010 at 10:20 pm
I love your books and the bread is fantastic. In HBin5 I have made the sweet potatoe spelt bread and even after decreasing the amount of water it is extra moist. Any suggestions? Should I decrease the amount of water more?
Also, are wholegrain flours interchangeable in the recipes?
Your Quinua bread is fantastic!!!
Thanks
Becky said...
February 9, 2010 at 11:52 pm
I’m waiting for my 2nd ever ABin5 loaf to cool (it is sooo hard to wait!), and I wanted to stop by and say thanks. There are so many recipes in both of the books that I’m excited to try! I’m really glad that I saw this post today because my pizza stone cracked in four pieces tonight while my bread was baking. I have an old 15″ cast iron pan, and it will replace my stone for bread baking nicely! I’ve wondered what I’d do with that big ol’ thing. I’ve always enjoyed making and eating homemade bread, but this method makes it more reasonable to make a quick loaf on a weekday. Thank you, Zoë and Jeff!
Becky said...
February 10, 2010 at 12:15 am
I have tried the basic recipe several times. I made sure my yeast and gluten were fresh. For the wheat flour, I grind my own grain fresh. I can’t seem to get the dough to have those gluten strands. When I grab a portion, it just come apart without any strands at all.
elana said...
February 10, 2010 at 6:20 am
thanks, jeff!
i made the dough last night and put it in the fridge. when i checked it this morning, it had continued to rise all the way to the top of the bowl. is this okay? the pictures seem to indicate that the dough should collapse in the fridge but it didn’t.
should i punch it down before taking out a piece to bake?
Tracy said...
February 10, 2010 at 7:01 am
Okay, I will try that. Thank you!!
Cindy said...
February 10, 2010 at 7:44 am
Hi,
I made my first bread from Healthy Bread in 5 Minutes a day this past weekend. The taste was great, but the bread seemed pretty dense and was fairly flat. Any thoughts on what to do differently next time?
Thanks for your great books and blog!!
Cassie said...
February 10, 2010 at 9:37 am
This is the African Peanut Soup recipe as printed in Golden Goodies, a cookbook published by Golden Lake Elementary in Circle Pines, MN
*******
African Peanut Soup
1 lg. fresh sweet potato, diced and begin to sauté in olive oil or canola oil
1 white onion, chopped
1 red pepper, chopped
2 jalapeno peppers – remove seeds to minimize heat, chopped
Sauté for several minutes, then add to pot.
2 cut up chicken breasts
2 cans chicken broth
2 jars medium or hot salsa (32 oz. Total)
1 can black beans – undrained
2 cans Healthy Choice Chicken with Rice Soup
1 tsp. Cumin
Add to pot. Bring to boil (I sometimes add a little water as needed – but you do
not want it thick). Reduce to simmer. 5 minutes before serving whisk in ½ cup of
peanut butter.
******
I use 2 sweet potatoes at least 1T of cumin. I have used Campbells Select Chicken and Rice. I usually skip the jalapenos, since I cook for small people. If you cook the peanut butter too hot it curdles; which looks wierd but tastes fine.
I doubt this is very authentic, but it is yummy. It is a family favorite and a big hit at pot lucks. I hope you like it.
Denisa said...
February 10, 2010 at 9:39 am
I love your method and have both of your books. One question–how do I avoid ridges on crust when it’s baked in places where I slashed it. Your loaf looks almost smooth when baked. I often get loaves that have deep ridges. I tried slashing them less but then I get the really ugly loaves with some of the dough bursting out the side or the ridges split themselves more.
Also, here you mention that you can let the loaf rise longer, like 90 minutes. I did that in the past with the white boule and the loaf was too dry on the top. Does is need to be covered with plastic wrap like the healthy breads when there is longer resting time?
Irene said...
February 10, 2010 at 9:55 am
Help! I forgot my dough raising and left it overnight. Is there something I can do to save this batch? (This is not tjhe first time in doing this)! Thanks for any advice!!!
kimberly said...
February 10, 2010 at 10:48 am
Thanks Zoë! Does it handle like a baking stone – same preheating time and whatnot?
Also, how would you recommend making soft hamburger or hotdog type buns from the ABin5/HBin5 master recipes? Thanks!
Linda said...
February 10, 2010 at 10:51 am
I have both books, but before using your master recipe, I used another calling for 4 cups of flour instead of the 6-1/2 yours requires. I wondered if I can use the 4 cup recipe with the same results? The 4 cup recipe calls for 1 tbls of both salt and yeast….I love the taste (I know the salt isn’t good for you)…and this was not kosher salt. It seems like a silly question but I don’t want to try it without your opinion.
Thanks for making bread so easy!
Sean said...
February 10, 2010 at 12:08 pm
Is there anything better than fresh baked bread? I am going to have to try out this recipe.
zoe said...
February 10, 2010 at 1:02 pm
Hi Brenda,
With each book the publisher gives us more pictures. It is a matter of budget and keeping the books at a reasonable cost. I agree that they are helpful and that is why we maintain this website so frequently.
In terms of the other issue, I have learned to bake smallish loaves to prevent me from eating 2 pounds of bread a day!
Thanks, Zoë
zoe said...
February 10, 2010 at 1:04 pm
Hi Frydel,
You can certainly try to decrease the water OR try adding a couple more tablespoons of vital wheat gluten. Are you using a “light” spelt by any chance? It seems to have even less gluten.
Which whole grains are you trying to substitute. They aren’t all interchangeable because of the gluten content.
Thanks, Zoë
zoe said...
February 10, 2010 at 1:05 pm
Thank YOU Becky,
Sorry about the stone, but your cast iron will work very well.
Enjoy all the bread, Zoë
zoe said...
February 10, 2010 at 1:12 pm
Hi Becky,
There is a great discussion going on with others who are using fresh ground wheat here: http://www.artisanbreadinfive.com/?p=1481 Read through the comments and you will get some great tips on improving your loaves.
Thanks! Zoë
zoe said...
February 10, 2010 at 1:13 pm
Hi Elana,
Your dough sounds very healthy and you should go ahead and use it. We NEVER punch it down or you will deflate all those wonderful air bubbles which will give you a nice open hole structure in your breads.
Enjoy, Zoë
zoe said...
February 10, 2010 at 1:16 pm
Hi Cindy,
Did the dough have any stretch when you went to pull a piece out of the bucket? What kind of flour are you using?
Let me know and we will help you figure this out! Zoë
zoe said...
February 10, 2010 at 1:22 pm
Hi Cassie,
Thank you so much for the recipe, it looks wonderful and I’ll give it a try soon.
Cheers, Zoë
zoe said...
February 10, 2010 at 1:27 pm
Hi Denisa,
I’m afraid I can not visualize what you are talking about. If you join our facebook page you can upload a photo of your loaf and I can get a better idea. http://www.facebook.com/profile.php?ref=profile&id=1075538139#!/pages/Artisan-Bread-in-Five-Minutes-a-Day-Healthy-Bread-in-Five-Minutes-a-Day/203618773151?ref=ts
If you are letting your loaf rest in a dry environment or for a long time it is always safer to cover it with plastic wrap.
Thanks, Zoë
zoe said...
February 10, 2010 at 1:35 pm
Hi Irene,
If it is a dough that has no dairy or eggs then just put it in the refrigerator and forget it ever happened.
I did the exact same thing yesterday and the dough is still excellent!
Enjoy! Zoë
zoe said...
February 10, 2010 at 1:43 pm
Hi Kimberly,
Yes, the cast iron pizza pan is treated just like a baking stone in terms of preheating.
There are directions for hamburger and hotdog buns in HBin5. You can follow those for either dough and just adjust the resting/baking time for the ABin5 dough. You will need to decrease the resting/baking times to about 30 minute rest and 20 minute bake.
Thanks and enjoy, Zoë
zoe said...
February 10, 2010 at 1:46 pm
Hi Linda,
Which recipe are you referring to? Are you just wanting to scale back one of our recipes? If so, it works very well to cut them in half.
Thanks, Zoë
zoe said...
February 10, 2010 at 1:47 pm
Hi Sean,
NOPE, nothing better than fresh baked bread!
Enjoy, Zoë
kimberly said...
February 10, 2010 at 1:56 pm
Thanks Zoë, and thanks for your patience – if I would have read the description of the recipe in HBin5 I would have seen that lean dough is ok. I had just looked at the dough called for in the recipe…sorry! *sheepish smile
Linda said...
February 10, 2010 at 3:29 pm
Actually, the entire message came out backwards! What I want is to take the 4 cup flour, 1 tblsp yeast and 1 tblsp salt (I don’t know how much water, it just said keep adding until the flour moves away from the side of the bowl) and develope the recipe using your 6-1/2 cup master recipe for artisian bread . I KNOW to increase the flour to 6-1/2 cups…I don’t know how much to increase the yeast, salt and water. I like the idea of having enough dough for 4 loaves of bread…the 4 cup recipe makes 2 larger loaves….yours is much better!
janknitz said...
February 10, 2010 at 5:58 pm
Just a note for Becky–my dough will sometimes act that way (coming apart instead of strechy gluten strands) when it’s too cold–it is tearing instead of stretching. Your fridge may be set too low (ours does this when it’s time to go grocery shopping and there’s not much in the fridge). Try letting the dough warm up in the bucket at room temperature for 20 or 30 minutes before pulling off a piece and see if you still have the same problem.
Stephanie said...
February 10, 2010 at 6:06 pm
Kind of off-topic question: What do they use to season a pre-seasoned cast iron? Given the many folks with food intolerances/allergies and restrictions, I’ve always harbored this fear that they use lard….
KerryAnn May said...
February 10, 2010 at 8:37 pm
I had yeast leftover from waffles, and did a quick search for bread. We’re snowed in and there’s plenty of time for stuff like this. I have NEVER made yeasted bread before. This sounded easy. Did not have the proper bucket or pizza stone, but hey, I figured I’m not out much if it’s a disaster.
I used a cheap cookie sheet turned upside down on top of another one (thinking the whole air insulating thing) for the pizza stone. I used an empty clear glass flour canister for the bucket.
I am not embarrassed to say I have eaten 3/4 of the loaf all by myself…yah, it came out great! So easy!!
Two things I am going to invest in: the books and a thermometer. I had to go on faith that 35 minutes in my oven was right…but I think I want to try a thermometer to make sure I am cooking it to the right doneness.
Thank you!
zoe said...
February 10, 2010 at 8:59 pm
Hi Linda,
I think if you follow the instructions I’ve provided in this post you will have the dough you are looking for. The ratio you mention is pretty much the same as ours.
Thanks, Zoë
zoe said...
February 10, 2010 at 9:04 pm
Hi Janknitz,
Thank you so much for this insight! I think you are absolutely right and I would never have thought of that.
Cheers, Zoë
zoe said...
February 10, 2010 at 9:07 pm
Hi Stephanie,
According to the Lodge company they season their pans with a soy-based oil. Here is the company website http://www.lodgemfg.com/use-care-seasoned-cast-iron.asp.
Hope that puts your mind at ease! Zoë
zoe said...
February 10, 2010 at 9:20 pm
Hi KerryAnn,
What a great story. Thank you so much for trying the bread. I’m thrilled that you had such a great experience.
Hope you stay warm, baking bread will help! Zoë
jennifer said...
February 11, 2010 at 6:51 am
i made a batch of dough last night and left it to rise the 2 hours on the counter, but forgot about it and it stayed out all night (about 10-11 hours!!). do i have to throw it out or can i still use it?
elana said...
February 11, 2010 at 6:55 am
thanks zoe!
i baked the bread last night and it tasted really good. i did find that it came out kind of flat but it was definitely holey in the middle so maybe that’s okay?
just wanted to ask what i might be doing wrong. also, when i pulled the dough out of the fridge it was super super sticky and i had a really difficult time forming a ball. i eventually gave up because i didn’t want to over-handle it and just plopped it down. any suggestions on dealing with the super stickiness?
Eric said...
February 11, 2010 at 7:00 am
I am having a problem that my dough seems far too wet/loose, even upon first mixing.
I am using the recipe measured by weight, not by scoop/sweep. With Gold Medal unbleached all purpose flour, I made the dough to 75% hydration (i.e., 800 g flour and 600 g of water). The dough looks like the one in the pictures above in the container. When I remove it from the container, it stretches quite a distance, occasionally breaking after a foot of stretch.
When I shape the loaf (aside from it being very sticky) it is so loose that it will not hold its shape when placed on the peel. It spreads out so much that there is no chance that it will rise on the bench.
What am I doing wrong? Not enough bench flour?
Cindy said...
February 11, 2010 at 8:42 am
Hi Zoe,
Thanks for your help. I am using the King Arthur 100% premium whole wheat flour. I still have some dough in the fridge. When I pull it out of the fridge, I can pull it apart slightly and then it breaks.
Thanks so much for your help!!
Cindy
connie Gangl said...
February 11, 2010 at 9:02 am
I always loved making and baking bread especially when my 4 boys were little but with this new technique it is definitely easier and faster. I love already tried three times so far. thank you. Connie Gangl
JenW!~ said...
February 11, 2010 at 10:42 am
I recently found your article in the Dec/Jan copy of Mother Earth News. Today I tried the master bread recipe and I was very pleased with the results. I will be getting your books soon. I am so in love with this method of bread baking.
Tupper Cooks said...
February 11, 2010 at 3:08 pm
Hi! I love your book and your site, and most of all your recipes. A quick question- I’m new to the blog community. Last night I made the challah, which came out great, I posted it on my blog, and gave credit to you-Is that adequate, or should I request permission first? I’d copied the recipe posted on Ivory Hut. Just want to follow protocol! Thanks!
Mandy said...
February 11, 2010 at 5:57 pm
Hi again, quick question… the crescent rolls made from the whole wheat brioche dough – can you make them a day ahead of serving them? Would they store well in a covered container?
thanks as always!
jeff said...
February 11, 2010 at 7:47 pm
Jennifer: You can use it! The overall lifespan of this batch may be shortened, but just chill it and use. Jeff
jeff said...
February 11, 2010 at 7:48 pm
Elana: Assuming you’re not using bleached flour (shouldn’t do that), it sounds like you just need to make yours a little drier, for whatever reason. Use maybe an eight of a cup more flour next time. Jeff
jeff said...
February 11, 2010 at 7:52 pm
Eric: Yes, just try more bench flour, and be sure to gluten-cloak as in our videos. If that doesn’t work, try a few loaves in a pan, or even in a closed cast iron that’s small (http://www.artisanbreadinfive.com/?p=552) so it can’t spread. Use lots of flour on your hands, but let most of it drop off the forming loaf. Also, our stuff firms up when cold; try not using it right away. Jeff
jeff said...
February 11, 2010 at 7:56 pm
Cindy: Check out our tips on dealing with denseness at the FAQs page. I’m guessing you will be much happier with the bread if you rest for 60, or even 90 minutes. But… if you’re using WW flour in a recipe calling for white AP, that just won’t work. Not sure I’m clear here– which of our recipes are you using. Jeff
jeff said...
February 11, 2010 at 8:05 pm
Tupper: Thanks for thinking of our book as the subject for a web posting. It’s fine with us, so long as you follow a few basic guidelines for respecting our copyright. We can’t extend written permission to use materials or recipes, since that could be seen as giving written permission to waive our copyright:
1. Copyright law prohibits you from copying material from the book and distributing it on the web, even excerpts.
2. Copyright law prohibits you from distributing any exact text from the book, including recipes. If you want to use material, it needs to be modified for your use. Or just link to our recipes on our website.
3. Please mention our book and website (www.artisanbreadinfive.com) as sources for the full and original versions of the recipes. The website is also a great place for people to get questions answered—we’re still answering questions ourselves here.
Jeff
jeff said...
February 11, 2010 at 8:06 pm
Mandy: Everything can be stored, but it definitely won’t be as good. Covered container would be the way to go. Jeff
jeff said...
February 11, 2010 at 8:12 pm
Sarah: Best as I can tell, the science on this is very unclear. My guess is that phytic acid isn’t causing a problem for many people in the US, but I’d also guess that our long-resting dough is taking care of the problem (if there is one). I’m afraid I don’t have anything more specific that that though…. Jeff
Robyn said...
February 11, 2010 at 9:45 pm
Zoe, thanks for answering my question about buns/rolls. The general bun method is EXACTLY what I was looking for. I had seen the Brotchen recipe and am anxious to try it, having spent many years living in Germany. I wonder if there’s a way to do a laugen (pretzel) type roll with your method. In Germany they boil them in a sodium hydroxide solution, but like pretzels, many people use baking soda bath here in the US. If you ever try it, let us know how they turn out.
nina said...
February 12, 2010 at 7:03 am
the photos are so fantastic. i live overseas and couldn’t download the videos because it takes so long on my internet connection. i think your attention to making them “making of bread” easier and easier is quite remarkable. thank you so much-making your breads changed my life as i live in a place where one could only buy (not very good) baguettes. i now have fresh and very interesting bread each and every day.
Jennifer said...
February 12, 2010 at 11:08 am
Hi Jeff & Zoe, I made the Challa bread today and it came out beautifully…my first braided bread…woohoo!!! You state in your book that this dough can also be frozen if not used in 5 days. How do you defrost and then bake?
Thanks for your books, I have both and am loving them!!!
Cindy said...
February 12, 2010 at 11:17 am
Hi Jeff,
Thanks for the follow-up.
I’m following the Healthy Bread in 5 Minutes a Day recipe on page 81 of your book. I took it out of the refrigerator, shaped it and put it on parchment paper for 90+ minutes prior to baking.
I’ll take a look at the FAQ. Please let me know if you have any other thoughts.
Thanks.
zoe said...
February 12, 2010 at 3:41 pm
Hi Robyn,
We do have a pretzel recipe in ABin5. Here is a post about it: http://www.artisanbreadinfive.com/?p=489
Enjoy! Zoë
zoe said...
February 12, 2010 at 3:49 pm
Thank you Nina,
I’m so glad you are enjoying the bread so much!
Zoë
zoe said...
February 12, 2010 at 4:03 pm
Hi Jennifer,
Just wrap the dough well in plastic in 1-pound packets and freeze. Then defrost, still covered, overnight in the refrigerator. Use it as though it just came out of the bucket.
Thanks and enjoy, Zoë
zoe said...
February 12, 2010 at 4:08 pm
Hi Cindy,
Does your dough have any stretch to it when you pull it out of the bucket? Your dough may be too dry. Try adding a few more tablespoons of water to the dough and see if that gives it a little more rise.
Thanks, Zoë
Jennifer said...
February 12, 2010 at 10:45 pm
Thanks for your quick response. I gave my first loaf to my neighbors and thought I would need to save the remaining dough a while longer…but my husband is going to have nothing to do with that!!!
Mary CLEMENT said...
February 13, 2010 at 9:19 am
I just purchased the Artisan Bread book and am enjoying it! I just have a quick question…I used some of the boule recipe to make pizza yesterday, using a pizza stone, which I placed low in the oven. The crust had a lovely flavor, but I found that the toppings browned much more quickly than the bottom of the crust, so it didn’t really get that nice crunch I’d like to have. Any suggestions? Thanks so much, I am looking forward to trying many more of the recipes. btw, the Tuscan White Bean Dip was a hit at our Super Bowl party!
Marc said...
February 13, 2010 at 10:57 am
I want to thank you for having your basic recipe online. I wanted to start your breadmaking while snowed in here in DC but have not gotten to buy your book yet. I made the dough last night and my first loaf this morning and am very pleased. I look forward to getting the Healthy Bread in 5 next week.
Carol said...
February 13, 2010 at 11:54 am
I’ve been baking bread (using your recipe) again since Christmas. Fair success, but some loaves come out dense…especially recently. I think I will play with the water amount a little. Thanks for the pictures. I realized that compared to yours my dough is not spongy at all and doesn’t get the same resting rise either (no bubbles). My white flour is Red Mill, 4% protein and the whole wheat is King Arthur, 4% protein also.
Any suggestions? I’d like to try again today. Thanks!
Frydel said...
February 13, 2010 at 12:29 pm
Zoe,
Thanks for your answer. This is about the Sweet Potato bread. I am using regular whole grain stoneground Spelt. Handling the dough was difficult since it is very wet. Can I add the gluten to the dough I already made? Also, my loaf spread quite a bit and in did not rise at all in the oven. Any ideas?
Ashley said...
February 13, 2010 at 1:17 pm
Hi,
A friend taught me to bake your basic loaf last year and I love it. I even gave it out as Christmas presents. Sometimes I add in kalamata olives or garlic cloves. Anyway I just got your book and am excited to try some of the breads that cook in loaf pans. I know you need non-stick pans. Do silicone pans work? I am anxious to try the cinn-raisin bread. I thought it might be good to use blueberries instead of raisins.
Thanks for the great recipes.
Ashley
zoe said...
February 13, 2010 at 3:36 pm
Hi Mary,
The trick to getting the best pizza crust is to have the stone as hot as the oven. The thicker stones may take up to 30 minutes to really reach that temperature. If the stone is not thoroughly preheated it will mean the bottom crust is not done as soon as the toppings.
Hope that helps! Zoë
zoe said...
February 13, 2010 at 3:40 pm
Great Marc,
So glad you gave it a try.
Enjoy, Zoë
zoe said...
February 13, 2010 at 3:43 pm
Hi Carol,
The pictures you see here are for the Master recipe from ABin5 which is all unbleached all-purpose flour. This dough will produce a very different dough and bread than the master recipe from HBin5 that has whole wheat. I am planning to do a post soon on making the whole wheat loaf.
Having said that you can certainly play with the water level in your dough if you are not getting a good stretch in your dough.
Thanks, Zoë
zoe said...
February 13, 2010 at 3:49 pm
Hi Frydel,
Did you check out our errata sheet? http://www.artisanbreadinfive.com/?page_id=73 That was one of the breads that was mentioned as having too much water. You can mix in some flour and then let it sit for a couple of hours to absorb the water. You could try adding a tablespoon of VWG to about a cup of flour and then incorporate it. It is hard to add just VWG once the dough is made up because it will clump up in the dough.
Thanks, Zoë
zoe said...
February 13, 2010 at 3:54 pm
Hi Ashley,
Yes, the silicone pans work very well. You can certainly use dried blueberries instead of raisins, but fresh ones would be too liquidy.
Thanks, Zoë
Ashley said...
February 13, 2010 at 4:20 pm
Thanks Zoe,
I was thinking dried blueberries or even craisins.
Mary Beth said...
February 13, 2010 at 6:43 pm
I just got your book: made the healthy bread recipe and had to let it rise 4 hours, not 2. (unexpectedly had to leave the house.) the dough is sitting in the refrigerator. will it still make a good loaf?
jeff said...
February 14, 2010 at 7:27 am
Mary Beth: It won’t be a problem at all. I’ve sometimes left it out overnight. Jeff
Mary Beth said...
February 14, 2010 at 8:09 am
2 questions: can I use a convection oven? also, what’s best way to check oven temp. — there’s a $3 oven thermometer but my husband (engineer) pointed out its so cheap, it may not be right…better thermometer choice?
Mary said...
February 14, 2010 at 10:28 am
Hi Zoe Thanks so much for your response!! We leave our stone in for an hour, so I’m sure it’s up to temp. I’m thinking of a new stone, this is about 15 years old. Thanks again!
zoe said...
February 14, 2010 at 10:57 am
Hi Mary,
If you are sure that your oven is at the right temperature using an oven thermometer then I’m stumped! ;( One thing to consider if you are looking to get a new stone is to try the iron pizza pan that I used in this post. The black tends to make a darker crust, which should help you get that crisp crust on your pizza.
Thanks, Zoë
zoe said...
February 14, 2010 at 11:01 am
Hi Mary Beth,
Yes, convection ovens work really well. You need to adjust the temperature down by 20 degrees to compensate for the intensity of the convection oven heat. Watch the first loaf to make sure that it is baking evenly. You may need to rotate the loaf if one side is coloring faster than the other.
I use an inexpensive oven thermometer and it seems to work just fine. I’ve tried them all and don’t really think the expensive ones work any better.
Enjoy, Zoë
Dana said...
February 14, 2010 at 12:57 pm
I just realized that I have a cast iron griddle that is big enough for a 1-pound loaf! Surely it will work like your cast iron pizza pan. I will just turn the handle to the back of the oven.
Michelle said...
February 14, 2010 at 2:48 pm
My pampered chef stone cracked when I baked a loaf the second time. I think this was because of the steam when I added the water to the broiler pan. The stone has been seasoned and used many times before. I am leary to buy a new one. I saw that you used a cast iron one. Would you suggest that instead? Will the bottom crusts still get crisp?
Amanda M. said...
February 14, 2010 at 5:02 pm
I LOVE your book. My husband gave it to me as a Christmas present and it is definitely one of the best gifts I have received.
Question: would any of the recipes from the first book work well as bread bowls (to serve chowder in)? The loaves from the master recipe cook up well, but I can’t get them to hold the right shape. Any suggestions would be wonderful.
Thanks again for making such a wonderful book!
jeff said...
February 14, 2010 at 8:44 pm
Michelle– yes, we’re pretty happy with cast-iron surfaces, including just a plain old cast-iron pan. Also, there are alternatives to steam:
Baking in a Dutch Oven: http://www.artisanbreadinfive.com/?p=552
Aluminum Roasting Pan for Crust: http://www.artisanbreadinfive.com/?p=510
Cloche baking: http://www.artisanbreadinfive.com/?p=566
jeff said...
February 14, 2010 at 8:47 pm
Amanda: I bet you’d get a better result with something with a stouter grain, like the rye bread. Bake it well as a boule (ball-shaped bread), then hollow out the center to form the bowl. Jeff
Becki said...
February 15, 2010 at 11:46 am
I have a wheat allergy and have been making recipes from Artisan Bread with white spelt. I’ve been pretty successful in modifying for the spelt and love your it!
I just received Healthy Bread as a gift and would like to make some of the breads, but have a question about the vital wheat gluten. Is there something I could replace it with or would you suggest I leave it out totally? I see that you used xanthum gum in the gluten free bread. Would that be helpful in lightening the whole spelt?
Looking forward to trying the Healthy Bread recipes! Thanks, Becki
zoe said...
February 15, 2010 at 12:21 pm
Hi Becki,
I have not yet tried replacing the VWG with the xanthan gum, but had that exact thought. I do want to give it a try. If you try it please report back about how it goes!
Thanks! Zoë
David said...
February 15, 2010 at 3:40 pm
I just made a batch where I halved the recipe (1.5 C water, 1 lb flour) and it feels way dry. I am going to add more water.
jeff said...
February 15, 2010 at 6:16 pm
David: That’s odd, can’t explain why this should have happened. How much extra water was needed? Jeff
Deb said...
February 15, 2010 at 7:43 pm
Just made my second batch of the master recipe yesterday. LOVED the loaves from the first batch I made, but when I tried to take some of the new dough for pitas tonight, it was SOO wet that I couldn’t use it. There were a few differences in my process I guess – for the first time, I made a double batch and used a stand mixer, but I mixed each batch separately and combined them in the container. I used bleached flour because that is what was on hand. This time I also made a double batch, but used unbleached flour, doubled it right away and mixed it by hand in the storage container. Must have been a measuring error I am guessing.
Long story short, I am trying to salvage the dough so I used my hands to incorporate a LOT of flour – still quite wet, but similar to what I ended up with the first time. This of course resulted in a dough with no bubbles. Should I let it rise again to develop the bubbles before I put it back in the fridge?
I heard your program on Wisconsin Public Radio and got the books the next day and I have to say that this is SO MUCH FUN! I have baked bread weekly for a long time, and I still do my stock 100% whole wheat for sandwiches but now I bake a number of these loaves a week as well.
Michelle said...
February 15, 2010 at 8:20 pm
Jeff, thank you so much for the alternatives. I will give them a try. I will have to say, my three loaves of bread (boule dough) I made were amazing. The crust is the best..OMG I’ve ever had. For some reason though, my breads don’t rise as high as in your pictures. Maybe I need to take more dough, but when I halved the recipe and split the dough in half, it doesn’t seem like much dough. No worries though when I do the whole recipe next time, I’ll make three loaves instead of four. Thank you so so much for all your help and amazing recipes and ideas.
Stephanie said...
February 15, 2010 at 10:20 pm
Becki,
I’m working on the same thing, and would love to see your results. Jeff warned me not to use white spelt, saying it would be prone to collapse. I’ve had pretty good luck with whole spelt (and often rye). I’ve made 2 batches with 1T of xanthan gum for the batch. It rises maybe a drop more than before? I’m trying to figure out whether a little oat flour, a little more xanthan gum, or something else would add what’s needed to really bind it together. Someone mentioned VitaSpelt. Their website claims to use only the spelt for “the best baking,” but you have to buy in pretty big bulk. So I’m waiting to use up all my spelt flour first!
Yuti said...
February 16, 2010 at 8:33 am
I would love to buy this book! Sounds amazing! But I can only get fresh yeast cubes here! Will that work? If yes, how do I convert amounts from dry to fresh yeast?
Jennifer said...
February 16, 2010 at 10:55 am
Just bought your Healthy Bread book last week and love it; thank you for helping me bring homemade, healthy bread to my family so easily! I have looked in the book, FAQs, and videos but need more direction on cloaking. I find this difficult–the dough breaks off as I’m pulling it from the center of the top of the dough ball to the bottom. Am I trying too hard? Is it more of a gentle stretching from the sides of the ball to the bottom just to make a smooth top?
Sara said...
February 16, 2010 at 1:41 pm
I just baked the whole wheat sandwich bread and it doesn’t taste very good. It had a strong bitter taste. I felt like I followed the directions closely. I did wait to bake it on the 5th day of refrigeration. Is that what gave it such a bitter flavor?
Barry Walker said...
February 16, 2010 at 1:47 pm
On page 56 of your current edition at the top is says”; leave it open a crack for the first 48 hours to prevent buildup of gases;” It then says to allow it to rise for up to 2 hours. Should it have read 48 minutes?
zoe said...
February 16, 2010 at 3:17 pm
Hi Deb,
How old was the dough you were trying to make into pitas? If it was fresh, 1-3 days old, then it could just be that it was too wet to begin with. You certainly can add more flour and then let the dough sit so the flour can absorb the water and the yeast can work its magic again.
Thanks and enjoy all the bread! Zoë
zoe said...
February 16, 2010 at 3:19 pm
Hi Michelle,
Have you tried letting it rest a bit longer before baking? This may really the dough to rise better in the oven.
Thanks, Zoë
zoe said...
February 16, 2010 at 3:21 pm
Hi Stephanie,
Thanks for the info on baking with xanthan and spelt. Oat flour will not add any stretch to the bread, no gluten, but it will be tasty!
Keep us posted, Zoë
zoe said...
February 16, 2010 at 3:26 pm
Hi Yuti,
I give the equivalent for fresh yeast in the recipe on this post. Just read the list of ingredients and you will find it under the yeast.
Thanks and enjoy, Zoë
Sarah said...
February 16, 2010 at 4:47 pm
Barry-
The book is correct- the container should not be airtight for, at least, 2 days or 48 hours. But it sits on the counter (also in a non-airtight container) for the first 2 hours.
Deb said...
February 16, 2010 at 7:36 pm
Hi Zoe,
Thanks for the reply. I did add more flour and let it sit for an hour before I refrigerated it when I went to bed. It is great now – my fourth large pita is just finishing baking now. They puff so beautifully, and my skill in rolling out a circle got much better with each one. I may sell the first one on ebay because I think it looks like Rodney Dangerfield’s profile!
Thanks so much for the great recipes!
Deb
zoe said...
February 16, 2010 at 11:01 pm
Hi Jennifer,
You are in luck, Jeff just made a video of this exact thing: http://www.artisanbreadinfive.com/?p=1632
Hope that helps! Zoë
zoe said...
February 16, 2010 at 11:07 pm
Hi Barry,
You leave the mixed dough on the counter for 2 hours to rise, then refrigerate it for up to 2 weeks. During the first 48 hours the lid should be left cracked a bit, this includes the initial 2 hour rise.
Hope that helps? Thanks, Zoë
zoe said...
February 16, 2010 at 11:20 pm
Hi Deb,
That is wonderful!!!
Thanks for letting me know! Zoë
elana said...
February 17, 2010 at 6:12 am
so far i’m loving this bread! i’m on my first batch and i’ve made loaves on day 2, 4 and 9. the last day, the dough definitely had a fermented smell to it. is that okay?
elana said...
February 17, 2010 at 9:32 am
oops, thought of one more question! when i first made the dough, i covered it with saran wrap and poked a few holes in the top when i put it in the fridge. should i just keep that saran wrap with holes on the whole time it’s in the fridge?
zoe said...
February 17, 2010 at 10:14 am
Hi Elana,
Many folks wait for the dough to have that “sour” characteristic before using the dough, but it is a matter of preference. If you prefer the dough to have a more subtle flavor than you’ll want to use it up or freeze it before it gets that fermented.
Thanks and enjoy! Zoë
zoe said...
February 17, 2010 at 10:18 am
Hi Elana,
You don’t really need the holes because the saran will never provide an airtight seal. The dough ferments naturally and it is the desired result. You will just have to determine how much of that flavor you like.
Thanks, Zoë
Cindy said...
February 17, 2010 at 10:43 am
Hi Zoe,
You suggested that I add more water to my whole wheat dough to give it more rise. Is this something that I can do with the dough that’s currently refrigerated or is this for future reference when I make my next batch?
Thanks for your great help!!!
chris said...
February 17, 2010 at 10:57 am
What do you all think of the whole wheat flour that is supposed to act like white all-purpose flour? I’m thinking of something called Ultragrain and I’ve had mixed results using it — things have been improving with the addition of gluten from HBin5, but I wonder if it’s still dry and needs more water. Have you used anything like this and if you have, what is your experience?
Janie said...
February 17, 2010 at 12:50 pm
I make my own flour from wheat just before I make a loaf of bread. This is the only way to get all the nutrients from wheat as it is only alive for three days. All of your recipes include white flour from the grocery shelf which I do not use. Can you help me adapt your basic recipe to use all whole grain freshly milled by me? I have on hand both red wheat and winter white. I usually combine the two as my husband prefers the hardiness of the red. I would like to try your recipe. The moistness of the bread appeals to me! Thank you for any help with the recipe to fit my freshly milled flours!
Tony said...
February 17, 2010 at 3:54 pm
I’ve had your new book for a couple of weeks now and I’m ready to start experimenting with the basic recipe. Rather than make a whole batch of something experimental, like adding herbs or cheese or what-have-you only to find it’s a failure, do you have recommendations with respect to how small a batch is feasible? Would I start with a whole batch and divide it up before adding liquid?
I see from one FAQ that you can fold in some ingredients at shaping time but I think that with small dry ingredients like seeds and nuts and herbs and grated cheese that adding them to the dry mix would give a better result.
Theresa said...
February 17, 2010 at 3:57 pm
I sent your original book to my mother in Canada. She is having problems with the basic recipe – the dough is very lumpy with lots of unincorporated flour. Maybe Canadian flour has higher protein content? Any ideas?
jeff said...
February 17, 2010 at 5:35 pm
Chris: White whole wheat (WWW) is actually whole wheat but with a lighter-colored, less bitter bran layer. It mixes and measures like regular whole wheat– in other words, it requires more water than white flour.
Ultragrain is a mixture of WWW and all-purpose (AP) white flour, and contrary to what the manufacturer suggests, it cannot be successfully swapped 1 for 1 in bread recipes for AP. That’s what you’re running into. Since we don’t exactly know the proportion of white to WWW flour in the Ultragrain product, you have to guess. Start increasing the water by 1/8 cups, or maybe 1/4 cups. See what you think. As you’ve already seen, may need VWG as well. Jeff
jeff said...
February 17, 2010 at 5:42 pm
Janie: I talk about freshly ground whole wheat at this post, http://www.artisanbreadinfive.com/?p=1165, but we haven’t yet released a free version of our 100% whole grain recipe. It’s about 75% whole grain, the rest all-purpose white. You’d need the book for the 100% recipe, can buy at http://tinyurl.com/pe8yr9
jeff said...
February 17, 2010 at 6:01 pm
Tony: That FAQ is the way I usually solve this problem. Doing it your way, I’ve found that quarter-batches are feasible, but below that it gets to be odd measurement amounts. The result is only one pound of dough, which is pretty modest. Jeff
jeff said...
February 17, 2010 at 6:03 pm
Theresa: It sounds like for whatever reason, the result is too dry and it’s tough to get everything incorporated. Higher-protein flour could be one definite explanation, and it would require more water. 1/8-cup? 1/4-cup? All depends on just how high-protein this flour is. Using a machine to mix might make this irrelevant, but we don’t want to require that.
But, yes, Canadian all-purpose is often higher in protein than U.S. Could be contributing to the problem. Jeff
Sara said...
February 17, 2010 at 9:40 pm
Hi Jeff or Zoe,
I think my post got skipped from yesterday. I made the whole wheat sandwich bread and it was bitter tasting. I waited until the 5th day of refrigeration. Is that just the sour taste from the yeast? Do I need to make it closer to 1 day of refrigeration? Thx, Sara
kimberly said...
February 18, 2010 at 10:04 am
Chris – I’ve used Eagle Mills brand AP flour with ultragrain in recipes from both books. I get the best results when I weigh the flours (weights are given in the second book) and when I add 2-4 extra tablespoons of warm water, depending on the proportion of ultragrain flour in the recipe. I add the extra flour at the end and shoot for what I think/hope is the right consistency. It helped to make a batch without the AP flour (100% whole grain), weighing the flours, so I could see first-hand how wet the dough is supposed to be. Hope that helps.
kimberly said...
February 18, 2010 at 10:05 am
whoops – that should be “I add the extra water at the end…”
zoe said...
February 18, 2010 at 10:52 am
Hi Sara,
Sorry if we missed your question! I think the bitterness that you are tasting is the fermentation of the dough. Just as you suggested if you use the dough earlier in the storage cycle you will have less of that “sour” flavor built up in the dough. Some people love that and others prefer the dough when it is fresher.
Thanks! Zoë
Sarah said...
February 18, 2010 at 4:57 pm
I love your bread recipes! My Grandma introduced me to the caramelized onion rolls from your first cookbook last summer and I make them all the time.
I have a cooking blog and would like to do a post with one of the recipes from your second cookbook – is that alright? I wasn’t sure what the procedure to go through was but I wanted to share with my readers how fabulous your bread is!
jeff said...
February 18, 2010 at 8:32 pm
Sarah: We can’t give permission to copy our recipes in print, or on the web– the best source for our recipes is this blog, which you can link to. Unfortunately, the publisher will have our heads if we give blanket permission to copy recipes on other people’s blogs. It would seem like we were waiving our copyright– which we can’t do. Jeff
Amy said...
February 19, 2010 at 11:14 am
Hi!
I’m looking forward to my first loaf from this recipe — the dough’s chillin’ in the fridge right now — but I had a few questions.
1) I didn’t get a lot of rise out of my dough when it was sitting out on the counter. It took about four hours to rise to about half of what is shown here in this post. I did notice during mixing that the dough, while sticky, had a bit of flour that wasn’t getting incorporated. Should I add more water next time?
2) What’re the effects of bleached AP flour vs. non-bleached in this dough? If it’s that crucial, I have a bag of flour I need to return.
Thanks!
Theresa said...
February 19, 2010 at 2:39 pm
Thanks Jeff! I did a little more research and found out that Canadian All-Purpose Flour has the same protein content as American Bread Flour. So I have suggested that my mother follow your book’s directions for using Bread Flour rather than All-Purpose.
Bob Fried said...
February 19, 2010 at 7:54 pm
Following up on a question posed by Tracy a few days ago, I find that my master recipe dough rises only about half as much as it should. Your photos show the dough at about the 4 quart mark after 2 hours, but mine only rises a little past the 2 quart mark. We’re using the same brand of dough buckets. I’ve double-checked my measurements. Is this just about adding a little more water, as you advised Tracy, or is there something else I should be doing? Maybe this is related, but I find my baking times are a little shorter than you advised. I checked my oven temperature with an oven thermometer, yet breads you say need 30 minutes I find I take out at 25 in order to avoid burning the crust. (By the way, everything tastes terrific!)
zoe said...
February 19, 2010 at 9:20 pm
Hi Amy,
A slow rising yeast may be due to the temperature of water that you used. If the water was cool it will take much longer for the yeast to fully activate.
Unbleached flour has more gluten than bleached. The gluten gives the dough structure and it absorbs more water. If your dough seems too wet it is due to the lack of gluten in the flour. You can try adding more flour if it is too difficult to handle.
Once the dough has refrigerated over night let us know what the consistency is.
Thanks, Zoë
jeff said...
February 20, 2010 at 6:38 am
Theresa: We say more about adjusting for different flours at the FAQs page, the one about flour varieties. Jeff
jeff said...
February 20, 2010 at 6:45 am
Bob: It has to be a difference in ingredients (try everything with commercial ingredients if you’ve been using fresh-ground)? Room temperature (mine’s 68)?
If you’re dough’s looking drier than what we get in the photos or video (like the one on the home page right now), then yes, let’s increase the water by increments, say 1/8-cup at a time, till it looks resilient like ours.
Since the stuff you’re baking passes the flavor test, I’m less concerned
Jeff
Amy said...
February 20, 2010 at 11:58 am
Hi, Zoe,
I used lukewarm water from the tap (not hot!). I did raise the thermostat after 15 minutes, when I figured out it was about 66 degrees in the kitchen. So hrm…
The dough is sticky to the touch, enough to leave traces behind on my fingers that require scrubbing off. I’m assuming a little flour on my hands will help with that? It stretches very nicely, though.
Will be trying the dutch oven method of baking in an hour or so, as I only have the one oven rack and placing a broiling pan or baking pan directly on the heating element seems to be something of a bad idea.
zoe said...
February 20, 2010 at 1:49 pm
Hi Amy,
Our dough is really quite wet, so you can use some flour on your hands and dust the surface of the dough with some as well.
You will love the results in the Dutch Oven.
The temperature of the water will just determine how long it takes for your yeast to activate. Should be just fine!
Thanks, Zoë
Wendy said...
February 20, 2010 at 5:10 pm
Not that this has anything to do with the topic of this posting, but I just wanted to share with you an idea for using your dough that you may not have thought of. Tonight I used the Light Wheat Dough in ABin5 to make Chinese steamed buns with meat filling. A 1-ounce piece rolled into a circle, filled with about 1/8-cup of a pork and shrimp filling and steamed for 15 minutes came out beautiful and delicious. Accompanied by a vegetable fried rice, my husband commented that we’d never get take-out again. Well, that may not quite be true, but it’s nice to know that our little experiment had such satisfying results. Thank you for sharing this wonderful technique with all of us. I’ve been having such a lot of fun making your recipes from ABin5 (sticky buns this morning) and experimenting with my own. You’ve made me look like an amazing baker and it’s all been so wonderfully fun and easy.
Flora said...
February 20, 2010 at 6:22 pm
Hi Jeff and Zoe,
I’ve always found bread baking to be a charming yet uncommon skill to have (I don’t know many regular bread makers) so I was excited to become the family bread maker. (My husband got me your first book and got me really enthused about taking on this fun task.) Now, I’m used to having success with nearly every new cooking endeavor but for some reason, bread making has me pulling my hair out. Why? Well, my bread (master recipe boule from ABin5) doesn’t look like yours in the book, website or youtube videos. Mine comes out hard on the outside (will practically chip a tooth) and gummy almost wet-like on the inside. I’ve spent the last 4 hours scouring your website and video posts (I really, REALLY want to do this well. I WILL learn to bake bread is my new mantra. hehehe) and I kind of figured that maybe my boules are a little too big and my dough might be a little too wet and maybe I should let it rest for 90 minutes after shaping. So, I’m going to tweak the boule size (I just hate using the oven to bake a small loaf that’s why I’ve been trying to make it big but I guess I’ll bake 2-3 smaller boules vs. 1 big boule), incorporate more flour and let it rest for 90 min. So, I have a question on one final thing. My oven. Okay, my oven gives me an option to use regular baking or convection baking. If I use the regular baking option, whatever temp I punch in is what it stays at (so 450 is 450 degrees) but the convection reads 25 degrees less. So if I punch in 450, it heats up to and stays at 425. I’m thinking that it’s probably because convection heat is thoroughly warmer so it knows to adjust because convection 450 degrees is hotter than traditional 450 degrees????? Anyway, so my question is, should I bake on the regular baking option or convection? If I choose the convection option and the recipe calls for 450 degrees, should I punch in 475 so that it settles at 450 convection degrees. I’m ready to tear my hair out. Btw, I’ve made your challah bread which came out delicious and soft (no teeth were chipped) but it was dense, not flaky/fluffy like I’ve seen challah be. So, what are your thoughts on the oven options because I really would love nothing more than to make bread that’s baked fluffy on the outside with a light crispy crust on the outside. Learning this is a BIG deal for me. So, I so appreciate your input. Oh, and I use a baking stone too. Okay, that’s it. Thanks and looking forward to your advice!!!!
Flora said...
February 20, 2010 at 6:26 pm
Oops, the sentence toward the end should read, “I really would love nothing more than to make bread that’s baked fluffy on the INSIDE with a light crispy crust on the outside.” Sorry.
jeff said...
February 20, 2010 at 9:58 pm
Wendy: Gotta try this– someone else told me that this works too. Jeff
jeff said...
February 20, 2010 at 10:03 pm
Flora: I think your oven temperature is off– don’t be misled by digital readout, they are as likely to be off as an analog system. A simple inexpensive thermometer will give the answer, like this one on Amazon: http://bit.ly/czmco2 Bet your oven is way hot.
If not, the second-likeliest explanation is that your dough is just too wet, and you can decrease the water slightly (or increase the flour) at mixing time.
Once we’re sure of your oven temp, I’d tell you that convection works great, just turn the temp down 25 degrees and everything else stays the same. Some people find a better crust result w/convection, but that all depends on your oven– see what you think.
And as you’ve already guessed, it’s much easier to do small loaves while learning our method, so you’re on the right track. Jeff
Flora said...
February 20, 2010 at 10:30 pm
Hey Jeff, thanks for your response! Will be buying that recommended thermometer. As for the convection oven temp, should I punch in 25 degrees lower even though the oven already does that when set to convection? So what I mean is if the recipe calls for 450 degrees, and I punch in 450, the convection setting heats it up to 425. Since the oven does that, is that 25 degree difference sufficient or are you saying that if the recipe calls for 450, I punch in 425 (then the convection setting will read 400)? I don’t mean to belabor this point I just want to make sure I’m doing it right. Thanks so much!!
Kathleen S said...
February 21, 2010 at 6:12 am
The weight of flour confuses me. I don’t understand why you have different weights than King Arthur Flour. For instance, KAF says that all-purpose flour weighs 4 1/4 ounces per cup and in HBin5 you list it as 5 ounces per cup. Also, the two of you have different weights for whole wheat flour and other flours. Do I use one weight for your recipes and another for theirs? Why is their a difference?
zoe said...
February 21, 2010 at 1:49 pm
Hi Flora,
If your oven automatically recalculates the temperature then you do not need to adjust it. Some newer models do that. Just keep an eye on the first loaf to make sure it is not over browning too early.
Thanks, Zoë
zoe said...
February 21, 2010 at 1:53 pm
Hi Kathleen,
The reason our weights are more is because we use a scoop and sweep method of measuring our flour. This method weighs more than if you spoon the flour into the measuring cup as many people do. You need to use a 5-ounce cup to get the right consistency in our dough.
Hope that helps! Zoë
Cynthia Barnes said...
February 21, 2010 at 11:16 pm
Thanks for the site, book’s on order from Amazon! I made a boule tonight in Boulder (5300ish feet). At 25 minutes it was golden brown and quite “done” looking, but a bit gummy and underbaked even after a complete cooling. Should I lower the temp and cook longer, or perhaps tent the loaf with aluminum fool? Thanks!
zoe said...
February 22, 2010 at 12:26 pm
Hi Cynthia,
Are you using an oven thermometer, your oven may just be running hot?
As you can see on the cover of ABin5 the loaves can even get so dark as to have some burned looking bits. You may just want to lower the rack in your oven so the top of the loaf doesn’t get too much color. You may also want to look through our post about baking at high altitude. http://www.artisanbreadinfive.com/?p=144
Thanks and enjoy! Zoë
Ann said...
February 22, 2010 at 1:26 pm
I am a devoted bread-a-holic and love both your books. One challenge I have (even though I’m at high altitude) is that during the oven spring, the dough “errupts” through the slashes on top (making the boule or baguette shapes). This results in a tasty, but less attractive loaf. I’ve tried slashing a little deeper, and a little farther across the dough, but that didn’t really help. Any thoughts?
Cyn said...
February 22, 2010 at 2:19 pm
Thanks for the prompt reply, Zoe! I do have an oven thermometer, will try lowering the shelf. (If my pizza stone breaks, I’ve been looking at a cast iron one anyway….) Will report back on the next batch.
jeff said...
February 22, 2010 at 8:18 pm
Ann: Your oven may be too hot, check it with the inexpensive thermometer in the Amazon store at left. Also, consider a longer resting time before the oven, we were conservative with that in the 1st book– 40 min may be too short. Consider 60, or even 90, even with white bread.
Use a bread knife rather than a razor or lame, both of which tend to allow the dough to re-adhere to itself with the very wet doughs in our books. Jeff
Mari said...
February 24, 2010 at 6:56 pm
I was so excited to get this book as a Christmas gift. I love bread, but bread doesn’t love me. When I found this book thru King Arthur’s blog, I just couldn’t wait to try my hands on it. I tried your Light Whole Wheat bread…everything went fine until cutting a pound off and rising it. It didn’t rise the way your picture here did. It still tasted good…but I didn’t get the rise that I wanted. The last batch, I let it rise for a long time but didn’t rise any higher. It looked like a focaccia bread. What do you think I have done? Thanks…I won’t give up till I get it though…
jeff said...
February 25, 2010 at 5:44 am
Mari: Any chance you are using bleached flour (doesn’t have enough protein)? Also, go through our FAQs page and see if you can identify a problem there, then check back with us here. Jeff
LaVerne said...
February 25, 2010 at 7:44 am
Haven’t bought a loaf of bread since discovering your books last year. Now I have fallen in love with your “toasted millet and fruit bread” It is GREAT! Keep up the fantastic work. I love love love your books.
Stacy said...
February 25, 2010 at 1:45 pm
It is completely random that I discovered this blog today but this recipe was originally printed in Cooking Light in 1998 or something like that. I kept the issue and often bring it to a shared lunch group we have at work. Cassie did give credit which I’m sure our host authors appreciate!
Cassie said:
This is the African Peanut Soup recipe as printed in Golden Goodies, a cookbook published by Golden Lake Elementary in Circle Pines, MN
Great comments & ideas, friends! Stacy
zoe said...
February 25, 2010 at 1:59 pm
Hi LaVerne,
So glad you tried the Millet bread! Thanks for letting us know!
Enjoy all the bread, Zoë
Mari said...
February 26, 2010 at 9:54 am
Hi Jeff: Luckily I have unbleached flour and that was what I used. I will go to your FAQ and try to find my answer… but just to let you know, I am not giving up. I know I can make the whole wheat loaf bread…so I can do the others too.
Thanks.
Jill said...
February 26, 2010 at 10:00 am
I am at my wits end!!! I have tried your Artian Bread and can’t get it to work. My Mom gave me the recipe and makes wonderful loaves and rolls all the time. Here is my problem- I follow the directions exactly- using unbleached flour, warming my water to exactiy 100 degrees- I set it out on the counter for 2-5 hours- it rises, maybe double the size- then I put it in the fridge for about 2 days before I use it. Here’s the problem- my dough is SO wet- it almost drips through my hands- so when I get it into some sort of shape and put it on the sheet, it flattens out- then when I bake it it’s maybe 1/4 inch on the sides, with a big bubble on top (I do score the top of the loaf)- maybe I’m not measuring the flour correctly? I use a spoon to put the flour in a measuring cup and then level off. Should I use the measuring cup and scoop it in the bag, then level off? Oh, and if I try to make another loaf a couple days later , the dough is hard on top and WET on the bottom of the container. I made yeast breads and have no problem- can someone please help????? When I watch the video about shaping the loaf- well, my dough looks nothing like that, like I said, its dripping through my hands. I am determined to get this right!!! I have thrown away probably 5 batches so far- HELP!!
zoe said...
February 26, 2010 at 12:30 pm
Hi Jill,
I think we have the answer. We use a scoop and sweep method of measuring, which results in much more flour than spooning the flour into the measuring cup. If you spoon the flour then you will end up with a very wet dough. This should fix up your dough! Let me know if all the other issues go away too.
Thanks and enjoy the bread! Zoë
Kellie said...
February 26, 2010 at 4:51 pm
My loaves are turning out nice except the shaping. They are flattening out more than I would like. What am I a doing wrong?
jeff said...
February 26, 2010 at 9:19 pm
Kelly: Why don’t you just add a little more flour to the mix? Also might benefit from more tight “cloaking,” see our videos.
Finally, consider doing the loaves in a cast-iron pan, or a loaf pan to control sideways spread. Jeff
Andrew said...
February 27, 2010 at 2:54 am
Quick Question. I live in the UK and can’t find a source of Vital Wheat Glutin. Do you (or any of your readers) know of a good source?
Patti S said...
February 27, 2010 at 8:53 am
Even though I was a disaster at bread baking, I have been making your bread since late last summer. With your wonderful FAQ’s, videos, and this blog, however, my breads are getting better and better every time! Thank you so much for bringing Real Whole Food back into my family’s lives where store-bought had been (hurting us)! The Master Boule is SO SIMPLE in content, and we are always amazed at the complexity in flavor as I change out the flours (KAF’s White Whole Wheat, Ancient Grains, Italian, and of course their All Purpose flour to name a few). Your recipes are heaven-sent for those of us with little time and I thank God for the Vital Wheat Gluten’s abilities to smooth over the roughness of the whole wheat! I’ve been letting the dough rest just a little while right out of the refrigerator and then rolling it out to fill with some parmesan cheese, Italian seasoning (fresh when available), and LOTS of garlic. If I wasn’t using whole wheat flour, I’d have to contain my compulsion and refrain from eating this day after day.
I make your Master recipe at least five times a month and the Brioche at least twice a month (for Challah and Cinnamon Buns), but your Olive Oil bread had become our favorite (for Pizza, Garlic bread, and buns). With a diabetic in the house, I’m always looking for ways to increase the whole grain and cut down on the sugars. Being an experimenter at heart, I have to tell you about my latest batch. I took half a recipe of your Olive Oil dough ingredients and mixed them with a half recipe of your Brioche ingredients and ended up with a very lightly-sweet, whole grain-infused dough that braids like a beautiful Challah but is not quite so delicate. It’s sturdier than the Brioche, but nobody really noticed the difference or missed the full amount of the sugar. I’m using it for Cinnamon buns and an Italian loaf but I’ll switch back to the original Olive Oil dough for the Garlic bread, because that was perfect as it was (don’t need a large amount of sugar there, either). I don’t know what to call this mixed dough, but OMG, we love it!
Our Publix bakery manager asked my why I’m not buying bread like I used to and I told her to check out your site. I think she has since bought your book, too! Thank you so much for all you do!
Mark from Maine said...
February 27, 2010 at 9:32 am
Nice tutorial, thanks. Always good to remind ourselves of the basics. I’ve been baking with your techniques since July and have enjoying making many different kinds of bread from just three recipes. Thank you for sharing your knowledge of and enthusiasm for the ancient art of bread baking.
One tip – the bucket that you had your husband poke a hole in does not have an airtight seal, so no hole is necessary. I always snap my buckets shut for rising as well as in the refrigerator.
Thanks again to both of you for your work.
zoe said...
February 27, 2010 at 9:42 am
Hi Andrew,
Hopefully someone will have an answer for you. I found this link that might be useful: http://www.flourbin.com/cgi-bin/psProdSrch.cgi?mode=user&transid=~transid~&search_text=vital+wheat+gluten&formCategory=All&search=Search
Thanks, Zoë
zoe said...
February 27, 2010 at 9:56 am
Wow Patti,
Thank you so much for your lovely note and for spreading the word about the book! I think your olive oil/brioche dough sounds amazing! I will have to give it a try.
Happy baking and enjoy all the bread! Zoë
zoe said...
February 27, 2010 at 9:59 am
Hi Mark,
Thanks and I’m so glad you are enjoying the breads! The lids on these buckets are surprisingly tight and I’ve had them POP right off when clicked shut. It thrilled my boys to no end, but I had dough all over my book case in the kitchen. That was the day my husband started drilling holes!
Happy baking! Zoë
Theresa said...
February 28, 2010 at 8:28 am
Hi Zoe and Jeff,
Let me start by saying how much we love your book and technique, and have really enjoyed playing around with the Master Recipe to get things “just right”. We love the crusty crust, and the “holey-ness” of the crumb.
We have come to the conclusion that we just like our crumb a little less custardy. We’re aiming for a very crusty crust and a dry hole-y center that you find in a typical European loaf.
We have tried many of your suggested modifications to make the center less moist. We’ve tried increasing the amount of flour to 7cups, using longer rise/rest times, making smaller loafs, trying different yeast, trying to be really gentle when handling the dough, trying the overnight fridge rest on parchment, and not cutting the bread until its fully cooled. These changes have made only small improvements toward our desired dryness of the crumb. As a result, we’ve begun to wonder if the ABin5 technique just naturally creates a gummier center than we prefer.
Do you have any suggestions on what else we can try to dramatically dry out the center of the loaf? Everything else (taste/rise/crust) is perfect!
We are using:
-a gas oven with an oven thermometer, pizza stone and a water tray beneath
-Gold Medal unbleached AP flour
-Fleishmans Yeast in a jar or packets, or Red Star Yeast packets
As a final note, sometimes we notice that the dough is slow to rise, so we’ve wondered if a problem could be that our house is too cold or dry.
Tom and Theresa
zoe said...
February 28, 2010 at 11:55 am
Hi Theresa,
Our dough, due to the high hydration, may never produce the type of crumb you are looking for. It is a challenge to be able to store dough without having it be too wet. The dry crumb you are looking for would be from a dough that is much drier and therefore will not store well. You may be able to dry out the dough to achieve this crumb, but then you’ll have to knead and not store.
Slow to rise during the first 2 hour rise or when resting after shaped?
Thanks and have fun playing, be sure to report back.
Zoë
Theresa said...
February 28, 2010 at 12:50 pm
Hi Zoë,
Thanks for the quick response!
Its comforting to know that I’m not completely crazy in finding that I just couldn’t get it dry enough with this method. If I wanted to push it to maximum dryness, is there anything else that I can do, or do more? Would adding a different flour (wheat?) change the consistency? Add even more flour? I haven’t yet tried reducing the yeast. Can you suggest a combination that would maximize the internal dryness, while keeping the internal holey-ness and external crustiness?
I love this technique so much that I’m not willing to walk away because of a little additional internal moistness- I just want to get it as close to ideal (for us) as possible
As for the slow rise- its during the first 2 hours. I’ve usually left it to rise for much longer (~4hours or so) before popping into the fridge. Sometimes its no where near where it should be at the 2 hour mark. Not expecting much rise after the shaping…
Cheers!
Theresa
Ellen said...
February 28, 2010 at 1:38 pm
Dear Zoe and Jeff, I have been using your recipes for a year now and still LOVE them. I have your first two books.
I have two questions:
1. You mention in your book that if we are not getting a crust that lasts and doesn’t soften then we are not baking it long enough. Is there an internal temp that I can take to determine if I have cooked it long enough until I get it right?
2. I don’t have the kind of success that you do with chilled dough. I have great success if I use the dough fresh, but when I chill it, though it is easier to handle, it doesn’t rise as well. I find that the loaf spreads out a lot and makes a very shallow loaf. If I bake it before it flattens out, then I have a beautiful loaf that is gooey inside. I just can’t seem to get the hang of how long to leave it before I bake it.
I have tried letting the dough come to room temp before I form the loaf, I have also tried forming the loaf straight from the frig. Each time the same thing happens–a flatter loaf. What can you suggest? Thank you!
Ellen
jeff said...
March 1, 2010 at 5:45 am
Theresa: What comes to mind is that you might prefer a higher-protein flour, which absorbs more water. A mixture of bread and AP flour? Give it a shot… Jeff
jeff said...
March 1, 2010 at 5:49 am
Ellen: Look at our videos and make sure you are adequately “gluten-cloaking” the bread– that contains the sideways spread. Also, consider doing the bread in a cast-iron or other closed pot– see instructions at http://www.artisanbreadinfive.com/?p=552.
I’m also wondering if you’d like this a little drier– can add a bit more flour– let’s say a quarter-cup.
For lean breads, internal temp = 205F, for enriched (with eggs), it’s 185F. Jeff
Theresa said...
March 1, 2010 at 8:08 am
Jeff,
Thanks for the suggestion! I’m eager to try it, and I’ll report back.
Cheers,
Theresa
Ellen said...
March 1, 2010 at 9:04 am
Thank you Jeff. I watched the video again and feel that I have been gluten cloaking the way you suggest. I will keep working at it on the cold dough. I will also try drying the dough out a little as you suggested. Can you help me though with knowing how I can tell when a rested cold loaf is ready for the oven? Is it by look, temp or what?
By the way I did read Zoe’s comments about the overnight raise in the frig and I will try that too.
Thanks again,
Ellen
Ellen said...
March 1, 2010 at 11:46 am
One more thing Jeff, Is there any way to do a group buy on your books directly from you?
Andrew said...
March 1, 2010 at 8:01 pm
Theresa, I read your comments about the crumb being too gummy. I’m not an expert, but three things you might try are: 1) leave the bread in the oven an extra 3-5 minutes; or 2) make a smaller loaf; or 3) make sure not to slice the bread until it’s cooled for an hour.
zoe said...
March 1, 2010 at 9:06 pm
Hi Ellen,
When the dough is ready to go into the oven it will no longer feel dense and cold as it does when it is first shaped. It will have a slight puffiness to it. You will want to feel the dough as you first shape it and then again after it has rested. If it is still dense and has no softness then let it sit longer.
Hope that helps! Zoë
zoe said...
March 1, 2010 at 9:19 pm
Hi Ellen,
The least expensive way to purchase the books is through Amazon, you can find a link on this page. If you are looking for books for an event you can contact our publisher and buy through them, but it is typically no cheaper, depending on the current price at Amazon.
I hope that answers your question? Thanks, Zoë
Ellen said...
March 2, 2010 at 10:00 am
Thank you Zoe for both answers. I did try a refrigerated loaf with a white dough yesterday and had better success. I think it is the whole grain ones where I have trouble. I think making a drier dough will help.
About the books. Thanks for letting me know. I am teaching a “Preparedness” class of about 20 people tonight and I am using your breads as an example of ways to use stored grains for those who are fear making bread is a “lifetime” event. I know that many will want to buy your books. I am being careful of your copyrights.
Thank you,
Ellen
jeff said...
March 2, 2010 at 12:35 pm
Ellen: Thanks for spreading the word about our method. To our surprise, Amazon and other on-line sellers remain pretty much the cheapest way to get our books (click on any image of a book on this page to go to Amazon). Jeff
Andrew said...
March 2, 2010 at 2:53 pm
Zoe, you used a dough whisk in this post. I’ve seen them online in the past, and they’ve always looked a little too special-purpose and flimsy for me to actually buy one. So I ended up repurposing a potato masher as a dough whisk. It’s worked remarkably well, and I definitely prefer it to the wooden spoon I previously stirred dough with. Anyway, I hope this might be helpful for someone else out there.
Beth said...
March 2, 2010 at 4:51 pm
I’ve been baking bread every week for a friend if mine. Recently she told me her mother has s restricted diet and can eat no salt. She has had to give up eating her favorite foods including bread and butter. I’m wondering if there is a salt free loaf I could make for her mom. Does the yeast need the salt? Thank you!
Beth
zoe said...
March 2, 2010 at 7:57 pm
Hi Andrew,
What an amazing idea, I will have to try with my potato masher next time I mix a batch up.
Thanks! Zoë
zoe said...
March 2, 2010 at 8:12 pm
Hi Beth,
You can make all of our recipes with no salt. It only effects the flavor in our bread, but doesn’t seem to mess up the recipe at all. http://www.artisanbreadinfive.com/?p=139
Thanks and enjoy! Zoë
Jodie said...
March 2, 2010 at 9:00 pm
Hi Jeff and Zoe,
Have both your books and have had several wonderful years baking bread from ABin5. Received the HBin5 book in December but have not had much success getting these loaves to raise. Is vital wheat gluten flour the same as vital gluten listed in your recipes? I bought Bob’s Red Mill. The loaves from HBin5 are looking like biscotti when sliced! Other ingredients are same as used for recipes in ABin5 and I use King Arthur flours.
I will ask all my questions in one post…
Latest problem, a batch of HBin5 master recipe has separated while in the refrig for 6-7 days. When I pulled dough to cut, it was very dry and all the liquid was a sludge under it. Had to remix by hand and incorporate more flour to salvage a 2lb loaf. Now two days later, the remaining 1 lb. in bucket has also separated again with liquid under the dough. Weird! Any ideas why?
Lastly, I have had no success baking different types of frozen dough. Generally thaw overnight and bake later the next day. Dough does not expand at all and loaves are not edible after baking. How do you do it?
I have added King Arthur’s Healthy Grains to ABin5 Light Whole Wheat Bread dough and it tastes like German Siebenfelder (spelling?)) bread! Grain/seeds do absorb liquid which makes a denser loaf. I’m going to try soaking seeds first before adding to other ingredients to see if it alleviates water absorption.
To both of you, thank you! I have told so many people about your method and the books. Bread making has become a joy!
jeff said...
March 3, 2010 at 8:29 am
Jodie: Whole grain breads, especially 100% whole grain ones, simply do not rise as much as white breads and the result is always denser. It’s a very specific style of bread, and it’s not for everyone (though I love it). But you should not be getting biscotti, so something is wrong. First suggestion: switch to Gold Medal, which has a lower protein level than KAF and yields a wetter dough. See if that makes a difference. If it does, you could then try switching back to KAF but increase the moisture to match your experiments with Gold Medal.
Yes, vital wheat gluten = vital wheat gluten flour
You did the right thing to mix in more flour when your dough “separated.” You do get pooling liquid when the dough sits that long undisturbed. We tested the batches with frequent removal of dough for loaves, with some dusting each time. This absorbs some of that water.
Unfortunately I can’t guess what’s up with your frozen dough– again, see what happens when you switch to a lower-protein flour. Anything else you might be doing differently? Jeff
Carrie said...
March 3, 2010 at 5:45 pm
I recently made the gluten free version of the bread. Mine was very tough-I live at a high altitude, here in Calgary, Alberta-what can I do to improve my bread with the alititude issue?
thanks/ Carrie
jeff said...
March 3, 2010 at 6:21 pm
Carrie: Go to our FAQs tab, and see the “high-altitude” suggestions. If that doesn’t help, check back with us here. Jeff
Mari said...
March 3, 2010 at 6:33 pm
Hi Jeff and Zoe:
I haven’t tried making the dough again. Went into the FAQ section and I think I must be over-kneading it. I haven’t finished the last bread, so I think I will have to take a break before I set my eyes on it again. I also saw the video on how you made the bread… that is also where I kind of found that I must be over-kneading it. Another question though, when the dough in the bucket is a bit tough, should I add a little water and leave it alone for a day? Thanks.
zoe said...
March 3, 2010 at 9:56 pm
Hi Mari,
Yes, if you add some water to the dough just let it sit for a long while so the flour can absorb it. Please let us know if there is anything else and we will help to make this a enjoyable experience!
Thanks! Zoë
Jodie said...
March 3, 2010 at 10:25 pm
Thank you Jeff for your quick response to my questions. I will try Gold Medal whole wheat to compare dough wetness to KAF.
As for my batch of totally separated whole wheat dough, I did try using KAF white whole wheat flour rather than regular whole wheat in this batch. Perhaps WWW doesn’t have the same long-term liquid retaining capabilities of regular whole wheat.
No idea what my problem is with frozen dough. A batch will bake well after the initial resting period but freezing any of it seems to kill the instant yeast. In the last 2.5 years, I have tried freezing different doughs from ABin5, with zero success. I’ll try your idea of using lower protein Gold Medal and check freezing results. May also be time to try a different yeast.
Thanks for teaching me how to make bread so easily that I no longer can even tolerate Wonder-type bread. Hurray, life is good!
jeff said...
March 4, 2010 at 7:44 am
Jodie: Well, just let us know if the results are inexplicable even with Gold Medal. As for WWW versus regular WW, I doubt that’s going to be the deciding factor. I think this is a function of a long undisturbed storage, which can introduce some variability.
I doubt this is the issue, but we usually use “active dry” varieties of yeast (actually, the Red Star brand), not instant, though we always say that it doesn’t matter. I suppose you could try switching to “active dry” and see if that performs better after freezing. I have to say, that this shouldn’t make a difference but it’s worth a try.
I have to say, that freezing always increases the density of stored-dough breads. Maybe it’s just exceeded your personal tolerance for a density level? Jeff
Kathy Deupree said...
March 5, 2010 at 5:42 pm
Why is mine always undercooked recently, even if I up the time?
zoe said...
March 5, 2010 at 8:57 pm
Hi Kathy,
Do you have an oven thermometer in your oven? This issue is often due to an oven that is not running true to its settings. The other possibility is that you are cutting into the loaf while it is too warm. The bread needs to cool completely to finish setting properly. As long as you are using the amount of dough we specified in the recipes the breads should be cooked through.
Hope that helps! Zoë
Nick said...
March 6, 2010 at 9:22 am
Hi,
Thanks for all your great recipes and tasty breads. I just halved a batch of your Whole Grain Olive Oil bread, but I messed up and used the full amount of yeast! It’s rising quite nicely now, but I wonder if I ruined the taste/flavor? I’ll still give it a try! Thanks again!
jeff said...
March 6, 2010 at 10:35 am
Nick: Some people detect a strong yeast flavor when using yeast on the high side, and if you’re sensitive to that, this is the batch where you’re going to notice it. You can actually decrease the yeast, see our FAQs page above.
Don’t throw it out– just see what you think. Jeff
Janet said...
March 6, 2010 at 9:52 pm
Hi Jeff and Zoe –
I’ve read your first book and attempted my first bread this afternoon. Used Bob’s Red Mill unbleached white flour, bulk yeast granules, kosher salt and tap water.
All seemed well, although I did end up adding a little more than 1/3 cup more water than called for in the master recipe because the dough didn’t look as wet as I thought it should. It rose during the rest time, and a little bit more in the oven, but it seems flatter and longer than it should…like it didn’t raise enough. It also seemed to fall a bit after it was in the oven for a while. I had some trouble shaping it, even after watching the video…it never really looked like a ball, unless looking like a half a football counts.
Any thoughts on what I did wrong?
Judy said...
March 7, 2010 at 10:46 am
Zoe and Jeff– I have both books and am enjoying the baking results. I have 2 specialty flour blends from King Arthur Flour — Harvest Grains and Ancient Grains. Have you used either in your recipe formulations? I am anxious to use both because I prefer multi grain bread. KAF recommends adding up to 1 1/3 cup of Harvest Grain to the recipe and substitute up to 1/5 of Ancient Grains for whole wheat. Do these proportions work in your recipes? Thanks!
Judy said...
March 7, 2010 at 10:54 am
Zoe and Jeff–Two more comments. Punching a hole in the lid of the bucket–what an amazingly simple idea! And I have noticed a huge improvement in the hole structure of the bread by allowing it to rest at least 60 min rather than 40 min. I do need to improve my slash technique–anything more creative than diagonal slashes across the loaf do not look as “pretty” as the photos in the books!
jeff said...
March 7, 2010 at 1:11 pm
Janet: Given all the changes in the recipe that you did, it’s hard to say. Why don’t you try again, doing it exactly as we describe? Sounds like you ended up with something too wet. Those won’t rise as well, and will spread sideways rather than rising in an upward direction. Jeff
jeff said...
March 7, 2010 at 1:17 pm
Judy: Haven’t tried those products but I trust KAF. If they give you a way to make swap, I’m guessing it will work. And about resting time, yes, longer is great, see our post on that, at http://www.artisanbreadinfive.com/?p=141
Jeff
Nick said...
March 8, 2010 at 7:17 pm
Jeff,
Thanks for the quick reply. I made a loaf and I thought it was just OK, def strong yeast overtones, but now I know how the smaller amounts of yeast affect the flavor! My wife didn’t like it at all!
I’m going to try an experiment with the remaining dough and I’ll let you know how that works out!!
BJ Wanlund said...
March 9, 2010 at 1:36 am
All righty, I have yet another bread question, but this time it’s more about the baking than the actual recipe and/or ingredients.
I’ve been looking at countertop convection/toaster ovens, simply because I live in a dorm currently and I found one that’ll go to 450 degrees F here at Amazon:
My question is, is using this a good idea to create results like you guys do, with the steam element going into the crumb tray? (I’m sure someone else thought of this and can help me on this one)
Thanks again for your amazing books (and I bought Healthy Bread in 5 not too long ago, gotta say, the chapter on gluten-free bread baking was pretty eye-opening. Maybe I could try millet flour at some point in place of brown rice flour.
BJ
BJ Wanlund said...
March 9, 2010 at 1:55 am
Aagh, forgot the link: http://www.amazon.com/Black-Decker-CTO4500S-CounterTop-Convection/dp/B001GJSMKE
BJ
jeff said...
March 9, 2010 at 7:13 am
BJ: I’ve been meaning to try a toaster oven, I know they make a baking stone to fit them (see below for Amazon link, it’s 7 by 10 inches if that would fit). I’m not sure that steam in the crumb tray’s going to work. Is it watertight? Is it safe? I wouldn’t want people dumping water onto electrical elements. Since I haven’t owned one since college (!) I just can’t say how this would work.
Millet’s great by the way… Jeff
http://www.amazon.com/gp/product/B000QJBNHY?ie=UTF8&tag=arbrinfimiada-20&linkCode=as2&camp=1789&creative=9325&creativeASIN=B000QJBNHY“>Kitchen Supply Old Stone Oven Toaster Oven Pizza Stone 7-inch by 10-inch<img src=”http://www.assoc-amazon.com/e/ir?t=arbrinfimiada-20&l=as2&o=1&a=B000QJBNHY” width=”1″ height=”1″ border=”0″ alt=”" style=”border:none !important; margin:0px !important;
Patti S said...
March 9, 2010 at 5:05 pm
Jeff and Zoe;
Theresa asked about how to get a drier crumb, and I was wondering….
My father-in-law is no longer with us and, if ever I could have made bread for someone (before, when I wasn’t good at it), he was the one. Visiting him in Germany allowed my son and I the chance to see how my husband grew up, see the sights he saw, and eat what he ate. I really miss the plain Bauern Brot that my father-in-law fed us for two meals every day, usually. The bread, purchased fresh every day (but NOT in a plastic bag, UGH!) was a consistently denser, drier loaf, full of rye flavor and sometimes a licorice flavor.
I was wondering if the drier texture could be achieved by using a similar method in your books for enriched dough (adding eggs, fat, and a cooler oven without the steam)? I think it’s the 450-plus degree oven along with the steam that creates the crunchy, lovely crust but also that traps the moisture inside. Do you think a cooler oven and no steam could provide the drier crumb?
Thanks for feeding our Souls!
zoe said...
March 9, 2010 at 10:02 pm
Hi Patti,
The dough is very wet in order to store it for any amount of time, and this is what is the cause of the wetter crumb. It is true that the enriched doughs have a lighter and drier crumb, but it is the nature of the ingredients more than the oven temperature or added steam.
Thanks, Zoë
CatJB said...
March 10, 2010 at 4:21 am
Oooh, I made this last night and it is delicious and so easy! I was dubious at first about the rising in the oven part, but followed it to the letter (which I often don’t do, to my downfall) and it worked a treat.
I’m spreading the word, thanks guys!
elana said...
March 10, 2010 at 12:45 pm
i’ve made about 8 loaves now with the master recipe (and 4 with the whole wheat) and i love it. so nice to have fresh bread so often. i made the baguette and the ciabatta from the book, too. quick question: i know you increased the resting time for the master recipe, should i increase the resting time for the other breads in the book? i think it’s 20 min for the baguette and ciabatta.
jeff said...
March 10, 2010 at 1:19 pm
Elana: Baguette and ciabatta are skinny— they warm up quicker and you really can get away with the short rest time, no need to increase… unless you’ve tried 40 minutes and you prefer it. Jeff
Ash said...
March 10, 2010 at 1:25 pm
I got the book yesterday, made a big batch albeit with a heavier flour so had to add some water; last night made a batard which had somewhat thin crust, but basically was fantastic. Now just made two more batards, one shaped a little, the other one not and that second one wouldn’t come off the peel, landed up with half it’s ‘tail’ oozing over the side of the oven and tile, getting damaged in the process of manhandling it back onto the tile and being somewhat straight, stuck to the tile on taking it out of the oven, but basically looks fantastic too. The more shaped one is a bit darker and thinner and smaller so I have learned by doing that your recommendation not to shape them too much is on the money.
Thanks a lot for your book. I really like this approach (less fuss, more forgiving, more flavor) and am grateful you put it all together.
Nick said...
March 10, 2010 at 2:25 pm
Jeff, I made sesame seed crackers with the remainder of that over-yeast-ed dough. I think the flavor works very well with the crackers!
Thanks for that recipe also.
Michaela said...
March 10, 2010 at 3:09 pm
Your tip on how to store the bread is incredible! We’ve been loosely covering them with plastic wrap or throwing them in a plastic bag, and the end always gets stale or the crust soggy. This is working beautifully. Thank you!!!
zoe said...
March 10, 2010 at 10:10 pm
Thanks Ash,
That was quite an experiment you conducted, so glad they came out!
happy baking! Zoë
Jordan said...
March 11, 2010 at 11:24 am
My books just came in the mail today! I am thrilled. A couple of questions. On this post is this your master recipe because you don’t use the vital wheat gluten? Also, it uses different amounts from the master recipe. One other question…if I don’t have vital wheat gluten, what will happen to my bread? I wanted to make bread today but no gluten on hand. I live at 6500 ft also so some major challenges I feel are ahead for me! =) Thanks so much.
Bobbie said...
March 11, 2010 at 1:59 pm
Just bought your book, LOVED the master recipe, made a free form loaf, pizza and bagel! However, the bagels were a very weird consistency,,,very rubbery,,,did I just not cook them long enough? I did cook them for almost 35 minutes so I figured I had better take them out. My husband says they taste ok, but I can’t even get myself to try them, they are weird! Any thoughts? Thank you so much..
zoe said...
March 11, 2010 at 4:39 pm
Hi Jordan,
The recipe on this post is the Master Recipe from Artisan Bread in Five Minutes a Day. It sounds like you are baking from Healthy Bread in Five Minutes a Day. Here is a post that talks all about that book and the use of vital wheat gluten. http://www.artisanbreadinfive.com/?p=1087 and some other info: http://www.artisanbreadinfive.com/?p=142.
Thank you and happy baking! Zoë
zoe said...
March 11, 2010 at 4:49 pm
Hi Bobbie,
I just made bagels in a class last night and the thing I stressed was not to over boil them or they get soggy/gummy. About 30 seconds on each side is often good enough, unless they are really large. Here is a post on making bagels that may be helpful! http://www.artisanbreadinfive.com/?p=423
Thanks, Zoë
Pam said...
March 12, 2010 at 9:55 am
I made the recipe for your whole wheat brioche on page 275 of the book yesterday and placed it in my six-quart King Arthur Flour dough rising plastic bucket to rise on the counter until it doubled and collapsed then placed it in the refrigerator overnight. I thought that I had left it slightly open not sealed tight but about six this morning I heard a loud noise and found that it had “exploded” in the bucket so hard that it blew the plastic lid up against the next shelf and shattered it into a million pieces! I am asking King Arthur if they will sell me a replacement lid only for the bucket but I wondered what you thought about this?
I plan to go ahead and bake it as the apple strudel bread on the next page and hope for the best in my oven (smiles) . Any advice for next time??
I am enjoying your book, started with the Anadama Bread, which has excellent flavor. Thanks for your reply.
farida said...
March 12, 2010 at 11:13 am
Hi Zoe & Jeff,
Your techniques look really easy and your bread looks delicious. I have only made bread once using the NYTimes No-Knead recipe and it was a disaster (dense and gummy bread on the inside). I gave up after that. However, your website has inspired me to try baking bread again.
I think it’s so cool of you guys to post recipes from your book and answer everyone’s queries on this website . Thank you so much for your time & effort.
I don’t have a broiler pan to put the water in the oven. Can I do any of the following instead:
1) Can I use a ceramic bowl (individual-sized souffle baking dish) or silicone loaf pan for the water?
2) I know you said “no” to glass baking pans – but what if I put enough water in the pan so that all of it won’t evaporate?
3) I have a 5-quart lidded cast-iron dutch oven. Can I put the formed bread dough in it with the lid on like in the NYTimes No-knead method?
4) any other options?
Bobbie said...
March 12, 2010 at 11:19 am
Thanks for the answer. The book said to boil them 2 min on one side and 1 more on the other, so maybe mine were boiled to long,,,,maybe I will try them again….
zoe said...
March 12, 2010 at 6:57 pm
Hi Pam,
Oh, no! This exploding bucket has only happened to me once when I snapped the lid shut. It blew the top off and sent dough flying into the air and onto the ceiling! If you just place the lid on top of the bucket, but do not snap it shut for the first 48 hours you will not have this issue!
Thanks! Zoë
zoe said...
March 12, 2010 at 7:04 pm
Hi Farida,
Thank you for your lovely note, we are thrilled you will be baking bread again!
You really want to avoid having ceramic or glass in the oven to create the steam. You can certainly use the Dutch oven method: http://www.artisanbreadinfive.com/?p=552
Thanks and enjoy the bread! Zoë
zoe said...
March 12, 2010 at 7:05 pm
Hi Bobbie,
I would err on the side of too little time in the water and think that 1 minute on each side is just about right.
Thanks! Zoë
Bill said...
March 14, 2010 at 11:24 am
Hello Zoe & Jeff,
Second baking attempt. First attempt, bread tasted great, but was wide and thin. Must not have measured the water properly. This attempt, presto, two gorgeous looking loaves of the whole wheat with olive oil recipie. I noticed the dough was dryer coming out of the tub, was able to shape them better, the rose during the rest way better (added a wee bit more yeast, ditto olive oil) and look like artisan loaves as they cool down.
Thanks so much for your book on Health Bread and for this great web site which is just a great source of info. I have become inspired and will be trying various recipes. I am also spreading the news about your book and method and having colleagues taste the results.
Bill said...
March 14, 2010 at 11:27 am
PS, I get the same brand and weight of vital wheat gluten that the amazon link offers for better than ten dollars for a third the price at a local grocer know for their typically high prices. Shop around bread makers.
zoe said...
March 15, 2010 at 10:23 am
Hi Bill,
That is fantastic news! We are so glad that it worked out for you.
Happy baking! Zoë
Kim said...
March 17, 2010 at 1:23 pm
Just bought ABin5 and baked my first little boule round this morning. Tastes great, but looks really funny! It was round with a nice tic-tac-toe slashing when it went in the oven, but came out all puffy and funky. Is this normal? Like I said, it tastes wonderful, but doesn’t look like anything in the book.
Now I just tried using the boule for Ciabatta, and it doesn’t look right either. A little more of an oval shape, but very puffed up. (It doesn’t look like the ciabatta I have bought at the store…) I did make sure it wasn’t under 3/4 of an inch, so I know I did things right there. But clearly I must be goofing something up!
Awesome book! I’m so excited to try more!
zoe said...
March 17, 2010 at 8:05 pm
Hi Kim,
Is it possible on the tic-tac-toe slash that you were not going 1/4-inch deep with the slashes? If you are too tentative the bread will bust open any old way. It may also be an issue of not allowing the bread to rest long enough before baking. Let it rest an extra 15-20 minutes and be sure that the slashes are plenty deep.
Try rolling the dough out a bit thinner for the ciabatta next time and let that rest an extra 10 minutes and you should have better results.
Hope that helps, Enjoy! Zoë
Kim said...
March 18, 2010 at 1:51 pm
Hey, thanks for your response!!!!
Well, could my slashes be TOO DEEP??? Tried again, making nice deep slashes (tic-tac-toe). This was after I let the boule rest for just over 60 min, instead of just 40 like last time.
Looks ridiculous! : ) Definitely nothing round about it either!
I ended up trying a baguette too, and that seemed a little more normal. Not perfect, but at least a little more like normal bread…
Hmmmmm. I will have to keep experimenting I guess!
zoe said...
March 18, 2010 at 7:21 pm
Hi Kim,
You may want to just try the straight slashes across the bread, like the one on the cover of the book. It is a little more predictable.
Thanks and enjoy all the bread! Zoë
Mary Beth said...
March 22, 2010 at 12:54 pm
what is the best way to tell if the bread is done inside? up till now, I have been waiting (till it cools!) and cut it. if it’s still not done enough, gotta re-bake, etc.
Mary Beth said...
March 22, 2010 at 12:56 pm
Dollar store unbleached, white flour! the dough was too wet when I used it in the master recipe. normally I use King Arthur Bread flour, and it’s perfect. what do you suggest so I can use the rest of the dollar store flour up making bread? how much more flour should i add?
jeff said...
March 22, 2010 at 3:38 pm
Mary Beth: I go by color and firmness– the lean doughs should be pretty dark. But to take some guesswork out of it, you can use an instant-read thermometer. Lean doughs should read 205 to 210 F, and egg-enriched doughs should read 185. Make sure you’ve got the probe tip in the center of the loaf, and let the reading settle down. Jeff
jeff said...
March 22, 2010 at 3:39 pm
Increase by quarter cup increments, Mary Beth. Or even 1/8-cup increments– that may be all you need. Jeff
Chrissy said...
March 22, 2010 at 8:03 pm
Love your books! I was wondering, though, if I can use some of the Nordic Ware shaped cake pans I have to bake my bread? and if I can, which breads would be best suited for them?
Thanks!
Michele Parthum said...
March 23, 2010 at 8:58 am
Zoe–I would like to buy a dough whisk but I am having trouble sorting out the dimensions online. Can you help?
I always make 1/2 the recipe in a container that is much smaller than the 6 quart–for ease of storage. Do I want to buy a large or a small dough hook??
FYI, my bread is coming out great. I have been baking rye recently and it is yummmmmmy!
Sincerely–
Michele
jeff said...
March 23, 2010 at 9:12 am
Which shape do you mean, don’t they have many different products? Jeff
jeff said...
March 23, 2010 at 9:20 am
Michele: Especially for the small batches you’re considering, the smaller (11-inch) should be just fine. I use that size, even for larger batches. Haven’t tried the 14-inch one. Jeff
Deepti said...
March 23, 2010 at 11:24 am
Zoe, Jeff
I was intrigued by the whole wheat+vital wheat gluten bread recipe that I found on Amazon (was searching for vegan baking cookbooks). It seemed so simple that I wanted to try it rightaway!
Result: the loaf didnt seem to appear like how it did in your video. My bread was dense, elastic and tasteless.
I used red star instant yeast (1.5 tblspn), Hodgson Vital wheat gluten (1/4 cup), pilsbury all purpose flr(2 cups),gold medal whole wheat flr (51/2 c) and 365 organic sea salt (1tblspn).
when i added luke warm water (4 cups) my mix was not as wet as it appeared in your video.
I used a 5 qrt steel vessel with lid. it did raise well, but i had to let it sit for close to 4hrs before it really doubled.
the refrigerated it.
next day, when i prepared the oven and took out the dough, it was not as elastic as you showed it be in your video. i could easily tear off a small ball , didnt require scissor.
after baking, the loaf looked good, it did raise. I had a hard time cutting it tho, very elastic and dense.
This is my second experience with bread, sadly not a very successful one either. We dont bake that often.
Please let me know what I did wrong. We are Lacto-vegetarians and lately smitten by the “organic” bug. I would love to bake delicious bread for my family and be assured of the healthy stuff going in, rather than buying bread from outside.
Please guide.
Regards
D
Alex said...
March 23, 2010 at 3:53 pm
I made a batch of wholewheat master recipe a couple of weeks ago and after the initial rise and colapse, I transferred it to a smaller container so that it will fit into the fridge. Unfortunately, it rose up again – a lot. So then I had to clean my fridge… Is this normal (as you said it will never rise again after the initial rise) or is it due to the transfer? or cause my fridge is a little on the warm side?
Aron said...
March 23, 2010 at 7:27 pm
this looks so fantastic!
zoe said...
March 23, 2010 at 8:28 pm
Hi Deepti,
The fact that your dough didn’t have any elasticity when you took it from the refrigerator makes me wonder if your refrigerator runs a bit cool. Sometimes when I take dough from my basement refrigerator it is colder than usual and has much less stretch to it. If this is the case I let the dough rest an extra 10-15 minutes before baking.
Are you using an oven thermometer? The fact that your crust came out tough and the interior was elastic sounds like the oven is perhaps running a bit off temperature? An inexpensive oven thermometer is one of our most useful tools. The other culprit for this is cutting into the loaf when it is still warm.
If the bread tastes a bit flat you may want to up the amount of salt by a bit. In this book we reduced the amount of salt to fit with a healthier diet, but both of us prefer it with a touch more than 1 tablespoon.
I hope this helps! Thanks for trying the bread, Zoë
zoe said...
March 23, 2010 at 8:37 pm
Hi Alex,
It sounds like the dough may have gotten a bit warm and activated the yeast again. If the dough is in the refrigerator and stays cold it will not usually rise again in the bucket. I had a similar thing happen when I put a container of warm soup in the refrigerator next to my bucket of dough, which caused the dough to warm up and rise again.
When you transfer to a smaller container make sure it isn’t too small to allow for some growth.
Thanks! Zoë
Alex said...
March 24, 2010 at 2:45 am
Zoe, I think you’re right about the fridge thermometre. My dough fridge
is in the garage and in the middle of Australian summer it has a really hard time staying cool as the garage gets boiling hot.
I did have enough space for the dough to rise about 50-70%. But I think it about trippled. I’m still learning
Cooking Rookie said...
March 24, 2010 at 3:20 pm
These are great tips! By now I have pretty much all the equipment except the Danish Dough Whisk – sounds like a nice tool.
I keep experimenting with your recipes all the time. I have to admit that I mostly go with the ABin5, because I am not a huge fan of whole wheat, but I do use some of your ideas from the HBin5 as well.
For example, I made a variation of your apple bread
http://cookingrookie.blogspot.com/2010/03/apple-buns.html
and it’s really delicious and the mild apple aroma when it is baking is amazing.
I also made a multigrain bread, which was very good
http://cookingrookie.blogspot.com/2010/03/little-bit-of-everything-multigrain.html
and now have a batch of zucchini dough ready to be baked.
Do you have a forum for your fans to share ideas on their experiments?
Your book literally changed my life – I am now absolutely addicted to bread baking and cooking in general
zoe said...
March 24, 2010 at 9:15 pm
Hi Cookie Rookie,
Your loaves are wonderful, thank you for sharing them with us. We are thrilled that you are baking so much and enjoying all the breads. Feel free to share your ideas with us and all those who are following here! If you have any creative ideas for flatbreads they may even find their way into our next book!
Thanks, Zoë
Peggy Peteler said...
March 25, 2010 at 6:28 am
Are you familiar with hemp seed? Any chance you will in the future incorporate some hemp seed into your recipes?
jeff said...
March 25, 2010 at 6:54 am
Peggy: No plans for hemp recipes at the moment– we try to keep to mostly easily-available products and this one isn’t (there are exceptions to that in the books, I know!).
Also Peggy, note that we had to edit out the health claims you made for hemp seed. While they may very well be accurate, we can’t put anything out there that we can’t verify ourselves, and we just aren’t familiar enough with this particular seed. Jeff
Aparna said...
March 26, 2010 at 1:21 pm
I just baked this bread today. Firstly, it did not rise as much as yours does in the picture, I thought it may have a good oven spring, but not much. I had my oven preheated to 450 with the baking stone. I followed all the directions , but the base of the crust did not brown after baking it for 35 min, 25 min on the parchment and then directly on the stone for 10 min. The crumb is dense. what did I do wrong?. I had proofed the dough for 60 min. instead of 40 min. after shaping.
Aparna said...
March 26, 2010 at 2:17 pm
Hello,
In my earlier comment I forgot to mention that my dough did rise very well , in fact it had almost tripled in over an hour. So, i was surprised that the loaf did not rise much in the final rise nor in the oven. I will keep on trying until I succeed . Please advise me as to what I had done wrong . The bread does taste good though has more of a sourdough taste.
zoe said...
March 26, 2010 at 8:31 pm
Hi Aparna,
Are you using an oven thermometer or going by the ovens gauge? The oven may say it is 450 degrees but it often takes much longer for the stone to reach that temperature. This would cause the undercooked bottom crust, lack of oven spring and dense crumb.
How warm is your kitchen? Did it seem as though the dough was overly soft when it went into the oven? If your kitchen is very warm the dough may have over proofed, which would mean it would not have a nice oven spring.
Thanks, Zoë
Aparna said...
March 27, 2010 at 7:11 am
Hello Zoe, Thank you for your quick response. To answer your question about the oven , I do not have an oven thermometer. Where do I buy one, and how does it work? I depended on the oven Gauge.I thought that the dough was very soft and springy during the first 2 hour rise, and then when I shaped it the next day after taking it out of the fridge the dough was very cold and still quite cooler after the 60 min. 2nd rise. I thought that was the reason it did not rise much the 2nd time. Should I leave the dough out for sometime before shaping? The bread tasted great though, I just hoped it had risen well. How do I shape the dough into a loaf instead of a round one
Thanks again, I love your web site. You have great tips for a beginner like me. I am buying your books as soon as I can.
Lauren said...
March 27, 2010 at 3:12 pm
Hi,
I am so excited about your blog, and I am definitely going to get your book. I do have a question though. . . I decided to try to make a loaf the same day I mixed the dough, after letting it rest a couple of hours in refrigerator. When I tried to pull out my 1 pound of dough, the dough stretched just a little, and broke off. This did not look like the videos I saw, of the really wet dough that was VERY stretchy and needed to be cut with scissors. What can I do to get the stretch into my bread? I even added slightly less flour than the recipe called for. Though I am using the bleached all purpose flour, could that have anything to do with it? Does it have to be unbleached?
I really appreciate your help!
jeff said...
March 27, 2010 at 3:33 pm
Aparna: We like this thermometer, or something like it, here on amazon: http://bit.ly/czmco2 It’s inexpensive but works wonders— I’m guessing your temp is low, so you just don’t get proper oven spring.
Doesn’t matter so much about leaving it before shaping, but if it’s whole wheat, go the full 90 minutes at room temp after shaping. But don’t expect much rise at this stage. Question is whether the final product is over-dense to your taste. If not, you’re on the right track. Jeff
jeff said...
March 27, 2010 at 3:38 pm
Lauren: Has to be unbleached, or else the protein content is too low to create the elasticity. Everything will work as billed once you switch. Let us know, though, if you have problems. Jeff
Dina Hafiz said...
March 29, 2010 at 3:43 am
Hi
do you think i can use my cast iron wok without the lid instead of the baking stone?? and put the water bath bellow it.
jeff said...
March 29, 2010 at 10:10 am
Dina: I’m a little worried that the bread may stick to it (probably need to grease it, but maybe not). Main issue is that woks aren’t massive, so they don’t have what’s called “thermal mass,” the ability to transfer a huge amount of heat to the wet ball of dough instantly. That’s what gives the best oven spring.
But in the worst case, it shouldn’t be much different than a cookie sheet or silicone pad, so try it! Jeff
farida said...
March 31, 2010 at 8:09 am
Zoe,
My bread turned out absolutely delicious in the cast iron pot. Thank you very much.
Michele Parthum said...
April 1, 2010 at 9:06 am
Jeff and Zoe-
When I took your class in Phoenix two years ago, and later on the site, I know that you did not think that, generally, the brand of flour did mattered (as between grocery generic and standard brands–ignoring King Arthur) for purposes of the master recipe. The emphasis was on the shaping and water content.
As it turned out, for me, the brand did matter. I was using Safeway brand unbleached flour and getting dense crumb. I switched to Gold Medal, and my crumb is much better. I suspect it depends on the quality of the generic, but I thought that you might be interested.
Michele
jeff said...
April 1, 2010 at 10:15 am
Michele: Interesting, haven’t heard that before. Any chance the store-brand stuff was stale? Jeff
Jorge Mostaccero said...
April 1, 2010 at 11:19 pm
Jeff and Zoe,
Thank you so much for providing us with a simple way of making delicious breads. It really is a treat being able to bake wonderful loaves at almost any time.
While on the topic of simplifying things, I have found that I can forgo the water tray step by simply spraying my loaves two or three times in the first 10 minutes of baking. When I do this I still make wonderfully crusty loaves. Furthermore, this works well whether I’m baking the bread in my full-size over or using my little counter top convection oven.
I love using the little convection oven when I’m baking smaller loaves. It cooks very rapidly and turns out beautiful loaves and allows me to save money as I don’t have to heat up the big oven.
Thanks again for showing us this wonderful way of making bread.
Jorge
Michele Parthum said...
April 2, 2010 at 7:32 am
No– This went on for two years–and I am whippin’ though flour. I gave up making the round loaves and concentrated on the flatbreads–can’t wait for the next book.
Then when your video came out, I made a boule using the generic and the loaf was better for the 90 minute proof. Then I started using the Gold Medal and that is when I am seeing great big bubbles in the crumb–just like yours. Flatbreads also more fluffy. Lovin’ it.
Michele
jeff said...
April 2, 2010 at 8:41 am
Jorge: Yep, there are three ways to create the steam environment, yours is one. We detailed this in the second book: the broiler tray, spraying, and baking inside a covered container for 2/3’s of baking time (all on the website here, too, though it can be difficult to find). Jeff
jeff said...
April 2, 2010 at 8:44 am
Michele: OK, no way it was stale then (unless it was on the shelf for a long while before purchase, but then you’d have seen an expired purchase-by date).
Gold Medal’s a nice product… Jeff
tracey said...
April 2, 2010 at 6:40 pm
I have both books and have made probably 20-30 loaves so far (along with almost every mistake you can make). I’m learning to work more by feel now and am even getting cocky enough to try to adapt some recipes. For instance, I would like to make the Vermont Cheddar as a whole grain bread, and make grain substitutions in other recipes. Jeff, I noticed in another post you mentioned substitutions depended on the gluten content of the flour. Is there a general rule about this, like if the gluten content is higher than that called for use less VWG? BTW, the Toasted Millet and Fruit Bread is fanatastic!!
jeff said...
April 3, 2010 at 5:21 pm
Tracey: See the FAQ about this, click above, re: Flour Varieties, Do I need to adjust…
Celine said...
April 4, 2010 at 11:02 am
I’ve seen many posts on food blogs about that “artisan bread in five minutes”, and I have finally get more information about it.
I tried it yesterday : I halved the recipe, and halved the amount of yeast. I baked a small loaf today and it was the best bread i’ve ever made
Very easy, and it doesn’t need to bake a lot of bread (unlike the sourdough method)
Thanks a lot! I think I’m gonna order the book soon!
it will satisfy the bread craving of a french teenager hehe
jeff said...
April 4, 2010 at 11:11 am
Celine: My brother and I used to come home from high school, and eat a loaf of bread with butter, and a quart of milk! Glad the recipe worked well for you, hope you enjoy the full versions in the books. Jeff
Betsy Clark said...
April 8, 2010 at 3:54 pm
Goodness, that is a beautiful boule! I notice that no matter what I do, my boule spreads quite a bit. Could it be too liquidy of a dough? Thanks!
rebecka veil said...
April 8, 2010 at 5:19 pm
1. Can I use a Silpat mat (on a cast iron pan, baking stone, or cookie sheet) instead of parchment paper (on a cast iron pan, baking stone, or cookie sheet)?
2. I note that in your brioche recipe (among others), the instructions say that, if I’m not using a baking stone (or cast iron pan) for brioche, that I don’t have to preheat my oven to 350 degrees for 20 minutes, but only for 5 minutes. Does this mean that I can put the brioche loaf (that has rested for 1 hour 20 minutes) into the oven after only 5 minutes of preheating even if, after 5 minutes of preheating, the oven temp hasn’t yet reached 350 degrees?
zoe said...
April 8, 2010 at 9:54 pm
Hi Betsy,
Yes, it could be that your dough is too wet. Perhaps you are not measuring with the scoop and sweep method? If you spoon the flour into the cup you will end up with too little flour and a dough that is too wet.
Be sure you are using unbleached all-purpose flour as well.
Thanks, Zoë
Betsy Clark said...
April 9, 2010 at 4:55 am
Thanks Zoe, I am using unbleached all purpose flour, and scooping & sweeping! I’ll keep playing with it, because the bread always tastes so good- just wish it didn’t spread as much as it does. I don’t want a tight, dry loaf either!
Deepti said...
April 9, 2010 at 1:35 pm
Hey Zoe,
Thank you for replying earlier. I bought a thermometer and yes! you were right, my oven was off temperature.
I made the whole wheat bread again, this time, I needed 4.5 cups water instead. Is it ok to add a lil more water if your dough is too dry?
Also, my bread tastes better with a pinch more salt!
but I still think its a bit dense.
I am using Hodgson gluten, Gold medal whole wheat and all purpose flour and Red Star instant dry yeast.
Please let me know how I can make my loaf light and fluffy.
Thanks
Deepti
zoe said...
April 9, 2010 at 9:18 pm
Hi Deepti,
Glad that you got a thermometer, now you can be certain of your temperature.
Adding that much more water is going to result in a very wet dough, which will also make your final loaf denser. Did you add the water because it was too difficult to mix with a spoon?
Whole wheat bread is never going to be light and fluffy, but if you want to try adding more white flour and less whole grain that is your best bet for getting a lighter loaf.
Thank you! Zoë
judy said...
April 12, 2010 at 7:15 am
Hi…where i live we dont have unbleached AP flour…..the only kind we have in the market is AP will that work as well??
Deepti said...
April 12, 2010 at 10:17 am
Thank you Zoe,
Yes, I found it hard to mix with a spoon. In your video I saw how you were able to mix it easily, it was not so for me and I thought I should add more (.5 cup)
jeff said...
April 12, 2010 at 6:38 pm
Judy: I assume you mean bleached AP, and if so, then the answer is that it will not work well in our recipes. It doesn’t have enough protein. You can try decreasing the water (? 1/4 cup) but I’m not at all sure that will work. The dough is likely to be too wet and without structure.
judy said...
April 13, 2010 at 9:08 am
Dear jeff/zoe
sooo sorry to bother you but as i said in my previous post we dont have unbleached AP flour , we have bleached AP and high protein flour (hpf) , will(hpf) work??
thanks
jeff said...
April 13, 2010 at 3:42 pm
Judy: Didn’t realize you had access to high protein flour– just decrease the flour by 1/4 cup in the basic recipe.
kathaleen said...
April 15, 2010 at 8:50 am
i have been putting a couple of tablespoons of VWG in my bleached AP flour (mix it with the flour well, then follow the other instructions) and it has helped it preform similar to unbleached.
jeff said...
April 15, 2010 at 12:03 pm
Kathaleen: Yes, there’s no reason that shouldn’t work as a stopgap for people who are stocking bleached flour.
Rosemarie said...
April 15, 2010 at 3:56 pm
I started baking bread and such over 40 years ago. I love making bread but found it very tedious.
When I found out about these no knead breads I just went crazy. The problem became, when I shoud start, or I wish I had it now. You seemed to have solved that problem. I live alone and want my bread fresh and small, even a few rolls for the day. I just bought Healthy Bread in Five Minutes a Day, I have the other out of the library, I do that to see if i want to buy, and I do.
Thanks for this new inovation in baking, where were you 40 years ago?
Thanks
zoe said...
April 15, 2010 at 9:19 pm
Hi Rosemarie,
We are thrilled that you like the books and hope you enjoy all the bread you bake. We are here if you have any questions!
Happy baking! Zoë
Ron said...
April 16, 2010 at 6:40 pm
Well, I have both books and started experimenting several weeks ago, and have made 3-4 batches so far.
Each one seems better.
I couldn’t resist a $6.80 25 pound bag of flour at Sams Club, even though it’s bleached and enriched, it makes wonderful bread with your basic recipe, and it’s costing me about 30 Cents per loaf.
Tonight I made cinnamon rolls, and they were the best I have ever had. The chewiness and crust were terrific, better than Cinnabon. I baked them at 375 degrees.
One problem I have been having with both bleached and unbleached mix has been a rather thick overcooked crust.
I even lowered the temp to 400 and it’s still a pretty hefty crust. Any thoughts?
zoe said...
April 16, 2010 at 9:36 pm
Hi Ron,
Are you using an oven thermometer and a baking stone, these two things will help you create a great crust. If your oven is too hot or cool it will adversely effect the baking time and create a touch crust or an undercooked crumb. If your oven is too low, such as 400, it will take your bread too long to bake and then the crust will be too think by the time the crumb is finished setting.
Baking on a stone will help to keep the oven temperature even. That combined with the steam should give you a crust that is thin and crisp.
I hope this helps! Zoë
Ron said...
April 17, 2010 at 11:23 am
Excellent advice Zoe. I raised the temp to 450, and let the loaf rest for 90 minutes this time, it turned out perfect!
I have been using a stone and water pan all along, but I don’t think I let the loaf rest long enough, and kept lowering the temp thinking it would help the crust.
I have been using a small round cake pan for the water, this time I placed it on the bottom rack instead of the bottom of the oven.
Do you use hot tap water or boiling hot water?
This time I ended up with left over water, when I had it on the floor, it all evaporated, but it’s harder to pour it in.
I also made my first pizza today, mixed results, but I’m excited to experimant further.
Any feedback on the Sams Club $6.00 bread flour? lol
Ron in Ohio said...
April 17, 2010 at 12:41 pm
Zoe and Jeff, I want to thank you for your books, they have opened up an exciting new area in my cooking life.
We had just bought a Kitchen-aid Mixer while remodeling our kitchen, so I stumbled onto your book while looking for bread recipes for my new mixer.
I was not up to the kneading, thus the mixer.
Well, I will now need to find other uses for the mixer as I don’t need it for my bread baking.
I never dreamed it could be so easy and economical to bake great breads!
jeff said...
April 17, 2010 at 6:59 pm
Glad it’s working for you Ron…
jeff said...
April 17, 2010 at 7:01 pm
Ron: You can use hot water, cold water, or even ice cubes, but I usually use hot tap water.
Haven’t used a lot of bread flour, but you can probably use it if you increase the water a bit (about 1/3 cup per batch), see FAQ above on using different types of flours and how you adjust for them.
KimA said...
April 19, 2010 at 6:27 pm
How long is the dough good in the refrigerator for?
zoe said...
April 19, 2010 at 7:10 pm
Hi KimA,
It depends on the type of dough you are talking about. Each recipe in the books specifies how long you can store them. If you are referring to the Master recipe it is 2 weeks.
Thanks and enjoy! Zoë
Katie said...
April 22, 2010 at 7:25 pm
I was wondering if you can bake two loaves in the oven at the same time, or if it would be better to bake one larger loaf? Would I need to increase the baking time for either of these? Thanks!
zoe said...
April 22, 2010 at 9:19 pm
Hi Katie,
I do that all the time and it doesn’t really require much additional baking, unless they are huge loaves. Just be sure to give each loaf enough space on the stone to expand.
Enjoy, Zoë
Ron in Ohio said...
April 24, 2010 at 8:52 pm
Too dark a crust?
I’m using an oven thermometer, and keeping the temp at 425-350 but it browns in 15-20 minutes and by the time 30-45 pass, it’s darker than I like it. It has a good chew,but a dark flavor.
The crumb is beautiful, not too wet or dry
I let it rest 60 minutes on the warm .stove over the oven.
Should I try spritzing the surface of the loaf with water before putting it in the oven?
Yes, I do use a cup of hot tap water in a pan below the loaf, and I use a pizza stone under my cast iron pizza pan.
Ron in Ohio said...
April 24, 2010 at 8:53 pm
Oopps, meant 425-450 degrees
zoe said...
April 24, 2010 at 9:23 pm
Hi Ron,
Are you using convection heat by any chance?
Is your oven a Wolf, Viking or other professional style oven?
What kind of dough are you baking?
Let me know some more details and we can help you figure this out.
Thanks! Zoë
Ron in Ohio said...
April 25, 2010 at 9:04 am
Hi Zoe, we have a new Frigidaire Gallery Gas Convection range.
I was using a pizza stone before, I give it about an hour preheat, now I got a lodge cast iron pizza pan, so I just put it on top of the stone. I figure it’s similar to a stone oven.
But I have been having the same problem with both Boule and Olive Oil dough.
I tend to remove it from the oven when the crust looks good, but then the crumb is damp.
Last night I left a Boule loaf in for about 35-38 minutes, and the crust is too done, but the crumb perfect;.
zoe said...
April 25, 2010 at 9:05 pm
Hi Ron,
Are you using an oven thermometer? Could it be that your oven is running a bit hot? Where in the oven is your rack? If the stone is too high in the oven the loaf will burn before the crumb is done.
You don’t need to use both the stone and the cast iron at the same time, one or the other is fine.
Thanks, Zoë
matt haines said...
April 26, 2010 at 1:26 pm
Just a quick message to say “thanks!” No questions. My sister pointed me to your site, as she has bought your books. I’ve always been afraid of bread-making, but this looked so easy…and it was! Got a very edible (but not perfect) loaf the first time. Need to adjust temperature next time, but I’m impressed. Will go order the book now.
zoe said...
April 26, 2010 at 9:55 pm
Thanks Matt,
I’m thrilled you are baking the bread. Let us know if you have any questions as you bake through the book!
Cheers! Zoë
Ninya said...
April 29, 2010 at 6:26 am
Thank you so much, i found this recipe in a magazine that my dad has and my son decided to rip it to pieces playing with it after the first time i made it. Iam so glad i found it again, it just seems that 3 cups of water is not enough because it is very dry! The last time I made it, it would not rise in the oven, any idea on how to make it wetter and to get it to rise? I follow the recipe exactly and have to add more water at the end to make the dough look like your dough..Seems like im not doing something right..please help!! Thank you so much, Ninya
jeff said...
April 29, 2010 at 7:06 am
Ninya: Something’s wrong, if you’re following this recipe exactly it shouldn’t be dry. How are you measuring, see my post on measuring the flour at http://www.artisanbreadinfive.com/?p=1801. What kind of flour are you using? Are you swapping in whole wheat flour, or other partial WW product? Are you using “white” whole wheat?
Those all require considerably more water.
Ninya said...
April 30, 2010 at 5:29 am
this feel kinda dumb asking but better safe than sorry…
Instead of using measuring spoons to get 6 1/2 cups flour can I just use a normal kitchen scale and weigh out the two pounds of flour? It seems so much easier to me and less of a hassle doing it that way.
jeff said...
April 30, 2010 at 5:49 am
Ninya: Yes— go to the FAQ (above), and click on the question about weighing the flour.
Lina said...
April 30, 2010 at 12:04 pm
I received a copy of your book a few months ago and have made many recipes since. ALL of my loaves taste great, but are ALL very small. What am I doing wrong? Should I include more dough in the loaves? Am I over-shaping it? (A VERY hard process anyway) I would appreciate any guidance you would give, as my bread right now is a total embarrassment, and I am just about ready to give up.
zoe said...
April 30, 2010 at 8:19 pm
Hi Lina,
Here is a video on shaping the loaves that may be helpful: http://www.artisanbreadinfive.com/?p=1715
If you make the loaves larger, you need to let them rest longer and bake longer. Are you baking them as a free form loaf or in a bread pan?
Here are some FAQ that may fit what you are going through, let us know if any of this helps! http://www.artisanbreadinfive.com/?page_id=1479
Thanks, Zoë
Lina said...
May 1, 2010 at 3:22 pm
Your video helped a lot with regards to shaping. Thanks!
I have made both free-form boule and loaf breads like broiche and buttermilk bread. They all turn out too small.
For the broiche, I even baked it in a smaller loaf pan than called for, but to no avail.
As for the buttermilk bread, I pretty much corrected the problem by using 1/2 lb. more dough. On the one occasion that I made it without refrigerating, however, when I used this much dough in one loaf, it overflowed the pan.
My boule (as I mentioned) tasted fantastic, but did not miraculously puff as your illustrations indicate. I concluded that I must not have added enough flour, but I haven’t tested my hypothosis yet.
I use active dry yeast…should I be using something different? I also use King Arthur Flour, but if anything, my dough is too slack, so I don’t worry about the protein content.
Again, thanks for all of your guidance.
zoe said...
May 1, 2010 at 7:14 pm
Hi Lina,
Here is a post about baking loaf pan breads that may help: http://www.artisanbreadinfive.com/?p=904
Are you using the scoop and sweep method of measuring the flour? If you spoon the flour into the cup it will end up being too little flour and the dough will be too wet.
The type of yeast will not matter at all.
Thanks, Zoë
Chocolate Fairy said...
May 8, 2010 at 2:45 am
Om my! I’m so excited! I’ve just made my first loaf and it is SUPERB. A bit dense as I think I didn’t cook it for long enough and I used strong bread flour instead of all purpose but SO SO much better than the bland, soggy stuff that comes out of my bread machine. Thank you, thank you. I’m off to buy a copy of your book now. And thanks for this site, it’s so helpful to be able to look up issues and questions. GENIUS!
jeff said...
May 8, 2010 at 2:21 pm
CF: Yes, using bread flour will throw off the water ratio. Check out the FAQs page under “Flour Varieties… Can I…”
rebecka veil said...
May 10, 2010 at 10:07 am
Not sure why you didn’t answer my earlier question (maybe it was a dumb question!), but I’m still confused (other than your bread recipes, my baking is limited to one birthday cake a year):
I note that in your brioche recipe (among others), the instructions say that, if I’m not using a baking stone (or cast iron pan) for brioche, that I don’t have to preheat my oven to 350 degrees for 20 minutes, but only for 5 minutes. Does this mean that I can put the brioche loaf (that has rested for 1 hour 20 minutes) into the oven after only 5 minutes of preheating even if, after 5 minutes of preheating, the oven temp hasn’t yet reached 350 degrees?
This may seem like a stupid question, but I’m genuinely confused. I have a very reliable and accurate GE Monogram oven, and it does NOT preheat to 350 degrees in only 5 minutes.
jeff said...
May 10, 2010 at 1:58 pm
Rebecka: In general, except in the largest of ovens, you can get away with that. If you’re finding that things aren’t getting done properly with that short of a preheat, just go 10 minutes and see if you prefer the result.
But no, the oven probably won’t be completely up to temp in 5 minutes.
Dina said...
May 12, 2010 at 6:00 am
hi i made my 4th batch yesterday and today when i checked on it i knew that it has less flour than alwayes can i add a little flour today and bake it tomorrow.
can this be done
thanks
zoe said...
May 12, 2010 at 11:18 pm
HI Dina,
You can add more flour. Let is sit for a couple of hours after adding to allow the flour to absorb the extra water.
Thanks, Zoe
Luc said...
May 14, 2010 at 3:26 am
Been using your master recipe for a while now and have had no problems with the whole wheat/unbleached recipe for shaping and baking.
I get into trouble when I use whole wheat white/unbleached. The dough is much wetter, but I deal with it by using lots of flour for shaping. The resting period (up to 90 minutes) produces a “flat bread” look to the dough for it spreads tremendously. Cutting slits on the dough is difficult. I would best describe the end results as looking like a ciabatta loaf.
I reduced the water content a bit without much success. I’m wondering if substituting one cup or more of whole wheat white with whole wheat would not solve this? On the other hand, I prefer the taste of www.
Any tips?
debbie T said...
May 14, 2010 at 9:37 am
I have a question about the “bucket” size. I have an older rubbermaid container, but it’s very wide and not so tall. It would definitely fit the dough, but is the container supposed to be tall as opposed to wide? Or doesn’t it matter if it expands outward and not upward?
thanks. I am looking forward to making my first whole grain healthy bread from your book
Dina said...
May 14, 2010 at 10:27 am
Thanks for the advice I put 2tbl flour and it turned out great
ur metheod is realy foolproof
jeff said...
May 14, 2010 at 3:38 pm
Luc: You need vital wheat gluten (VWG) if you want to push the ratio of whole grain flour (white whole wheat won’t make a difference). Here’s our post on that: http://www.artisanbreadinfive.com/?p=142
You might like our second book, Healthy Bread in Five Min/Day. It’s high in whole grain and depends on VWG, and can be found at http://bit.ly/3wYSSN
jeff said...
May 14, 2010 at 3:40 pm
Debbie: It should be OK. Sometimes all that surface area encourages drying out the dough, but I know Zoe uses that shape and it’s fine.
jeff said...
May 14, 2010 at 3:40 pm
Dina: Excellent!
Luc said...
May 14, 2010 at 4:25 pm
Jeff,
I have your second book and your master recipe is the one I use on page 54. I do use VWG as directed. I use stone ground organic white unbleached flour – 4g protein per 30g (inlieu of whole wheat) with unbleached white – 4g protein per 30g in the proportions included in your recipe.
When I use whole wheat, the dough is tighter and doesn’t loose its shape as much when its resting.
zoe said...
May 14, 2010 at 8:36 pm
Hi Luc,
The problem may be the way the www is ground. If it is a courser grind of flour it will not form as much gluten and therefore make for a wetter dough, which does not hold its shape. Many people have found that adding a bit more VWG to the dough is helpful or decreasing the water by a couple of tablespoons.
I hope this helps, Zoë
Luc said...
May 15, 2010 at 2:23 am
Thanks Zoë, I’ll try out your recommendations and l’ll let you know how they turn out.
Luc
Jo said...
May 15, 2010 at 12:08 pm
Brenda and those gaining weight with bread: I’ve been diabetic for years and learned to count and exchange carbs. When I eat bread, I leave off all other carbs like potato, rice, etc. Only lean, unfried meat and vegs. If eating pasta, cut your pasta in half, increase sauce and enjoy your bread!!!
Debbie said...
June 3, 2010 at 6:41 am
Do I have to use a pizza stone to have a good loaf of bread? I can not afford one. I’m okay with the crust being softer. Thanks!
jeff said...
June 3, 2010 at 3:23 pm
Debbie: You can do the bread on a cookie sheet, yes the crust won’t be quite as good. An inexpensive option is an unglazed quarry tile from a home supply store, people swear by them and they’re a few dollars. Jeff
Debbie said...
June 3, 2010 at 6:29 pm
Thank you Jeff! Ordered the book today!
Heather Bryant said...
June 13, 2010 at 6:08 am
I love that cast iron stone! I need to find me one of those.
I have a question though. I am trying to switch over to extra virgin coconut oil and I was wondering if I could replace that where it says to use a neutral flavored oil. I know coconut oil has a flavor, but it’s not overpowering I’ve heard. I am thinking about the 100% whole wheat loaf bread I think it’s on page 92 in the healthy breads book.
jeff said...
June 13, 2010 at 7:47 am
Heather: Assuming the manufacturer says you can heat coconut oil to 350F, this should be fine– but check with the manufacturer, I don’t know if coconut is meant to be heated. I bet the flavor will be nice, possibly even better than neutral-flavored oil in this situation.
Heather Bryant said...
June 13, 2010 at 11:11 am
Extra virgin coconut oil has a smoke point of 350F. I will definitely be trying this next week since we have to eat pizza made from your dough weekly
Lisa said...
June 14, 2010 at 12:01 pm
This sounds like a great way to make bread! I was wondering if after the initial rise and refrigeration if the loaves, rolls, etc. could be formed and frozen then thawed and baked as usual?
zoe said...
June 15, 2010 at 2:42 am
Hi Lisa,
The short answer is yes, but they may lose some of there shape as they defrost and rest. I would try it with a small batch and see if you like the result you are getting. The alternative is to freeze the dough before shaping and then once it is defrosted shape and rest the bread as normal.
Thanks! Zoe
Liv said...
June 18, 2010 at 12:38 am
Hi Jeff & Zoe,
I tried making Light Whole Wheat bread twice. I followed the measurements in the recipe but my dough seems to be very sticky unlike your video. I added more flour & kneaded the dough. Should I reduce the water?
I am using organic bread flour which is high protein plain wheat flour and wholemeal wheat flour. Please help.
jeff said...
June 18, 2010 at 5:41 am
Liv: Probably a different flour type/types than what we get. Just reduce the water a bit, maybe try 1/4 cup less and see what you think. Go down by 1/4-cups.
JoshMe said...
June 22, 2010 at 8:18 pm
Hi Zoe/Jeff,
I was wondering if you think it’s more accurate to do the measurements by weight or volume. I noticed your master recipe above says “6 1/2 cups (2-pounds)” and I was debating whether to use my kitchen scale or a measuring cup. Thanks!
zoe said...
June 23, 2010 at 1:40 am
Hi JoshMe,
Weighing the ingredients is always the more accurate way to bake.
Enjoy, Zoe
Joanne said...
July 6, 2010 at 6:18 am
I just wanted to let you know that I did everything wrong while making the master recipe. I used bleached AP flour/ expired yeast/ table salt/ no pizza stone/ no corn meal, just cornbread mix. But it turned out great!!! My family loves this bread. We do like it better when it made from more aged dough (3 day old). Thank you so much for the recipe and all the videos on Youtube for help.
jeff said...
July 6, 2010 at 1:57 pm
Joanne: Love this story, thanks for writing. Makes me think that we’re thinking too much about this stuff! Jeff
Margo said...
July 16, 2010 at 7:17 am
I don’t have a lot of room in my fridge, can I “half” your recipe & put it in a smaller bucket? Thanks
jeff said...
July 16, 2010 at 8:19 am
Margo: Absolutely, yes.
Jane said...
July 19, 2010 at 9:17 pm
Help. I love the book and idea, but am not having much success. The loaves are small, dense and the crust is not crusty, but chewy. I think one problem is my oven. I does not have a good seal, so the steam escapes. Any other suggestions?
Thanks.
zoe said...
July 19, 2010 at 9:22 pm
Hi Jane,
Are you using an oven thermometer? It sounds like maybe your oven is not hot enough? This may be of help: http://www.artisanbreadinfive.com/?page_id=1479 Let us know if you find the information you need.
Thanks, Zoë
Rebecca said...
July 21, 2010 at 5:28 pm
Not only do I love this method, but I’ve got people at work interested too! Can’t wait for the new book (I’ve got HBin5, and may pick up the original, too.)
Here’s my question: In this post you mix the flour into the liquid. In HB (if I read it right) you mix the liquids into the flour. I found dry into wet much easier! Is there a reason to do it one way vs. the other?
Thanks!
jeff said...
July 21, 2010 at 7:16 pm
Rebecca: HB’s method is required because there’s vital wheat gluten in the mix, which must first be distributed with the dry ingredients or you get lumps. If there’s no VWG, you can go in whichever order you prefer. Jeff
Rebecca said...
July 24, 2010 at 6:09 am
Thanks, Jeff! I mixed this batch (WW w/olive oil) in a bowl and then put in into my frig container. The mixing was much easier in the bowl than in the straight-side canister I’m using in the frig.
By the way, this makes great sandwich rolls, which are one thing I have not been able to get in whole grain at our local bakeries. Good pizza, too. (Though I rolled it too thick the first time! I like thick crust, but this was more like foccacia.) Thanks, again!
jeff said...
July 24, 2010 at 8:29 am
Rebecca: to get the pizza crust to relax, do it in shifts. Roll it out till it starts to “resist.” Then walk away for 5 minutes, do something else. When you return, it will miraculously be willing to get really thin.
Other thing that helps is forming the dough ball, then letting it rest for 30 to 45 minutes, likewise relaxes. Jeff
Annie said...
July 25, 2010 at 6:04 pm
Hi guys! I just tried to do my first loaf, and when I went to cut it with my serrated knife before I put it in the oven, I couldn’t because the dough was too wet I think? When I used the knife, it just stuck to the dough. Do I need to reduce the water?
Thanks!
zoe said...
July 25, 2010 at 9:26 pm
Hi Annie,
Have you checked out any of our videos about working with the doughs? Here is one about wet dough. http://www.artisanbreadinfive.com/?p=1715 See if your dough looks similar or if it is wetter. If you still think it is too wet you can reduce the water next time. If you still have dough left in the bucket you can add a touch more flour to this batch, just let it sit for a couple of hours to absorb the excess water.
Thanks, Zoë


Follow us on Twitter 

Mardi@eatlivetravelwrite said...
February 9, 2010 at 9:40 am
This is fantastic! I made it my goal to learn how to bake bread in 2010 and bought ABin5 and HBin5 recently but have yet to tackle them. Am bookmarking this post for future reference!!!! Thank you for the step by step pics too!