intro copy

The homemade bread revolution continues, with healthy new recipes…


… ARTISAN BREAD IN FIVE MINUTES A DAY taught busy people how to make great bread at home, with only five minutes of active preparation time. Now, HEALTHY BREAD IN FIVE MINUTES A DAY whips up fabulous breads made with more whole grains, fruits and vegetables. The secret? Mix up a lightning-fast batch of moist no-knead dough, save it in your refrigerator, tear off portions over the next week or more, shape, and bake.

click to purchase

Click to purchase

store logos

amazon

Follow us on Twitter


Red Star Yeast

Recent Posts

Categories

Links:

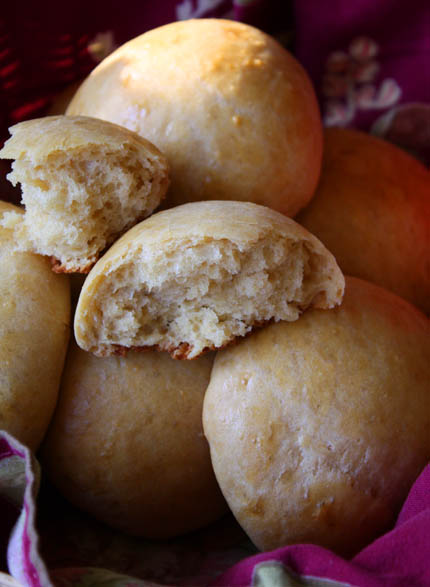
Thanksgiving Buns and Helpful Hints for Holiday Baking!

Print | Email | by Zoe, November 26, 2008
Filed Under Special techniques, bread questions | 64 Comments

thanksgiving buns

Tomorrow is Thanksgiving and Jeff and I wanted to express our gratitude to all of you! We’ve loved hearing from you over the past year. Your questions have challenged us to learn more, your stories have inspired us and your encouragement makes this whole project a joy!

We know from your comments and emails that many of you will be baking bread for Thanksgiving. We are so pleased it will be part of your special meal. Just in case you need a little guidance on Thanksgiving day, I wanted to lead you to some good information about our most frequently asked questions:

Dense Crumb or Loaves Not Rising Enough?

Wet Dough Sticks to the Peel?

How to Improve Whole Grain Loaves?

High Altitude Baking?

Using a Different Type of Flour?

Too Salty or Not Salty Enough?

During the past week we’ve had several questions about making our various doughs into buns. These tiny little loaves are the traditional shape for the holidays and can be easily made from any of our doughs.  Here is how:

thanksgiving buns

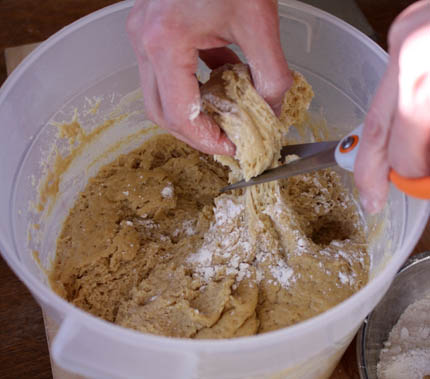
Pick any dough you want from Artisan Bread in Five Minutes a Day. Sprinkle flour over the top of the dough and cut off small pieces; kitchen shears are nice for this job.

thanksgiving buns

If you have a kitchen scale you will want each one to weigh about 2 ounces. As you can see I have a small bowl of flour sitting right on my scale. I set the bowl down and then press tare. The bowl of flour allows me to rest the sticky dough down without making a complete mess of my favorite scale.

If you aren’t using a scale then the buns should be about the size of a golf ball.

thanksgiving buns

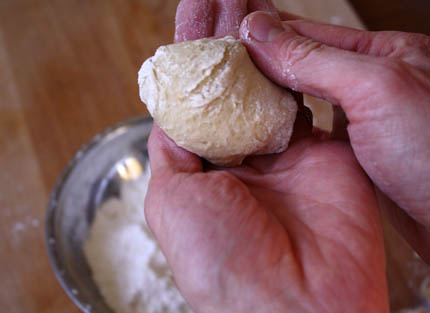
Form the dough into a smooth ball by gently pulling the top of the dough around to the bottom and then tuck the ends under.

thanksgiving buns

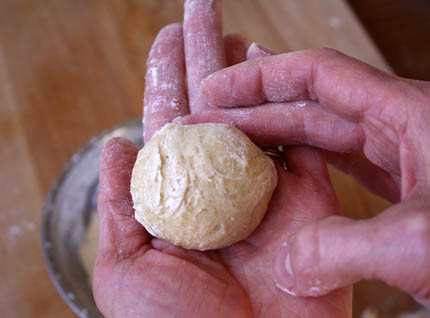
The ball should be nice and round, but you should only work it into this shape for about 20-40 seconds. Try to handle it as little as possible.

thanksgiving buns

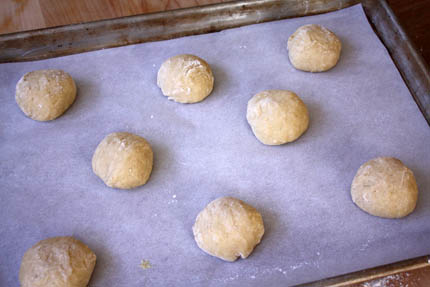
Set the buns on a cookie sheet that is lined with parchment or a silpat.

thanksgiving buns

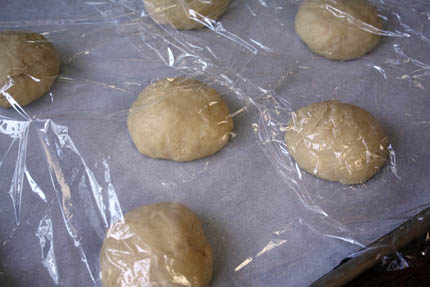
Normally we don’t cover the dough in plastic as it rests, but it has been so dry in my kitchen this fall that I loosely covered the buns. Let them rest until they no longer feel chilled and have a bit of puffiness to them. Our dough will not double in size while it rests, but it will have nice rise in the oven! This rest can take anywhere from 20 minutes to an hour depending on the dough and how cold your kitchen is.

While your buns are rising, preheat your oven to the temperature that the specific dough suggests.

thanksgiving buns

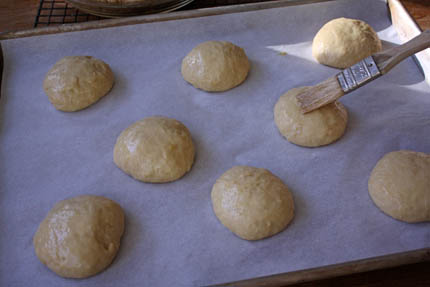
Some breads will ask for a dusting of flour, a brushing of cornstarch wash or egg wash (use a pastry brush). Do as the recipe suggests. You can certainly slash them as well, but I just left the shape to chance and baked them without slashing.

Bake the buns for about 20 minutes. If you are using the non-enriched doughs you want to go by the same deep brown crust guideline that you would use for the bigger loaves.

thanksgiving buns

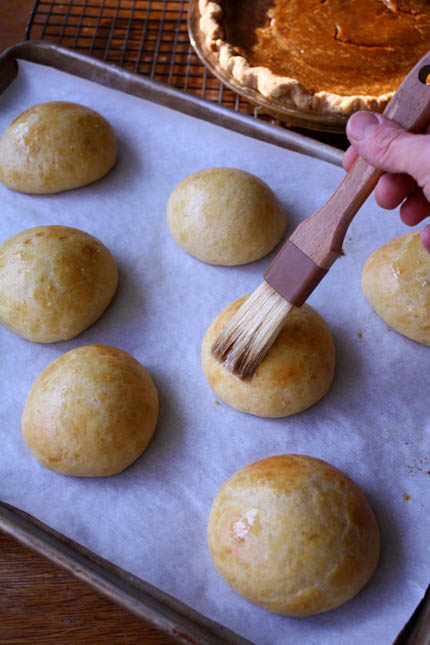
Once my buns  came out of the oven I brushed them with butter, this will soften the crust, which is exactly what I wanted.

Happy Thanksgiving!

Zoë and Jeff


Comments

Laura said...
November 26, 2008 at 10:06 pm

Happy Thanksgiving Zoe and Jeff.
As I think of all the things I am grateful for, one of them is finding your book. It definately helped me get through the long winter. It also helped open up my baking world.

zoe said...
November 26, 2008 at 10:16 pm

Thank you Laura!

Have a wonderful Thanksgiving Day!

Zoë

sara z. said...
November 26, 2008 at 10:52 pm

Oh, very good. I’ve been wondering about buns/rolls as I’m usually only cooking for two. Not that’s it a challenge for us to consume a whole loaf, but it’s nice to have a non-gluttony option if I just want a couple of rolls.
(But then, it would feel like a waste of energy to turn on the big oven for two rolls if I’m not already cooking something else in it – I guess I could do them in the toaster/convection oven, sacrificing some crust texture due to lack of stone and water…)

Adrienne said...
November 27, 2008 at 5:27 am

Happy Thanksgiving! I baked up 4 loaves (an entire batch!) of pain d’epi yesterday afternoon, I think my family will be impressed-it’s so pretty. Thank you!

Elle said...
November 27, 2008 at 6:58 am

Happy Thanksgiving! The rolls look fantastic–I can almost taste them!

Liz said...
November 27, 2008 at 8:00 am

You must have read my mind. It is early morning here, and I was just lying in bed thinking about how I could get rolls out of that big mass of dough that is sitting in my fridge! Thanks so much and Happy Thanksgiving!

Stefan Bert said...
November 27, 2008 at 8:44 am

Happy Thanksgiving!
Great idea; I baked the buns the last minute and they were a delight to eat; oh, so much food tonight! Enjoy, best to you,
S & S

LJCohen said...
November 27, 2008 at 11:29 am

I wanted to make rolls, but the boys outvoted me. They wanted zataar flatbread. (My current favorite recipe from your book.)

I’ve made a loaf of this just about every night for the past 3 weeks. It never lasts for the next day.

Thank you for your book and your blog!

Deborah Ellis said...
November 28, 2008 at 3:51 pm

I love the breads I’ve made from this book, and I want others to learn from one big mistake I made! I don’t know why, but I used a glass Pyrex pan (instead of a metal broiling pan) for the water on my first try and it exploded when the water hit it. It was a mess and I had to throw out my boule as it was filled with shards of glass! So please don’t do what I did and you will enjoy your bread so much more!

Thanks for the great book!

jeff said...
November 28, 2008 at 3:56 pm

Thanks Deborah, and welcome to the site. The same comment appears elsewhere on our site, but may as well say it again… DON’T USE A GLASS PAN TO CATCH WATER FOR STEAM IN THE OVEN!

Thanks! Jeff

Laura said...
November 28, 2008 at 9:28 pm

I walked into my local bookstore
and one of the first things that caught my eye was a Mother Earth News magazine. On the front cover was a headline about making crusty bread in five minutes a day. Well, now they had my attention, so I just had to look. And guess what method the article was talking about! Congratulations on the article.

Lou Ann said...
November 29, 2008 at 10:22 am

How timely! We just made peasant dough rolls the other night. I slashed Xs into the top, and let them rise on my cornmealed peel with their shoulders touching, in a little cluster. They were easy to slide onto my baking stone and came out so pretty, with crusty tops and soft sides where they were pulled apart from their mates. Yum.
I was wondering if and when I should brush with butter (though we didn’t miss it in the eating) – thanks for the play-by-play!

zoe said...
November 29, 2008 at 8:19 pm

Thank you Laura,

we are so excited about the article! I grew up reading that magazine so it was so fun when they said they wanted to do a piece on us.

Hi Lou Ann,

Your buns sound fantastic. I love that they were all snuggled together. I bet they were wonderful!

Best, Zoë

Mandy said...
December 4, 2008 at 7:58 am

Thanks for the info… I make the dinner rolls all the time, but my kids really went wild for the soft tops from the melted butter.. Love it! (my daughter was even impressed b/c they looked like “real” rolls- not like when I slash the tops!)

I had 2 left over and they reheated nicely in the oven for my lunch the next day.

Thanks again for all the new ideas.. .still baking and loving it here!

Mary said...
December 7, 2008 at 5:22 pm

Thank you so much for this book! Our church provides meals and hypothermia relief to the needy and homeless. For a long time, we’d wanted to bake bread–but lacked equipment to knead dough on a large scale. About a year ago, I heard you on the radio and downloaded the recipe from the internet. Once I tried it, I realized that this was the ticket. We now make bread dough in large quantities, in Home Depot paint buckets (humorously labeled “Give us this Day Our Daily Bread”). A triple quantity of the basic recipe will feed about 50, gives the comfort of home cooking and costs about $5!

Now we’ve just made rolls from the regular recipe, without the butter wash or much shaping (it is a quantity effort we’re doing). We do dust with flour (as on the onion roll recipe in the book) and use flooring tiles as cooking stones (they fit better in our stoves).

We may try this version, but the standard instructions work very well too! Thank you for coming up with an approach that lets us bring comfort to so many of those who need it!

jeff said...
December 7, 2008 at 5:35 pm

Thank you for writing Mary, this is very inspiring this time of year. We’ve gotten a few other notes from people who are using this to do bread on a massive scale, but never quite so charitably. Jeff

Darkgardyner said...
December 11, 2008 at 10:31 am

I am absolutley thrilled with the results I have had using your recipe and techniques! I first heard about your book through my new issue of Mother Earth News. I haven’t bought a loaf of store bought bread since! BRAVO!!!

jeff said...
December 11, 2008 at 11:34 am

Hey DG, welcome to the site. Thanks for all the kind words. Visit again ANYTIME you have questions and post into any of the “Comments” fields, doesn’t matter if it’s related to the post. Jeff

Kathy said...
December 21, 2008 at 3:56 am

If you like rolls you can also make clover leaf roll in a muffin tin. Just take smallish, golf ball sized pieces of dough, roll into ball and throw into a greased muffin, three to each section. They come out great and kids love to pull the pieces apart.

Kathy said...
December 21, 2008 at 3:58 am

I use only food grade buckets and found some nice ones at Sam’s Club in a package of 3 for around $10. I have also found food grade buckets at a restaurant supply store.

jeff said...
December 21, 2008 at 7:14 am

Great tips, Kathy, thanks!

Joannie said...
December 28, 2008 at 10:47 am

Now that we’re celebrating our snow-delayed Christmas, I want to make some classic soft dinner rolls, the kind that you make in a 9″ cake pan and then pull apart. I have a batch of the Soft American-Style White bread rising, but I haven’t been able to find any conclusive information about how much of the dough to use and how many rolls to put in each pan.

Because you are so fantastic about replying to comments, I thought I’d ask. Thanks for any tips you can provide.

jeff said...
December 28, 2008 at 11:16 am

Joannie: Zoe’s the bun expert, but I know she’s out of e-contact for much of today, but I’ll tell her to look for your reply here. Jeff

zoe said...
December 28, 2008 at 11:40 am

Hi Joannie,

Happy belated Christmas!

I’d follow the directions for these buns and put about 8 of them equally spaced in the pan. You may even squeeze in 10. If you put more in the pan they will spread less and rise upward more. Bake them for about 20+- minutes or until the buns in the center are firm to the touch. If you want them to be soft then brush them with melted butter as they come out of the oven.

Enjoy!

Zoë

Joannie said...
December 28, 2008 at 12:30 pm

Thanks to you both! I’m going to start shaping them now.

Joannie said...
December 29, 2008 at 8:20 am

The rolls were a huge hit! Thanks again for your help. I posted a picture at http://poe-query.blogspot.com/2008/12/how-we-roll.html.

Terry Verstuyft said...
January 12, 2009 at 8:18 am

Hello Jeff, I recently purchased your wonderful book from “book of the month2″ and have been avidily and happily making bread. I always shied away from the old methods as i never got good results. But your methods have changed all that. The question i have is my husband has a traditional sour dough started that he made and he wants me to incorporate it into the artisan bread. As a rule you add the starter by the cup full to a traditional recipe but i don’t know what or how i should add it to the Master Recipe in your book. I hope this can be done. Please let me know if you can.

jeff said...
January 12, 2009 at 8:53 am

Hi Terry, welcome to our site! I’ve experimented with natural starters and they definitely work in our method. They’re finicky if you try to add zero packaged yeast, but they work beatifully as an additive to the dough– adds lots of flavor and you can cut the yeast significantly. I’ve used up to two cups of starter in the Master Recipe (page 26), but you then have to adjust the water and flour levels to keep the consistency at the level of the original recipe. All depends on how runny your starter happens to be.

It’s takes a bit of experimentation, which is why we didn’t put it in the book. But sounds like you and your husband should be able to pull it off. Jeff

Terry Verstuyft said...
January 12, 2009 at 2:46 pm

Hi again Jeff, we will certainly be trying it and will post the results as soon as i get some baked. Again, thanks so much for your book. I guess you have made artesans out of all of us on some level. Thank you, sincerely, Terry V.

jeff said...
January 12, 2009 at 5:21 pm

Terrific Terry, thanks again.

Doris Fusco said...
January 22, 2009 at 12:31 pm

Hi Jeff and Zoe,
I purchased your book for myself to give me something to experiment during the winter months. I thank you two so much for taking the insecurities of baking bread away from me. I can actually do this and produce a fabulous product, just amazing! We love the peasant type breads and my husband, always the skeptic,just loves the loaves i bake.
As i write this email,i am baking cinnamon raisin loaves and the question i have is, when rolling out the dough to the suggestion measurement of 8×16″ rectangle, is there a trick to roll the dough to achieve this shape. I always end up with an oval. Should i cut to the size or no? The loaves are just rising now and they are filling in nicely as they are resting. Maybe it doesn’t matter? I have made a cinnamon loaf before but with another recipe. I suspect the kneading that was requested, hardened the dough and the end result was very dry and the loaf hardly changed it’s shape or size after it was baked. I see a difference already using your buttermilk dough recipe. Cannot wait to try it.
Doris, ontario, canada

jeff said...
January 22, 2009 at 1:17 pm

When Chef Zoe does it, it turns out as more or less rectangular. When I do it, it’s pretty oval, but I find that it doesn’t matter. The key is to completely roll in the fillings, and the oval does the trick.

The real answer is: experience. You have to roll with perfect pressure in two directions, and then apply a roll or two into what will be the corners of the rectangle.

But as I say, not crucial. Thanks for the note, Doris.

Richard F. Rebel said...
February 27, 2009 at 2:25 pm

Hello,

I want to make Brioche hamburger buns, or even simply sandwich or dinner rolls.

Do you think this parchment paper on baking sheet method would work for the Brioche dough? Has anyone tried?

Thanks!

Richard

jeff said...
February 27, 2009 at 2:34 pm

Richard: Parchment or a silpat are great options for brioche dough. In general we don’t put brioche dough directly on a stone, too delicate and prone to scorching. Cookie sheet’s also fine.

Bake brioche at 350 degrees F.

Janet said...
March 28, 2009 at 5:24 pm

Hi Jeff and Zoe,
I would like to make only two 4 inch soft hamburger buns out of my deli rye dough. If I bake these on a parchment lined cookie sheet,at what temperature should I bake them and for what length of time? (I did bake my loaf of this rye at 450 on a stone.. with the broiler pan for steam.but I would prefer that these be soft rather than crisp. Thanks for your reply!

zoe said...
March 28, 2009 at 6:01 pm

Hi Janet,

If you want them to be softer then you can bake the buns at 375-400, for about 20 minutes, without steam. When they are going in and/or out of the oven you can brush them with butter and it will soften the crust.

Enjoy! Zoë

Janet said...
March 29, 2009 at 10:53 am

Zoe or Jeff,
My post above mentions baking hamburger buns that would be about 4 inches in diameter. How many ounces should I allow of raw dough for each one? These would be made from any one of the nonenriched doughs in the book. Thanks for your help.

zoe said...
March 29, 2009 at 4:00 pm

Hi Janet,

I think a 3 ounce ball of dough will get you a 4-inch bun.

Enjoy! Zoë

Mary said...
April 12, 2009 at 7:33 am

I just made a batch of rolls using the European peasant dough that turned out great. I still slashed the tops and did not brush with butter, so they would be crusty. I would like to make another batch of rolls using the roasted garlic potato dough, and brush with butter, as a softer option. How long would I bake them if the dough is not refrigerated? If the dough is refrigerated?

jeff said...
April 13, 2009 at 4:55 am

Baking time doesn’t change measurably so long as you do an adequate rest. It’s the resting time that changes. You can do with a shorter rest time if it’s non-refrigerated dough; let’s say 40 minutes refrigerated and 20 non.

Diana said...
April 19, 2009 at 10:32 pm

I just made a batch of hamburger buns with the European Peasant dough (it was what I had) and they turned out great! Before baking I brushed them with egg wash and sprinkled sesame seeds on their tops. When they came out, I brushed them with melted Smart Balance. They were soft, yet had some body to them, too, because of the whole grains in the dough.

I’m going to try both hamburger and hot dog buns next using the Soft White Sandwich dough. I think they’ll be perfect!

I was thinking about your method today and wondering why it makes such a huge difference for so many of us and I came up with this: I have many, many recipes for all the fun things I’ve been making lately but I hadn’t gotten around to them before because the investment of time to make one batch of dough that may or may not turn out (when you’re trying something different for the first time, like pita or English muffins) makes that batch “expensive.” Not monetarily, but emotionally. Now that I have buckets of dough sitting in my fridge, dough is “cheap.” So what if the pitas don’t turn out? (They did, and were amazing!) There’s more where that came from, with no waiting.

I’m having fun!

jeff said...
April 20, 2009 at 7:22 am

Diana: Exactly, that was what we were hoping for. Traditional method means all that work = one precious loaf. Doesn’t work for most of us.

Thanks Diana!

Rebecca said...
June 15, 2009 at 4:52 pm

In looking for this post a second time, I’d come to wish it was tagged “rolls” or something similar. Thanksgiving buns just didn’t come to mind :) Just a helpful (hopefully) suggestion. PS. the first time they were a HUGE Hit!

Mandy said...
October 18, 2009 at 10:54 am

I was wondering how to bring these to my mom’s house for dinner… If I baked them at home would I just reheat them in the oven at her house on a cookie sheet?
thanks! counting the days till the new book.

jeff said...
October 18, 2009 at 11:35 am

Might be nicer to par-bake them (partially bake) them, till set in the center but not yet turned color. Finish the baking in pre-heated oven at mom’s.

I’m not a big fan of re-heating fully baked breads, they tend to be a bit dry for my taste. But a lot of people don’t agree with that… Jeff

Mandy said...
October 19, 2009 at 5:00 am

Yes, fresh is better.
would a bucket of cold dough be ok on a 45 minute drive there?
problem is no fridge space when I get there so I would have to shape right away… would a longer rise be ok?
thanks so much!

jeff said...
October 19, 2009 at 11:26 am

I do that all the time. In winter, it’s not going to loosen up very much unless it’s inside the cabin with you. Trunk will be kind of like the refrigerator, depending on where you live.

If it’s a cold trip, longer rise after shaping (eg., 90 minutes) will be fine. Jeff

Mandy said...
October 19, 2009 at 12:53 pm

thanks for helping me work this out!

Katrina said...
November 23, 2009 at 9:17 pm

Hello again! Just put in a batch of the cornbread and was planning on making it with the cranberries. Is there a way that I could actually make that into the pan d’epi? I think that would be so pretty and so nice. Thoughts?

jeff said...
November 24, 2009 at 8:37 am

Katrina: Cutting epi’s is great fun and I’d give it a shot. I’m guessing that particular dough is a bit too soft to hold a good shape for this, but may be worth the experiment. Jeff

Mary said...
December 1, 2009 at 4:52 am

IDoes the dough need to be punched down at any time? I saw no reference in the book about that.
Thanks

jeff said...
December 1, 2009 at 5:52 am

Mary: Never punch down our dough! You’re trying to trap and retain all the gas from the initial rise; that’s what sustains rise-ability over the storage time in the fridge.

Jeff

Margot said...
December 1, 2009 at 3:59 pm

Just double checking…if I want to make crusty rolls like I ate in Europe, I can make boule dough, shape into rolls instead of one big round, rest for 40 min., bake with steam? Does that sound right?

zoe said...
December 1, 2009 at 10:48 pm

Hi Margot,

Here is a post on making crusty rolls: http://www.artisanbreadinfive.com/?p=536

Enjoy, Zoë

Katrina said...
December 8, 2009 at 7:32 am

Hi, guys–

My mother used to make some awesome peanut butter donuts which was PERFECT for snowy days like today in Kansas. Can you give me a couple thoughts on adding peanut butter to one of your recipes? Which one would you add it to and in what quantities? Thank you!!

Katrina said...
December 8, 2009 at 9:59 am

I did want to add that the cornbread worked nicely for the epi. I have no pictures but I’ll do it again, I’m sure!

jeff said...
December 8, 2009 at 1:42 pm

Katrina: I’m guessing that peanut butter has about the right consistency and liquid content to do well in our recipes. Try about a half-cup per batch and see what you think, leaving everything else the same. You could increase from there if there’s not enough peanut flavor. The concern would be density… if you’re using the 1st book you may need to add some vital wheat gluten as in our 2nd book. Jeff

Katrina said...
December 9, 2009 at 5:04 am

Thanks, Jeff. I actually went ahead and made it and it’s super. We made doughnuts out of it and plan to do something different today as we’ll have another grand snow day. I put in almost a cup and it was fine. Next time I may add more but I am thinking as the roll with the ganach, it will be fantastic. Thank you for your help. We appreciate you guys and all the work that you do and I have been recommending your book to everyone I talk to and have gotten a few onto the method.

Thank you as well for your awesome customer service!

jeff said...
December 9, 2009 at 8:27 am

Katrina: So glad your mom’s peanut doughnuts worked with that much PB. I was being too conservative.

We love connecting with readers here, it’s really been fun and it certainly differentiates the book from other cookbooks. As far as I no, no one is doing this— at least, not like this. Jeff

Carol H. said...
December 16, 2009 at 11:04 am

Hi – all I can say is a BIG thank you for writing the first book (I have yet to purchase the 2nd). My husband always asks for Vermont Cheddar whenever I say, “What kind of bread shall I bake?” My grandchildren (19 in all!) go wild over it. I’ve baked bread for 49 years and this is the best set of recipes yet!! Thanks a bunch! C.

zoe said...
December 16, 2009 at 6:24 pm

Hi Carol,

How wonderful, thank you for writing! I agree with your husband, I love the cheddar bread.

Thanks, Zoë

Barbara said...
January 11, 2010 at 8:34 am

I recently bought both of your books & read them in 2 days. I first made your Pecan Sticky Buns & they turned out wonderful. I made the rest into dinner rolls. Great results.

I just mixed up the Whole Wheat Flax Bread & can’t wait to try it.

I grind my own wheat & use hard white winter wheat kernels. I’m wondering if that flour will be OK & if that is also what you call “white” whole wheat flour in some recipes.

Next, if it’s not OK, which type of wheat kernel would you recommend?

You’re both so generous to spend so much time – not only to experiment for the books & write them, but to answer questions here. I’ve been baking bread for many years & your method is the BEST!!!

jeff said...
January 11, 2010 at 9:29 am

Barbara: If the wheat you’re talking about has a very light outer bran, that’s it. Try to use the lightest-in-color bran you can, and you’ll start to get to what KAF and other brands are calling “white whole wheat.” It swaps for regular whole wheat, not all-purpose white flour. Jeff

Barbara said...
January 13, 2010 at 6:31 am

Thank you, Jeff. It is light. We loved the Whole Wheat Flax Bread. I made one similar the traditional way. It had a lot of seeds in it, so next time I’ll add seeds & it will taste the same.

Write a comment