intro copy

The homemade bread revolution continues, with healthy new recipes…


… ARTISAN BREAD IN FIVE MINUTES A DAY taught busy people how to make great bread at home, with only five minutes of active preparation time. Now, HEALTHY BREAD IN FIVE MINUTES A DAY whips up fabulous breads made with more whole grains, fruits and vegetables. The secret? Mix up a lightning-fast batch of moist no-knead dough, save it in your refrigerator, tear off portions over the next week or more, shape, and bake.

click to purchase

Click to purchase

store logos

amazon

Follow us on Twitter


Red Star Yeast

Recent Posts

Categories

Links:

Baking Bread in a Dutch Oven! (see post below for winner of the book giveaway!)

Print | Email | by Zoe, March 11, 2009
Filed Under Special techniques, bread questions | 307 Comments

dutch oven bread

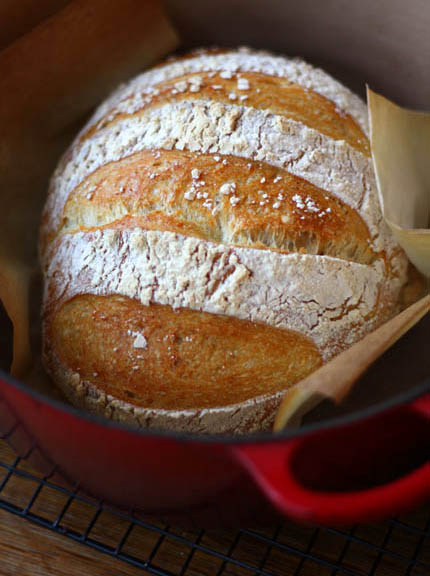
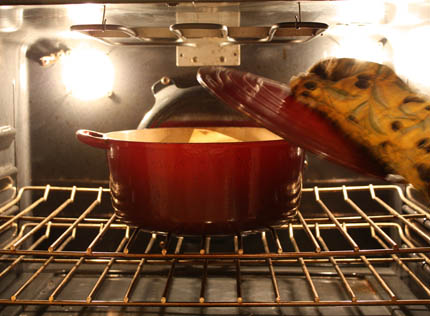
Here is yet another way to get a fabulous crust on your bread without using any steam in the oven. I mentioned my very unsophisticated disposable lasagna pan as an option and now I present you with yet another ingenious idea. Baking bread in a Dutch oven was made popular by a Mark Bittman’s article in the New York Times  about baker Jim Lahey. He introduced home bakers to a professional style bread that didn’t require a steam injected oven.  All the iron-pot methods are based on the old European technique of baking inside a closed clay pot.  Most people don’t have one of those, but enameled cast-iron pots are readily available– and they trap all of the internal moisture in the dough and that creates the steam you need to get a crisp and shiny crust. It really is fantastic and it works perfectly with our stored doughs from the book.

As you can imagine, the only drawback to this method is that you are limited to a bread that is the shape of your Dutch oven. Luckily, Le Creuset has several shapes to choose from and I’m determined to try them all! The company even sells a special knob that can withstand the 500°F baking temperature of this method. All of these items (including the metal replacement knob) are available in Minneapolis-St. Paul at Cooks of Crocus Hill or nationally through Amazon (which offers a 7 1/4 quart pot, a 6 3/4 quart oval,  a two-quart, and others.  There are other brands, but I have not tried them!

dutchoven

Using a metal replacement knob is really essential to baking with this method, the hard plastic knobs will smoke at 500°F.  Otherwise you’re limited to the maximum temperature recommended by Le Creuset (usually 450 degrees), and the crust won’t get as crisp.

dutchoven

Preheat the pot with the lid on to 500°F for about 20 minutes.  I used a 7 1/4 quart pot to bake a 1 1/2 pound loaf of bread.

dutch oven bread

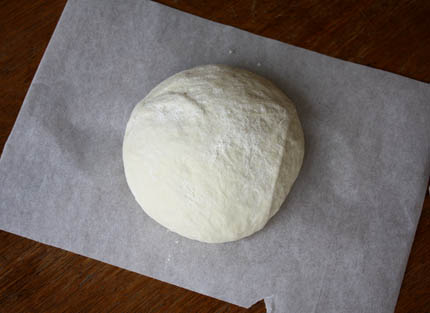
Shape your boule from any of the non-enriched doughs from the book and allow to rest on a piece of parchment paper as suggested in the recipe. I used the master recipe for this loaf and let it rise for about 1 hour and 20 minutes, because it was larger than normal. I find it easiest to get the dough into the very hot pot if I can drop it in right on the paper.

dutch oven bread

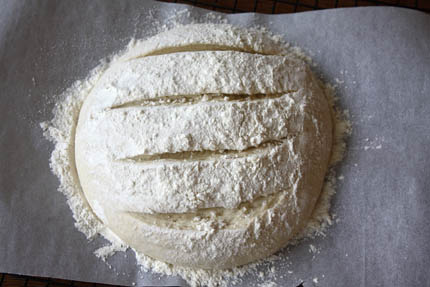
Slash the dough 1/4″ deep.

dutch oven bread

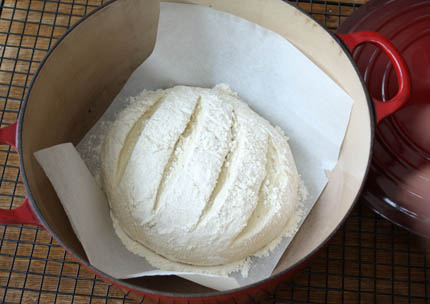
VERY carefully lift the dough and drop it, with paper and all into the preheated pot.  This can be awkward the first time you do it. I took the pot out of the oven and rested it on a cooling rack so that it was at a comfortable height to get the dough in without fear of touching the hot pot! It is very easy, but just be careful! Replace the lid and slip it back into the oven.

dutch oven bread

After 15 minutes of baking remove the lid. The dough only needs to bake in the steam for that amount of time. now it is time to get a lovely caramel color to the bread. Turn the heat down to 450°F and bake for another 15-20 minutes, depending on the size of the loaf.

dutch oven bread

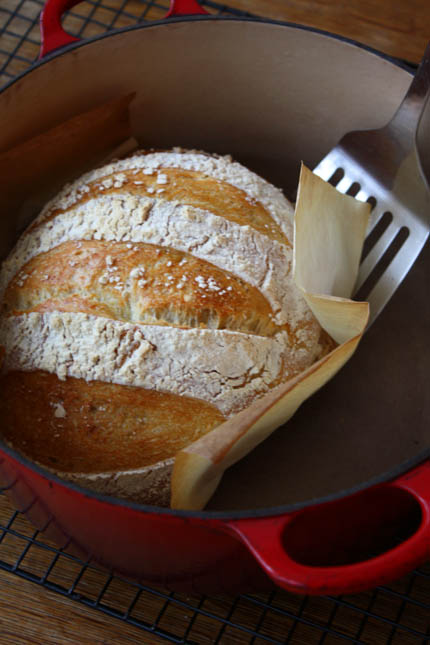
Once the loaf is nicely browned, carefully remove it from the pot with a spatula.

dutch oven bread

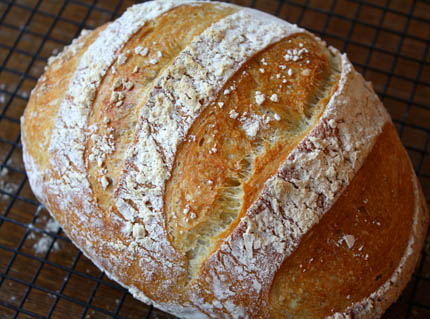
Peel off the parchment and allow to cool on a cooling rack.

dutch oven bread

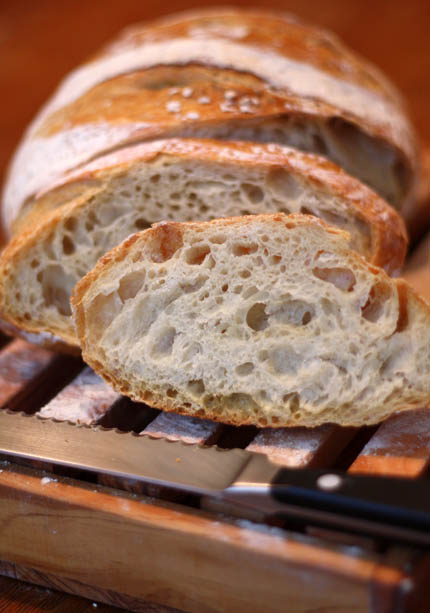
Once the bread is totally cool, cut and you can see how fantastic the crumb is! Enjoy!!!


Comments

Victoria said...
March 11, 2009 at 7:52 am

I have another brand of dutch oven. I wonder if the metal replacement knob would work on mine, or if I can find one for my brand. I really want to try this method! Love all the continuing info you guys give us!

Bryan said...
March 11, 2009 at 7:54 am

I’ve been using your book’s recipe with Lahey’s cast iron method for awhile, and it’s worked pretty great. I actually cover the knob with aluminum foil completely, which protects it from the heat (I don’t have a Le Creuset, though the cast iron dutch oven I have does have a plastic handle). Have not had a problem yet. You can also remove the knob in most cases, but that makes it harder to put the lid on. Also, the parchment paper is a good idea, but not necessary if you don’t have it. Have baked it many times without it.

jeff said...
March 11, 2009 at 8:00 am

Victoria: I wouldn’t bet on having that Le Creuset knob fit on a non-Le Creuset pan. Better check it out in an actual store rather than buying on-line.

Bryan: The Le Creuset plastic knobs are rated to 450, so another option is to bake at the lower temp but the crust won’t be quite as good.

Jean Gogolin said...
March 11, 2009 at 8:27 am

I made this bread for the first time yesterday, added 1/4 cup too much water by mistake, and aside from the dough’s being hard to handle, it was perfect. Baked it in a copper pot with lid.

charles said...
March 11, 2009 at 8:34 am

I’ve been using this method with a Tramontina enameled dutch oven (can’t beat it for $40) for about a month now — ever since I bought the book. Works fabulously.

I replaced the knob on the oven with a metal cabinet knob that I had laying around the garage. I’m pretty sure that you can use the LC knob with this (and other) dutch ovens, but you may have to get a different length screw to attach it with.

Sheri said...
March 11, 2009 at 9:00 am

Thanks! I’ve been wanting to do this for a long time – RLB posted a similar article on her blog a while back (http://www.realbakingwithrose.com/2007/01/baby_breada_great_new_techniqu.html). I need to get a new knob though. :)

Barb said...
March 11, 2009 at 9:10 am

Wow – there is no end to the ways to be using your bread recipe. I will be trying this method this summer camping… I figure if I put the lid of my dutch oven upside down and put hot coals on it – making the bread a bit flatter, I could probably make it work!

I’ve been playing with some bread sticks too – you might like to see my new ‘twist’ on them if you have a moment. I’ve posted a step by step on my blog at

http://www.lalalime.blogspot.com

Thanks for all the new ideas – I have not bought bread for several months!

Chris said...
March 11, 2009 at 10:31 am

just curious, the manual that came with my LC says to never heat an empty pan because you can cause permanent damage to the enamel and pan.

Angus said...
March 11, 2009 at 10:47 am

Love the book. I’ve been using a similar method for a bit — though no fancy Creuset here… I use an 18″ covered Granite Ware roasting pan, $13 from Amazon.

Advantage of the 18-incher is it’s long enough for a nice size french baguette. Simply stretch master dough, rest on parchment, and bake covered for 25 minutes (ish) and uncovered for 12-15 (ish) more.

Perfection.

zoe said...
March 11, 2009 at 11:50 am

Hi Chris,

I just emailed the people in the know at Le Creuset and they said that the pots are just fine with the empty 500°F pre-heat. Just be sure you have a metal knob!

Thanks for the great question!

Zoë

Brenda said...
March 11, 2009 at 12:30 pm

I gained 10lbs when I bought your book so I am taking a break from bread, but when I return to carbs, I really want to try this method. Do I understand that this can be done in a cast iron pot? Sounds great!

Erika Kerekes said...
March 11, 2009 at 1:18 pm

I bake all my bread in a cast iron dutch oven, which has a glass (or maybe Pyrex, not sure) lid. I love it!

Kathy – Panini Happy said...
March 11, 2009 at 2:12 pm

Thanks for the great tip! It seems I’ve been…um…forgetting to pour the water into the tray with some of my loaves, so perhaps this will help ensure I incorporate some steam in my bread baking! Just need to get one of those metal knobs.

Mary R said...
March 11, 2009 at 3:31 pm

I actually split the plastic knob of my Le Creuset the first time I made Lahey’s no-knead bread. It wasn’t the end of the world, though. If you do that, you can call Le Creuset and they’ll send you a replacement, no questions asked. For a few dollars, they’ll send you a metal one. Mine came with screws, so if you did get a metal Le Creuset knob to modify the knob of another oven brand, the screw likely won’t be the issue–the size of the hole will. ‘Course, the screw hole for the lid of any decent Dutch oven shouldn’t be too big.

nads said...
March 11, 2009 at 4:17 pm

ive been using this method too lately after i came across ‘the magic bowl’ method. a ‘toxo bread’ had made your boule by the same method you’ve mentioned above but using a pyrex bowl. i tried it in my large oval glass baking dish (with lid).
i forgot to preheat it with the oven though but tried it anyway and that was the first time my scoring had opened up so much.
i also tried it with my mum’s bassema pot and covered the knob with foil but there was a smoky smell (must’ve missed a spot) but the bread turned out wonderful and again really opened up.

nads said...
March 11, 2009 at 4:27 pm

by the way i forgot to ask how old was your dough (because of the crumb)?
also, the bottom of my bread always gets shaped by the baking paper. the baking paper bunches up around the dough and ends up influencing the final shape.
thanks

Bill Funkhouser said...
March 11, 2009 at 6:21 pm

I use this method whenever I am baking indoors instead of in my wood fired oven. It is absolutely the best way to get the steamed crust that professional bakery ovens achieve. Thanks for posting such a clear description of the process. I usually let my bread rest on the parchment, INSIDE a bowl. I think it helps the bread keep its shape better than resting flat on the counter. I will link to this as well as your book on my site. Keep up the good work.

Bill
http://www.woodfiredpizza.org

Tres Amie said...
March 11, 2009 at 7:09 pm

Maybe you could simply cover the Dutch oven with foil?

zoe said...
March 11, 2009 at 7:17 pm

Hi Brenda, Yes a cast iron pot, with or without the enamel, with a lid should work just as well. Let me know once you have tried it!

Hi Nads, This dough was 5 days old. My pot is quite a bit bigger than the loaf was, so the paper could lie flatter. I bet this is why it didn’t effect the shape of my loaf.

Thanks everyone, Enjoy the bread!

Zoë

zoe said...
March 11, 2009 at 7:43 pm

Hi Tres Amie,

I’m not sure if it will trap the steam well enough, but it is certainly worth a try!

Report back if you do it.

Thanks, Zoë

Ann said...
March 11, 2009 at 9:10 pm

Wow – look at the holes in that bread. I am jealous – I don’t seem to be able to get that. I make the basic white master recipe. Never bake the 1st day, usually 3rd or 4th is 1st time. Quickly shape it, let it rise for 30-60 minutes, then bake.

Any suggestions?? I do notice that during the week, the dough sometimes seems to lose some of it’s volume in the fridge. I use a rubbermaid container for my “bucket”.

Thanks – Ann

Ann said...
March 11, 2009 at 9:16 pm

I do get “great spring” from mine, just not holey enough!

Jocelyn Dennis-Milton said...
March 11, 2009 at 9:34 pm

I found your fabulous recipes in Mother Earth News and immediately bought your book. My family and I thank you for your contributions to our culinary delight! However, one question that is not made clear…in the recipe for 100% Whole Wheat Sandwich Bread (pg 76)…you mention that this recipe is also good for the freeform artisan loaves. If I am making the loaves this way, should I follow the standard boule technique, using only one pound portions and allowing a forty minute to 1 1/2 hour rest, then baking for 30-35 minutes at 450 degrees? Or should I be following the exact given instructions without using the actual baking pans: 1 1/2 lb. loaves, 1hour 40 minute rest, and 50 to 60 minute bake time at 350 degrees? I would appreciate your assistance with this. Thank you so much for your help!!!

Melissa said...
March 12, 2009 at 2:53 am

After cracking my stone on my very first loaf of bread, I’m a little gun-shy to use another stone and have it break, too. So this is brilliant! I’ll be buying a cast iron pot sometime this week. In the meantime, I’ve been using the cracked piece of stone, and it did work out okay, but it’s not very big :)

Julia said...
March 12, 2009 at 7:07 am

Jeff & Zoe:

I wanted to ask a question about the buttermilk bread recipe in the book. I made some last week — it tastes, predictably, wonderful — but I found that my crumb was a bit dense and I didn’t get a good deal of rise in the loaf. I made all 3 loaves at different times during the week, letting them all rise for at least the time indicated in the recipe… but none of them rose above the top of the baking pan during baking. I’m fairly certain I used the right amount of dough (about 1/3 of my container of dough the first time, half the next, although I’m not sure they were “cantaloupe-sized” balls) and before baking each loaf rose to fill 1/2 the baking pan — at least in the center. Any idea what my problem might be?

By the way, I have successfully converted three people to your baking method. I’m working on others…this is too good not to share! :-)

jeff said...
March 12, 2009 at 9:13 am

Ann: It’s normal to have some loss of volume in the fridge. Try a longer resting time and I bet you’ll like the results better. Maybe 60 to 90 minutes and see if the crumb doesn’t open up for you. Also, check other approaches we’ve discussed on the website at http://www.artisanbreadinfive.com/?p=141

Jocelyn: For that WW loaf, you do need to lower the temp down to 350 or it scorches the crust. and you’ll need the longer rest and baking times as you say.

Melissa: As an FYI, Williams-Sonoma continues to offer a lifetime guarantee against cracking for their 14×16-inch stone– save your receipt if you go for this.

Julia: Our method depends more on oven spring for its loft than on pre-oven rising. In order to get a taller loaf, we’re telling people to fill them higher than we said in the book. Try 3/4’s full when first placed in the pan. And let it rest for 1 1/2 to 2 hours before putting it in the oven. Also, check other approaches we’ve discussed on the website at http://www.artisanbreadinfive.com/?p=141

THANKS FOR ALL YOUR COMMENTS!

Suellen said...
March 12, 2009 at 10:39 am

I have a Lodge cast iron dutch oven, with the traditional lid and handle? I’m assuming this would be acceptable to use as well?

Barbara S. said...
March 12, 2009 at 11:39 am

I have a large unglazed clay baker (large enough to do a chicken/dinner in), that I am “supposed” to soak in water before using for the steaming effect. (I am also supposed to put it in a cold oven. I am wondering if I could use this preheated without the soaking/steaming? Would the bread dough be enough steam?
I also have a Lodge cast iron chicken fryer, and a Club cast aluminum dutch oven. Would one of those be a better choice than the clay baker?

Maria said...
March 12, 2009 at 1:32 pm

Gorgeous loaf!

Rosemary C said...
March 12, 2009 at 7:18 pm

I have been using this method for a long time, but substituted your recipe for the Lahey recipe. I liked the time factor and the taste so much more. My Le Creuset dutch oven is the same age as our marriage(42 years) and I have never had a problem with the lid. Recently I purchased a Chantal dutch oven at Marshalls that cost me $9.99 and works just as well as my “antique” LC. I switched to parchment paper when I found it difficult to plop the loaf into the pan. I use your recipe and the same parchment paper method in my rectangular Le Cloche. Love the flour on top of your loaf. Thanks for the book and this great web site.

zoe said...
March 12, 2009 at 8:49 pm

Hi Suellen, Yes it should work beautifully!

Hi Rosemary, I love that you have been using your LC for 42 years! Bravo to you!!! Enjoy the bread!

Zoë

zoe said...
March 12, 2009 at 8:53 pm

Hi Barbara, they all sound like great options! I don’t think you need to soak the clay pot first. The dough will provide plenty of moisture to produce steam.

let me know how it goes! Zoë

Mev said...
March 12, 2009 at 9:49 pm

I have a lodge enameled cast iron dutch oven… I asked about replacement knobs and they instructed me to go to a local hardware store and pick up any stainless steel knob there. It’s worked like a charm.

Janice said...
March 12, 2009 at 11:04 pm

I have a Magnalite GHC anodized aluminum 7qt Dutch oven–metal handles and all metal lid. I’m assuming it’ll be okay at 500 degrees, but it’d be nice to hear if you know for sure.
(My first half batch of the basic recipe is in the fridge. I’ll be baking my first loaf tomorrow!)

jeff said...
March 13, 2009 at 5:18 am

Mev: Perfect, maybe a much cheaper way if the hardware store one fits your dutch oven.

Janice: Best way to check is to go back to the manufacturer and it’s usually on their website. If it’s sold on Amazon, usually all the specs are right there also.

clarice said...
March 13, 2009 at 7:07 am

Yes–I’ve been using this method with your recipes from the beginning and it works. I’ve used a variety of enamel coated dutch ovens and they work. So did a thick potterir pot and lid (an old Dansk one from about 1970). All work fine.

I like the notion of the roaster for baguettes that another poster suggested.

In years of trying to bake good bread at home, I have tried every oven technique and have found only the wetter dough cooked in a pre-heated covered pot works.

Brenda said...
March 13, 2009 at 9:51 am

I do this in my pyrex casserole with lid. Works fine. I have an oval baker and I use a half recipe, and get a lovely large loaf. I like the idea of the parchment, though, as I’d been using Lahey’s “dump it in” method and couldn’t slash the top.

Megan said...
March 13, 2009 at 11:27 am

I need help! I have been using your book with excellent results – buttermilk bread and brioche (including beignets), but I cannot seem to cook the pizza dough correctly. Either the bottom burns, even with a pizza stone, or the center of the dough is raw. What am I doing wrong?

Cheap Like Me said...
March 13, 2009 at 1:19 pm

My plain cast iron Williams-Sonoma covered deep skillet works fine, as does a Lodge cast iron Dutch oven.

I use a Silpat for resting to avoid throwing out a sheet of parchment paper every time. I wonder if I could plop the Silpat in the pan as you do the parchment?

Penelope said...
March 13, 2009 at 1:30 pm

where might I find info on cooking in a clay pot. I have a covered clay cooker and wonder if it would be acceptable to use. thank you.

Janice said...
March 13, 2009 at 2:32 pm

Thanks for the response. The Magnalite line is no more and I can’t find specs online. Rather than risk it, I’ll bake in an All-Clad stockpot.

CJ Tinkle said...
March 13, 2009 at 3:38 pm

I’ve been making your master recipe this way for some time now, I use an Emile Henry clay dutch oven, works beautifully.

zoe said...
March 13, 2009 at 6:41 pm

Hi Brenda,

I like the fact that you have more control over the dough if you use parchment. Be sure to put quite a bit of flour under it before you rest your dough or some parchment paper will stick to your loaf.

Hi Megan,

I wonder if you are rolling the dough out thin enough? How long are you baking the pizza? This is very curious, most people have the opposite problem of the bottom crust not crisping enough. I’d love to figure out what you are doing differently.

Thanks, Zoë

zoe said...
March 13, 2009 at 6:44 pm

Hi Cheap like me,

Hmmm, this is an interesting question. Some silpats say that they can stand 500°F, but others say only 400°F. Be sure to check which yours is before you throw it in a 500°F pot.

I’ve never tried this method, so I’m not sure how it would work?

Thanks, Zoë

zoe said...
March 13, 2009 at 6:45 pm

To everyone interested in baking in the CLAY POT. Jeff just got one and is going to do a post on it soon! Stay tuned!!

Thanks, Zoë

Nina said...
March 14, 2009 at 1:00 am

Do you ever give your resting loaves a little nudge if/when they start to spread out to the sides? How to you keep them so round?

aprendizdepanadera said...
March 14, 2009 at 1:50 pm

I have already tried it!

Regards from Spain!
marga – aprendizdepanadera

Judy Caudill said...
March 14, 2009 at 2:05 pm

I love your bread book. Every recipe I’ve tried so far has turned out great even the pizza dough, however, the frustration level is too high. I can’t get the pizza into the oven without it folding over or like last night I lost most of the toppings on the oven floor. What if I put the pizza in a pan? What about aluminum foil as parchment paper will only take a 420 degree oven? HELP! I’m determined to make a great pizza on Friday nights.

Annie said...
March 14, 2009 at 5:19 pm

Hey,

What about folks (i.e. college students) who don’t have a baking stone or a fancy dutch oven/clay pot?

I have old cheap cookie sheets… so I’m going to try that with parchment and the disposable lasagna pan method. Any alternative suggestions?

sue l said...
March 14, 2009 at 5:34 pm

By the way I think I love you guys! a few questions -do you think I can exchange any more King Arthur’s white whole wheat flour for white flour in the light whole wheat dough recipe?

BTW it was the metal peel that was causing the problem in the pizza recipe. The wood peel made all the difference.

Mo S said...
March 14, 2009 at 7:07 pm

Have been making the Bittman recipe for a bit (although I just got my copy of Artisan Bread in the mail yesterday and am very excited to start!)

I have an oval pot Le Creuset (I got it for free, from a neighbor who didn’t like it). For the final dough rising, before it goes into the hot pan, I made a form that exactly matches the bottom of the pan out of a cardboard drywall shim (individual cost at Home Depot:$0.02 each. These are flexible cardboard strips, about 2″ wide and about 4 feet long. I laid the strip inside the pan, cut it to length and then stapled it together.)

I put the form on the counter, line it with parchment paper, drop the dough in, cover with a kitchen towel and let rise. When I’m ready to put it into the hot pan, I lift the dough out by the parchment paper and drop it in to the pan.

The parchment paper gets brittle but hasn’t burned yet, in about 25 loaves.

I also have a sourdough starter I use (I add a cup to the wet dough without making any other changes).

jeff said...
March 15, 2009 at 9:15 am

Nina: I don’t nudge them to keep the shape, I think it’s a matter of technique– see our videos (but you’ve prob done that– http://www.artisanbreadinfive.com/?page_id=63). If it continues to spread sideways, mix up your dough a little drier– increase the flour by a quarter cup and see what happens.

Aprendiz: Thanks for trying our stuff!

Judy: Pan pizza is great… pre-heating a cast-iron skillet, then dropping the dough works well. Another way is to bake the crust “blind,” that is, without toppings. Go 5 to 8 minutes, take it out, top, then slide back in– it won’t fold or otherwise be difficult.

Annie: Cookie sheets are a good way to start. If you can take it off the sheet and finish on a bare shelf once it sets, all to the better.

Sue: If you increase the WW, increase the water too, or it will be dry. Keep the consistency like our Master and you’ll be fine. See also http://www.artisanbreadinfive.com/?p=142

Mo: Cool ideas, thanks!

Joy said...
March 15, 2009 at 11:53 am

Jeff and Zoe

I bought the book locally, because I wanted it soooo bad. I made a batch. The first night I bake a loaf on my baking stone. Last night my grandson was here, and we made our own little pizza’s, we had so much fun, making, watching them bake, and best of all eating them. I have a small amount left from the first batch, and plan to make caramel pecan rolls in the morning. (They turned out great) I have also started a second batch. Love it so much, I don’t think anyone could mess up a batch. Thank you so much, I am glad I found “Artisan Bread in Five Minutes a Day”. I am a baker from way back, my mother had a bakery/diner and I have made all types of bread, and some of them take all day, believe me, I am starting to like to bake again.

Thanks again
Joy

jeff said...
March 15, 2009 at 6:24 pm

Thanks for all the kind words, Joy. Check back if you have questions for us. Jeff

Nina said...
March 16, 2009 at 12:06 am

Thanks Jeff. All of my previous batches have been make with AP co-op flour. My next batches will be made, as per your suggestion, with Gold Medal AP, and if that spreads sideways too, I will add an additional 1/4 cup.

clarice said...
March 16, 2009 at 9:21 am

Jeff and Zoe, I love the convenience of your bread and a number of your recipes are wonderful–the brioche and deli rye for example, but even though I always use the pot cooking method and let the bread rest for 90 minutes before baking, the texture of the boule made your way is frankly not as good as the bread made the Sullivan St Bakery way.
I wonder if letting the yeast rise for more than 90 minutes before refrigerating it would help? Have you tried that? Or, is it possible to double the Sullivan St recipe and let it sit overnight before refrigerating the dough.

clarice said...
March 16, 2009 at 9:23 am

I meant rise for more than TWO HOURS before refrigerating it…Sorry…

Jan said...
March 16, 2009 at 9:37 am

Such a timely article. My daughter lives in Romania and brought me a Romertopf clay pot for Christmas. I can’t wait to try your bread recipe in this. Today I stopped at a thrift store and there was a Romertopf clay pot for $5.99. You can believe I snatched that up immediately for a friend.

Barbara said...
March 16, 2009 at 11:07 am

I have been using a 7 qt Lodge cast iron pot since reading the Mark Bittman article a while back. So, when my sister gave me your book a few weeks ago (how could I have missed it!?!) I just adapted all of your recipes to the pot. Of course, sometimes I have to squish them in a bit, but it works fantastically well. I don’t bother with parchment paper. Thank you so much for coming up with your method Jeff & Zoe, you have made breadbaking a pleasure for me, my family and friends (who are coming out of the woodwork to enjoy my/your bread!) BTW, yesterday I made an amazing fougasse with parmesan, shredded mozzarella, meatballs, caponata and a little tomato sauce. I would have never been so adventurous if it weren’t for your guidance. Thanks again!

clarice said...
March 16, 2009 at 1:45 pm

I think I may have the answer to my own question. I went upthread and noticed I might have to add more water as I do use higher protein bread than you are using. I’ll try that.

clarice said...
March 16, 2009 at 1:46 pm

ugh–higher protein FLOUR..C

Toby said...
March 16, 2009 at 2:18 pm

Have been using my grandmother’s and aunts 70 year old cast iron Dutch ovens for this method for many months. I preheat to 450, slide the dough off the peel into the pot, quickly nudge it to shape and cover.
My neighbor Kris, a convert and devotee also uses this method. We think our method works just as well as using the stone and parchment.

zoe said...
March 16, 2009 at 8:33 pm

Hi Clarice,

I think the way to go is to allow your loaves to rest longer before you bake them. If the dough goes into the oven when it is still cold and dense you will not get the nice open crumb that you are looking for. As you can see from my pictures our dough will do that, but you have to let it rest long enough. See if that makes a difference.

Yes, you are right about adding more water to your high protein flour. The drier dough will make a denser bread. Try both things and I think you will be very pleased!

Hi Jan,

Write back and let us know how your clay pot worked out with the bread. I bet it will be fantastic!

Hi Toby,

I think if it makes a bread you love to eat than keep it up!!! ;)

Thanks everyone! Zoë

zoe said...
March 16, 2009 at 8:37 pm

Hi Barbara,

Thank you for the great note. So glad your sister got you the book and you are enjoying the bread. Your fougasse sounds incredible! It is amazing how people show up when there is fresh bread baked! ;)

Thanks, Zoë

Rosemary C said...
March 17, 2009 at 12:46 pm

HAPPY ST. PADDY’S DAY!!! I got an email from King Arthur Flour today. They had a recipe for a “Harvest Loaf” (long rising method) They used one of the Romertof (sp,??) bakers. After the long rising, they formed and put the loaf in the baker. They let it rise for two hours and then put it in a cold oven, setting the temp. to 450. They did soak the top of the pot, for extra steam. So…..I feel I can now use my Romertof, and your method. “May the wind be at your back, may the road rise up to meet you, and may there be bread at the end of your journey.”

jeff said...
March 17, 2009 at 1:51 pm

Rosemary: Crazy coincidence, my clay baker arrived today, and I’ll be testing it for a future post. I got the Sassafras La Cloche http://tinyurl.com/dhlms5, but these all work pretty much the same. Stay tuned! Jeff

Carol Voigts said...
March 17, 2009 at 8:55 pm

i’ve been using several different dutch oven types including a round clay pot and the chicken clay pot, as well as a le creuset, and even tried an old heavy alum. dutch oven (which got the bottom too brown). I can make all different shapes with the variety. I found that using one of those thin silicone sheets called “super parchment” I’ve been using the same one for over 1 year and it keeps working. Thanks for doing all your research on what steps we could eliminate! Wonderful. ps. I use 1/2 ww flour which I grind just before using it. or same with rye flour I grind.

zoe said...
March 17, 2009 at 11:13 pm

Hi Carol,

The “super parchment” is a great idea. Thank you for sharing!

Cheers, Zoë

Alison said...
March 18, 2009 at 5:06 am

Hi Jeff and Zoe
I’m hoping you can help me, I’ve tried your master recipe, and am not having much success, I figure there’s something I’m not doing right!! When I take the dough from the fridge, it is quite sloppy, and once formed to let rise, just spreads on the surface it’s resting on. It does rise in the oven, and is edible, but not what I expect. Is it just a matter of not making the dough so hydrated, so that it’s able to be formed as your pictures above show?? I’ll try this next time, but any help would be gratefully appreciated, thanks!!

Don Speranza said...
March 18, 2009 at 6:34 am

Great post on this bread. This is one of my favorite breads to bake. I’ve been using a Lodge cast iron (non enameled) Dutch oven which avoids the issue of the knob.
The parchment is a great idea. I had been proofing on a couche and sometimes the dough sticks.
Glad to have found your site…I’ll be visiting often.

joey said...
March 18, 2009 at 7:25 am

I have tried this method with the no-knead bread of the Mark Bittman article fame…I’m so excited that I can do this with your breads too! YAY! Can’t wait to try it!

Ann said...
March 18, 2009 at 8:26 am

I have a great covered casserole made by a potter Meg Campbell from up by Duluth. It is glazed, both bottom and top.

Do you think this will work for the dutch oven method?

jeff said...
March 18, 2009 at 2:08 pm

Allison: Any chance you’re using bleached flour? Cake flour? White Lily brand? Those are all too low in protein and don’t absorb enough water. If that’s not it, then increase the flour slightly. Quarter-cup? Then see what you think.

Don: Lodge is a nice product, I have their skillet.

Ann: So long as it’s oven safe to the temps we’re using here, you should be fine. I’d maybe keep it to 450 if you have any doubt. Can you ask Meg Campbell?

JT said...
March 18, 2009 at 3:24 pm

Off topic: Found your website and bought the book last week and I’ve been thoroughly impressed so far. The problem is that my wife has Celiac disease and can’t eat wheat, barley or rye and she’s jealous of my awesome bread. Have you guys experimented at all with gluten-free bread mixes? I’ve tried everything I can think of and nothing seems to produce bread that’s above average.

Barbara said...
March 18, 2009 at 6:20 pm

I was wondering if you had an area where we could post photos of our wonderful breads. I just made an awesome pizza and my husband insisted on photographing it before we ate it! Yes, it was that good! LOL! I would love to share the photo with you as it’s too late to share the pizza!

zoe said...
March 18, 2009 at 6:47 pm

Hi JT,

Tell your wife that we are on it! We are currently working on our second book and there will be a chapter on gluten-free breads. It will be out in the fall!

Thanks, Zoë

zoe said...
March 18, 2009 at 6:49 pm

Hi Barbara,

That is a wonderful idea! I’ll ask our webmaster what it would take to have a page where you could show off your breads and pizzas!

Until then you can send it to zoe@zoebakes.com. I’d LOVE to see your pizza!

Thanks! Zoë

Beth said...
March 18, 2009 at 11:44 pm

Hi – re: your Master Recipe Boule, what weight of a cup of flour was your recipe written for? I’m a weigher, not a cup-measurer, so I’m interested in what degree of hydration the recipe intends. I’ve VERY disappointed that your recipes only specify volume measurements and omit the weights.

Thank you,

jeff said...
March 19, 2009 at 4:11 am

For the Master Recipe, it’s 2 pounds of unbleached AP flour with 1.5 cups of water (75% hydration). That’s very close to 5 ounces per cup of unbleached AP, measured by the scoop and sweep method. Other resources at QA Types of Flour, Weights, and How Much Water To Use: http://www.artisanbreadinfive.com/?p=140

redmenace said...
March 19, 2009 at 8:21 am

This bread looks perfect! I often make the no knead bread in my dutch oven but it never looks pretty. Now, it will!

clarice said...
March 19, 2009 at 10:19 am

zoe–I regularly have been letting my loaves rest for 90 minutes. Yesterday I tried leaving one in the fridge all day covered with saran wrap before baking and the dough opened up more..(It was still from a batch of high protein flour dough to which I should have added more water.)
Next week I’ll be thru this batch and I’ll try more water–or a different flour, ninety minutes rest and all day in the fridge to see if I can get an even better crumb.

Although to date the crumb on my zoe and jeff breads is not quite as good as the Sullivan loaves but they are delicious..and your deli rye and brioche doughs were really fabulous.

zoe said...
March 19, 2009 at 4:15 pm

Hi Clarice,

I will look forward to hearing about the next batch. I think you will like the dough better when it is a bit wetter!

Hi Redmenace,

Let us know how it comes out this time!

thanks, Zoë

nads said...
March 19, 2009 at 5:18 pm

hi! yours is mainly the only bread ive been making eversince coming across your method and buying the book. i always keep a bucket of dough in the fridge ready no matter what else ive got going on. which brings me to my question, lately ive been researching simple french breads using only the 4 ingredients that make up your master recipe. what i noticed was that it is the universal recipe for french bread.so….may i ask is there a difference to the end results and if not (or not much) what is the point of all the fiddling about, etc. with the usual methods?

also, i made a baguettte the other day using master dough but more stiffer version (as for epi), and i noticed my scoring has improved heaps (i used a bread knife, very lightly dusted, sprayed with water)but when shaping (i used letter fold ) it wasn’t smooth the way my boules/ovals ususally are and this is always the case. could you possibly show a step by step baguette on your site with end results (there’s no pic in the book)

thanks heaps, appreciate it.

jeff said...
March 19, 2009 at 5:47 pm

Nads: The traditional recipes for baguette contain the same ingredients, but much drier, don’t you think? Otherwise it doesn’t store well, we’ve found.

Step by step for baguette is at: http://www.artisanbreadinfive.com/?p=152, just quit before the snips are made for the pain d’epi.

nads said...
March 19, 2009 at 10:38 pm

thanks, but do you have any photos of the baked baguettes?

yes i have noticed the water is less by a half cup. however, ortiz in ‘village baker’ refers to the advanced baker increading the water to 3 cups.

this is totally unrelated, but i was jus wondering about these very light delicious sweet breads, sometimes with filling/plain/iced(glazed). they’re found in asian HOT BREAD bakeries. due to the airy crumb do you think its suited to your method. they contain eggs flour sugar milk yeast salt can’t remember off the top of my head if there’s any other ingredient. i’d love to try it but i have no idea how much of each ingredient to put. appreciate any advice.

thanks heaps.

kimberly said...
March 20, 2009 at 9:34 am

Thank you sincerely for this wonderful book! I made my first boule last night using the master recipe, and it was absolutely divine – as good if not better than what I can get at local bakeries. I’m still stunned that *I* made it, and it was so simple!
Right now I have a free-form loaf of 100% WW + vital wheat gluten and flax setting on the counter to rise. I’m going to bake it in my dutch oven, and I’m wondering if you can tell me at what point I should remove the lid? I’m planning on baking it for 50 minutes since it’s only a 1 pound loaf.
Thank you again! I can’t wait to buy the new book.

jeff said...
March 20, 2009 at 2:34 pm

Nads: No, I guess we don’t have finished baguettes on the website, except for the ones cut as Epi loaves. Not familiar with the HOT BREAD bakeries.

Kimberly: In Zoe’s post she goes covered for about half the total baking time or a little less. So pull the lid at 20 to 25 minutes.

clarice said...
March 20, 2009 at 2:54 pm

I used the last of my boule dough batch to make a baguette this afternoon. I have a covered crueset pate loaf pan that I baked it in. It’s still too warm to cut into but it looks very good..

kimberly said...
March 20, 2009 at 3:01 pm

Thanks Jeff!

Manuela said...
March 20, 2009 at 3:02 pm

Unfortunatelly Le Creuset pots are very expensive…

And who won the book? I keep searching for that information but I couldn’t find it.

zoe said...
March 20, 2009 at 3:24 pm

Hi manuela,

There are several other options that people have suggested in this comment stream that are less expensive. Here is the announcement for the winner of the book: http://www.artisanbreadinfive.com/?p=562

Thank you! Zoë

Marianne said...
March 20, 2009 at 6:55 pm

I’ve had great success baking my bread on a pizza stone and covering the dough with an unglazed terracotta flower pot. Just be sure to plug the pot’s drainage hole with a piece of crumpled aluminum foil. Preheat both the stone and the flower pot as you would the dutch oven and follow the directions for the recipe with regards to temperature and baking time. Works like a charm!

deeba said...
March 20, 2009 at 8:02 pm

Hi…I only just joined the great club of ‘five minute a day’ bread bakers…& am sold on the idea. The book isn’t available in India, & I luckily found the recipe & your review on Mother Earth news.I substituted some plain flour for wholewheat garlic-chives flour, & some oatmeal flour…handsome loaf!! Thanks a million!!

zoe said...
March 20, 2009 at 10:21 pm

Wow marianne, that is a great idea!

Thanks, Zoë

Marianne said...
March 21, 2009 at 8:41 am

Zoe, I can’t take credit for the idea. I read about it somewhere on the Internet. But, it does work and the price is right!

Ellen Norton said...
March 21, 2009 at 9:37 am

I have a 2 & 3/4 qt. Le Creuset oval pot I would like to use for a petite loaf. How much dough should I put in the pot? I am just getting started with this after being introduced to your book by my daughter. Thanks for something we are both enjoying!

zoe said...
March 21, 2009 at 3:52 pm

Hi Ellen,

I would try baking a 1/2-pound loaf (about the size of a large orange)and see if that fills the pot nicely.

Let me know how it goes!

Zoë

Rochelle Bernold said...
March 22, 2009 at 6:51 am

I just bought your book and I am eagerly waiting for my first batch of dough to get ready for baking. I just love your technique !
Can I adapt your recipes to bake loaves using a combination of both your refrigerator rise idea and the use of a covered Le Crueset pot-either in a hot oven or a cold start oven ?

jeff said...
March 22, 2009 at 7:43 am

Rochelle: The covered iron pot method is usually done with a pre-heated pot; we’d worry that the crust wouldn’t crisp in a cold iron pot at the start.

That said, the closed clay pot method is often done with a non-preheated pot, so it may be worth a try. Certainly easier to handle a cold iron pot than a hot one.

I’d always preheat the oven though.

Monika said...
March 22, 2009 at 1:35 pm

Looks jummy. How about skipping my glass lid with black knob and putting the pizza stone on top of the enameled dutch oven instead?

jeff said...
March 22, 2009 at 2:18 pm

That should work… any oven-safe cover that prevents most of the moisture from leaking out (but obviously, doesn’t create a true seal).

Rochelle Eisenberger said...
March 22, 2009 at 4:28 pm

I tried the refrigerator rise with the Le Creuset and got the best crumb and crust ever!

Thanks for the great book and blog.

Lin said...
March 22, 2009 at 6:03 pm

OH I’m excited about your book and methods of making bread! I am
allergic to wheat and wondered how I might adapt your recipes to
spelt grain that I grind to flour myself?

Thank you for what you’ve done for the “world” of bread makers!

Nina said...
March 22, 2009 at 8:57 pm

Loaf pan question. I have started using my 9″x5″ (l lb.) loaf pan for my pumpernickel, boule, and rye breads to make sandwich sized loaves. I originally used 1 lb. of dough in this pan, but recently started using 2 lbs. of dough in the same pan.

The loaves are coming out too dense (especially the rye and boule). Is this because the l lb. pan is too small for 2 lbs. of dough?

Should I buy and try a larger 1.5 lb. loaf pan, would that make a difference with the crumb and still give me sandwich sized slices?

Any formula for judging the additional baking time for the larger loaves- I have been checking the loaves for 200 degrees, but that is a pain, opening the door, taking them out and checking the temp.

jeff said...
March 23, 2009 at 8:23 am

Rochelle: Great to hear, thanks.

Lin: Spelt is related to wheat– it’s not gluten-free (see the University of Chicago’s website at http://www.celiacdisease.net/gluten-free-diet). But that said, we have a fair amount of spelt in our second book, out in October. You can try spelt as a swap for our 100% WW recipe on page 76 of the current book, but I’d be concerned about over-density with 100% spelt. Assuming you are NOT allergic to gluten, you can try the tips at:

Whole Grains+VWG: http://www.artisanbreadinfive.com/?p=142

Dense Crumb on AB5.com: http://www.artisanbreadinfive.com/?p=141

Another option is to use spelt as a substitute for whole wheat or rye in any of our existing recipes.

Nina: This is a large pan; a 9×5 is generally for much bigger than 1 pound (though the manufacturers frequently mislabel them as “1-pound”). Our loaf pan breads work better in a smaller pan— easier to get done to the center.

So get the smaller pan, if anything– 9×4x3 is what we call for in the book.

But if you stick with the big loaf–go for a longer rest period (1.5 hours), and a longer bake– more like 45 minutes rather than 30.

Nina said...
March 23, 2009 at 10:45 am

Thanks Jeff. For the l.5 or 2 lb. loaves, I’ve been resting for about an hour and then baking 45 minutes or so. How much dough, weight-wise would you suggest using in the 9×5 pan?

When I use it for a one pound loaf, the crumb is good but the slices are small, so that is probably because it is too big.

I’ll look for a smaller pan, 9×4x3 for my one pound loaves. Thanks

jeff said...
March 23, 2009 at 11:43 am

It sounds like you aren’t liking the result when that big pan is fully loaded (1.5 to 2 lbs), but you also don’t like it when it’s skimpy (1 lb). But only the 1 lb is baking up nicely.

You could try 1.5 lbs with a 1 hour bake, maybe turning down the temp 25 degrees if it’s getting over-brown on the outside. I believe this is a small loaf pan, more like a pound: http://tinyurl.com/c826ua

Snowpea said...
March 23, 2009 at 5:33 pm

As someone who did several batches of Bittman’s No Knead, I’m happy to read that it works with your bread technique. I got your book but haven’t yet tried it. I can confirm that the bakelite knob will indeed explode (it resisted a few bakings, and I simply assumed it was a black metal of some sort) and then one day, PAF!

Until I got a replacement knob, I used nuts and bolts from my tool box. Not pretty but it worked. And I got to use all three of my dutch ovens so I got oval, round and pumpkin shaped breads LOL
The improvised knobs: http://farm3.static.flickr.com/2382/2166689975_2cbe3e5b93.jpg

Dorli said...
March 23, 2009 at 5:48 pm

After using Mark Bittman’s recipe for no-knead bread for about a year, I have switched to your method and have produced marvellous breads that several European visitors called the best bread they had eaten in the US. I use my clay cloche, preheat it in the oven and then put my loaf in on parchment paper. It works beautifully. I have also baked loaves in covered Pyrex dishes and they have come out fine…Great book.

Flour Girl (aka Rochelle Bernold) said...
March 23, 2009 at 9:23 pm

Thanks Jeff !
I took a chance and actually did bake some of my “Lahey” type dough in a cold covered pot starting in a cold oventurned to 450. It was delicious-we couldn’t tell the difference. I baked 40 min.covered;then uncovered, spritzed and baked 18 min.at 450 . I will try it with your dough and report back !

jeff said...
March 24, 2009 at 7:15 am

Snow: Cool, thanks for sending!

Dorli: I’m soon going to post about my clay cloche experiments. Thanks so much!

Rochelle: Definitely, let us know, it’s amazing what you can get away with.

Flour Girl (aka Rochelle Bernold) said...
March 24, 2009 at 7:16 am

For everyone having trouble with exploding knobs- Le Crueset stainless replacement knobs fit perfectly on many other pots-including Lodge enamelled pots which are wonderful and really cheap on Amazon.
In my last post I neglected to say that I used room temp dough-I am refrigerating some dough now and will try baking half in a cold pot in a cold oven after breakfast, and half the traditional hot pot/ preheated oven way. Either it will be inedible or it will be an even simpler way to do it as it rises on parchment right in the pan it will bake in!

clarice said...
March 24, 2009 at 8:27 am

I made the Italian peasant bread and it was good but still the crumb seems too dense for my taste.
I am going to let the bread dough rest even longer than 90 minutes to make sure it’s at room temp before baking to see how that works.

If it doesn’t, I may try the Leahy method (letting the dough rise overnight)and then refrigerate it. Unless anyone has tried these methods and found them wanting..In which case please share that info with me.

In all cases, though, the recipe makes great tasting bread.

Nina said...
March 24, 2009 at 12:38 pm

Thanks Jeff. I will buy the smaller and larger pans from Amazon, per your link.

My problem with the 9×5 pan with two lbs. of dough, is that they are very dense.

Does that mean that the dough doesn’t have enough room to expand sideways and so the center is too compact?

There are very few holes in the crumb, so the finished bread looks and tastes ‘too solid’.

Nina said...
March 24, 2009 at 12:41 pm

I know that the boule flavor improves after a few days in the refrigerator. Does this happen with any of the other breads – ie: pumpernickel and rye.

clarice said...
March 24, 2009 at 12:54 pm

Yes, Nina, I found the bread’s flavor and texture improves with longer standing in the refrigerator–this was true of all the breads I tried–the boule. rye and brioche..The peasant bread was baked after only one day in the refrigerator..It is looking bubblier already and probably will taste better the next batch.

Mark in Tennessee said...
March 24, 2009 at 1:22 pm

Wow! Beautiful Pictures and a great site. Thanks! I need to “talk” my wife into a dutch oven.

Flour Girl (aka Rochelle Bernold) said...
March 24, 2009 at 1:27 pm

WOW !
I actually baked an edible 1 lb. peasant bread on parchment in a 3qt. covered enamel pot in a cold oven which I turned to 450 after placing the pot in the lower 1/3 of the oven. I baked it 25 min. covered , then uncovered it and spitzed it with water. It then baked for an additional 21 min.
it was a small loaf-I usually bake 1 1/2 pounders, but it domed nicely and had a thin and fairly crispy crust. It was tender with a nice crumb-not at all dense, but without the fantastic structure of your beautiful loaves, Jeff and Zoe. Because it goes into a cold oven in a cold pot, this would be a nice and safe way to introduce kids to baking bread. . .
But it does need some refinement. . .I bet if I reheat it tomorrow the crust will be better …

I then used 1 1/2 pounds of the same dough to bake a loaf by your refrigerator rise method (n the same covered pot) using your instructions for baking in the covered pot . It looks yummy. . .it’s cooling now, so I’ll let you know how they compare.
Thanks so much for all your help and advice and for the opportunity to share with other breadaholics !

Flour Girl (aka Rochelle Bernold) said...
March 24, 2009 at 2:35 pm

Well, I just had my carbs for the week taste testing and comparing the 2 breads made with your European peasant dough! The refrigerator risen bread baked in the covered enamel pot was certainly a little chewier than the cold start loaf, and had a slightly crisper crust, but if I closed my eyes and ate them one after another I wouldn’t be able to discern a major difference. They were both delicious. !
So, it seems worth the effort to explore perfecting the cold start bread as another option. Especially in hot summer weather or when baking with kids.

zoe said...
March 25, 2009 at 6:38 am

Hi Nina, Clarice and Flour Girl,

thank you for sharing all of your experience with us. I love that you are playing with the dough to make your perfect loaf!

Great advise for others to try!

Zoë

zoe said...
March 25, 2009 at 6:42 am

Hi Nina,

About the loaf pans. the dough probably needs more resting time before baking to improve the crumb. the loaf pan breads do tend to be a bit denser.

Thanks, Zoë

clarice said...
March 25, 2009 at 8:55 am

Voila! I took the last batch of deli rye from the fridge and let is rest overnight on parchment paper in the microwave (to protect from drafts) and then baked it in a preheated pot. I got the wonderful taste of your recipe and a crumb that is much more open and that i prefer.
Next, I’ll try letting my boule dough rest out of the fridge overnight before baking to see if that works, too.

clarice said...
March 26, 2009 at 6:34 am

Yesterday afternoon I left out a batch of Italian peasant bread for about 5 hours before baking–again, the crumb was fantastic.

My husband tasted the deli rye and this bread and said it was the best bread in D.C. and we have some really excellent bakeries.

Zoe,there is so much variation in flours, water,cooking methods, kitchen and oven temps etc..that I think everyone should experiment with the basic recipes until they figure out how to get the breads to their taste.
In mine, baking in a dutch oven, and letting the breads sit out for a much longer rest before baking does it. (Only the brioche for some reason does not need that and works perfectly simply following the book’s recipe.)
I also prefer a sour dough taste and find that to my palate the breads improve with time in the refrigerator.

Flour Girl said...
March 26, 2009 at 6:34 am

I am eager to try your overnight rise, Clarice! I too have been letting the formed loaves rest for a much longer time. . .How big are the loaves you are baking ?
If anyone is using a Cuisinart enamel pot (often available at T.J Max and Marshall’s for a good price) I spoke to the company, and they said that it is ok. to preheat the empty pot but NOT to put cold dough straight from the fridge into the hot pot as the temp difference mught damage the enamel. so, this is another reason to have the risen loaf at room temp.

clarice said...
March 26, 2009 at 7:13 am

You may already know this, but I didn’t.Patrick Lynch finds success with his calphalon pots and uses steam trays and covers for longer breads:
http://patricklynch.net/recipes/dutch-oven-bread.html

clarice said...
March 26, 2009 at 8:24 am

Flour girl, With the Jeff and Zoe recipes I am making about 1 lb loaves (by eye).

Generally, cooking them in a pre heated dutch oven (450 deg), takes 30 minutes with the lid on and about 15 minutes with the lid off. (Same as the Sullivan St bakery recipe)

My dough seems quite cold when it gets out of the fridge and aven is cool and somewhat ineleastic to the touch after only 90 minutes in the kitchen.

The recipes are quite tasty and you might find them more flavorful than what is locally avaiable following the 2 hour pre fridge rise and 90 minute pre bake rest, but to my taste, the longer the rise, the better the no knead bread.

Monika said...
March 26, 2009 at 1:37 pm

Tried it with the dutch oven and pizza stone on top sprinkled with sesame seeds, nice nutty flavor.

Awesome, everyone liked it.

Mary said...
March 26, 2009 at 1:42 pm

I have been following this post with great interest and have found it VERY helpful. I never baked any bread until I bought your book, and now my family is in AWE :) one thing I did was to place the ready dough on the stone, and invert my porcelain cast iron pot over it. solves the problem of getting the dough into the pot, and makes it easy to score, and remove from over. I do not have full strength in my hands so this was my work-around, and it is easy!

vincent said...
March 26, 2009 at 2:17 pm

Hello,

We bumped into your blog and we really liked it – great recipes YUM!!! YUM!!!.

We would be delighted if you could add your blog to Petitchef so that our users can, as us,
enjoy your recipes.

Petitchef is a french based Cooking recipes Portal.

Best regards,

Vincent

zoe said...
March 26, 2009 at 6:01 pm

Hi Mary,

Have you seen the post I did with the disposable lasagna pan over the bread? It seems like the same method you mention, but the pan is much lighter and easier to lift off.

http://www.artisanbreadinfive.com/?p=510

Enjoy the bread! Zoë

PJ said...
March 26, 2009 at 10:38 pm

Hi Zoe and Jeff. I’m enjoying my breads using your recipe but I don’t have time to wait 40 min – 1.5h + 30 min cooking time cos I would like to eat the bread for breakfast.

Can I leave the dough to proof overnight (8 – 9h) at room temperature?

Or what do you suggest assuming I don’t have 1+h to prepare breakfast?

Flour Girl said...
March 27, 2009 at 7:13 am

Thank you for the tips Clarice-they are much appreciated !
I just mixed a batch of your N.Y. deli rye, Jeff and Zoe.
(It brings back memories of my parents buying our bread at the Clearview bakery or at the Cakebox bakery on Bell Blvd.in Bayside N’Y. back in the 50’s) If I want to bake it in a covered enamel pot, should I use the cornstarch glaze immediately before baking, or should I paint it on after I remove the cover for the final browning of the loaf ?
what if I wanted to bake an old -fashioned “corn rye” bread ? Would you substitute a little cornmeal or corn flour for a bit of the white flour? Then, would it need an addition of vital wheat gluten ?
Many, many thanks for writing such a superb book and for being so generous in giving us all your xpert advice !

jeff said...
March 27, 2009 at 7:31 am

PJ: It will overproof at RT overnight, but try the refrigerator proof: http://www.artisanbreadinfive.com/?p=141, and scroll down about a third of the way for the instructions. The other option is to make a pita, which doesn’t require any resting time, check it out in the book.

FG: YOU COME FROM BAYSIDE? I’m from Little Neck, and my wife’s from Bayside. It’s a small bread world!

I’d try the cornstarch at the beginning, and then re-paint for the open phase of baking. The “corn” bread you’re thinking of doesn’t actually have corn… it’s just a very high rye, with a lot of natural sour. You can approximate it with our method by kicking up the rye and the water in the Deli Rye recipe, and adding vital wheat gluten. See http://www.artisanbreadinfive.com/?p=142

clarice said...
March 27, 2009 at 2:16 pm

jeff, Honest, the rye did not overproof overnight at RT–I don’t know why but it didn’t. In fact, it was incredible.

Now, it is possible that I had not proofed it sufficiently before refrigerating it–that 2 hours was not enough, but it did work.
(Bread is mysterious–so many variables.Maybe my rye flour–I used KF rye mixtures.)

clarice said...
March 27, 2009 at 4:09 pm

Jeff and Zoe, have you tried partially baking the bread and finishing it up in the morning?
Would it be possible to do the covered bake for say 1/2 hour..remove the bread overnight and then bake it for the last 10-15 minutes uncovered in the morning?

Flour Girl said...
March 27, 2009 at 7:50 pm

It really is a small world,I grew up in Bay Terrace-went to Bayside High and Queens College…
Thanks for the advice on the glaze for the rye bread ! I will try it Sunday.
Tonight I am trying an overnight rise with my last pound of Italian peasant bread. . .
My kitchen in Ct. is so cold that it’s almost like a refrigerator -certainly no more than 55 degrees at night.Maybe Clarice’s kitchen is cold too, and that’s why her overnight rise works so well?

clarice said...
March 27, 2009 at 8:00 pm

Flour Girl, I think it may have worked so well because perhaps my first rise was insufficient. I left the latest batch do a longer first rise and it seemed lighter, higher and bubblier than the first batch–If so I will do the overnight rise in the fridge.

It could well be that my kitchen was too cold, but I believe I did that last rise in the microwave to avoid drafts.

The only dough recipe I made that really rose in 2 hours before refrigerating was the brioche dough.
I don’t mind experimenting–it isn’t as though the flour and salt and yeast is so expensive or that the less than perfect loaves aren’t still good.

zoe said...
March 27, 2009 at 8:49 pm

Hi Clarice,

Yes, this will work just fine. I would parbake the loaf, let it cool completely and then wrap the bread so that it doesn’t dry out. Usually I wouldn’t wrap the bread in order to preserve the crust. But, since you will be recrisping it anyway I think it would be better to wrap.

Let us know how it goes!

Thanks, Zoë

clarice said...
March 27, 2009 at 10:06 pm

I will Zoe. Of course Flour Girl may well beat me to it.

Flour Girl said...
March 28, 2009 at 6:37 am

Clarice-Thanks for the idea about proofing at room temp overnight ! I just baked a little Italian peasant bread that had rested in a covered pot 12 1/2 hrs. at 55degrees, and it wasn’t overproofed at all. In fact , it rose better than the refrgerator rise loaf did. And it WAS originally well proofed before I put it in the fridge fo rest for a few days ! I topped it with a mixture of poppy seeds, sesame seeds, dried garlic , and dried onion-a homemade version of KA ” everything” topping-and it does smell inviting. (I also used a bit of this mixture inside the dough when I gently rolled it to shape it .)
Sorry Clarice , I did actually did beat you to it
;-) . Parbaking in that way you have even more flexibility on timing, and as an extra perk-the crust gets even crisper.
Thanks Zoe and Jeff for constantly refining your recipes, and for all the great advice. Now I have to experiment with your pizza dough and your suggestions on trying the recipes using less yeast!

clarice said...
March 28, 2009 at 8:12 am

Flour girl,
Last night I baked an Italian peasant bread that I’d left out for about 10 hours (forgot to note exact time). It came out a bit flatter in shape but very delicious..and less tight crumbed than it did with a shorter rise.
The KA everything topping is what I use on the deli rye–it is delicious.

jeff said...
March 28, 2009 at 8:18 am

FG: I went to Cardozo…

clarice said...
March 28, 2009 at 10:03 am

A poster at another site suggested this container for baking:

“Finally, you don’t need a proper dutch oven. I baked a wonderful loaf yesterday in a flower pot (10 1/2 unglazed terra cotta bulb pan with saucer). The pot was pre-baked after getting a Crisco coating to make it somewhat non-stick. Put it in a cold oven and heat to 250, then 350, then 450 for 20 minutes each, and then let it cool. (Don’t wash with soapy water, just rinse). I put a round a foil in the bottom to cover the hole. I preheated it to 450 from a cold oven, plopped in the dough, and covered the pot with the saucer. 20 minutes later I removed the saucer and finished baking it. I think I got better results this way than even in a dutch oven. And it was lot cheaper!”

Flour Girl said...
March 28, 2009 at 2:15 pm

Clarisse -
Thank you so much for the creative flowerpot idea. . .I had heard about it, but I never read all the details-it sounds like it would be fun to try.
Have you actually done it yet ?

It’s a good thing we’re not on ” Atkins” with all this bread !
Is it cost effective to use the premixed ” Everything ” topping ? It does sound very convenient to have on hand. . . I’m waiting for a free shipping offer then I’ll splurge on some of their goodies.
Happy baking !

clarice said...
March 28, 2009 at 2:47 pm

I don’t know if it’s cost effective –just that it’s good. They are also offering small pots to bake small decorated cakes in and I notice that Martha Stewart uses the real things for the same purpose–Really, Eastern Europeans have long made Easter pashkas in them so why not cupcakes and bread? They are essentially the same material as clay rumertopfs and cloches though of course you must be careful to clean them well before using them to bake in.

clarice said...
March 28, 2009 at 3:42 pm

Flour girl, another good KAF product is their olive bread additive..I substitute about 1/4 cup of flour in the Lehay recipe with it and it make a great olive bread..I haven’t used it with the 5 minute loaves yet..

Flour Girl said...
March 29, 2009 at 5:07 pm

Hi Clarisse!
I now have 3 varieties of breads that I’ve sliced into, and one new one resting in the fridge. Thanks so much for all the suggestions ! I look forward to trying some of the KA goodies.
I was about to tell YOU about the pashka-which I;ve always wanted to try. . . I adore all varieties of cheesecake. . .Martha Stewart does have some lovely ideas…I used to see her at ” Hayday” in Westport Ct.
where we both went for coffee years ago before her little “problem “. Let me know how the flowerpots work if you do try them . . .
Jeff and Zoe-
I am so disappointed in my rye bread :-( It tastes wonderful, but no matter what
I tried ( I even rolled a teatowel on either side of the parchment to prevent it from spreading like an amoeba, it just wanted to grow horizontally! I should write a bread book and call it ” “Sideways.” The crumb was good, but certainly not as open as yours, so it probably wasn’t a question of too much water. Maybe I handled it too much when shaping? I did a letter fold and then rolled it gently into a cylinder about 8×3 . I used KA bread flour and 2tsp of vital wheat gluten with the 1 cup of rye in your master deli rye recipe. Any tricks for coralling a loaf into the desired shape ? When I use my little 2 3/4 round le Creuset for up to 1 1/2 pound of dough
there’s no problem – because the dough is forced to grow upwards. ..but I wanted to do a more traditional oval shape.
What should I try next time ?
Many thanks for your help !

Flour Girl said...
March 29, 2009 at 5:12 pm

. . .
Jeff and Zoe-
The website keeps giving me a ” duplicate message ” detected warning. . .
I am so disappointed in my rye bread :-( It tastes wonderful, but no matter what
I tried ( I even rolled a teatowel on either side of the parchment to prevent it from spreading like an amoeba, it just wanted to grow horizontally! I should write a bread book and call it ” “Sideways.” The crumb was good, but certainly not as open as yours, so it probably wasn’t a question of too much water. Maybe I handled it too much when shaping? I did a letter fold and then rolled it gently into a cylinder about 8×3 . I used KA bread flour and 2tsp of vital wheat gluten with the 1 cup of rye in your master deli rye recipe. Any tricks for coralling a loaf into the desired shape ? When I use my little 2 3/4 round le Creuset for up to 1 1/2 pound of dough
there’s no problem – because the dough is forced to grow upwards. ..but I wanted to do a more traditional oval shape.
What should I try next time ?
Many thanks for your help !

Flour Girl said...
March 29, 2009 at 5:20 pm

Clarisse- I am looking forward to trying some of those KA goodies-
Do let me know how the flowerpot turns out. Martha Stewart certainly has lots of creative ideas. . .She used to live in Westport and we sometimes had coffee in the same “Hayday “coffee bar years ago.
I was just going to tell YOU about pashka. I think it;s the only cheesecake I’ve not tried yet. . .After bread and chocolate, cheesecake is definitely one of my all time favorites.

jeff said...
March 30, 2009 at 5:46 am

FG: Just try drying out the rye dough a little– decrease the water by a quarter cup at a time and see what you think.

zoe said...
March 30, 2009 at 5:51 am

Hi FG,

One more thought about the rye, what kind of rye flour are you using?

All the recipes were tested with Hodgson Mills or Bob’s Red Mill. If you are using anything else you will end up with a much wetter dough, because rye has very little gluten.

Still follow Jeff’s advice, but this may be part of the reason???

Zoë

clarice said...
March 30, 2009 at 7:15 am

I’m not planning to make cakes in the pots or use them for baking bread because I already have so many other options.
Tonight my husband was away and I tried using some of the Italian peasant dough for pizza. I preheated the oven with a baking stone to 475 deg. I rolled out about (by eye) 1/2 lb of the dough onto a small silpat sheet. I put the sheet on a peel and placed the dough in the oven for 5 minutes. I took the dough out pricked the bubbles, coated it with a thin layer of olive oil, some sliced grape tomatoes, sliced yellow and orange peppers, sliced pre cooked Italian sausage, shredded mozzarella and parmesan. I then returned it to the 475 oven for 10 minutes. It tasted very nice–the crust was thin and a bit crunchy and very flavorful–the balance between the crust and the topping was just right.

clarice said...
March 30, 2009 at 7:57 am

zoe, I used KAF rye mix which might explain why my deli rye tasted better after a longer rise.

I can try to use less water the next time, or treat it as I would (and did)a Lahey bread with an overnight rise and bake–because the taste is so delicious..

Lois said...
March 30, 2009 at 9:55 am

I tried Bittman’s method for a while but the dough is harder to handle, maybe because I need it wetter for high altitude/dry climate. Anyway, rather than buy an expensive pot, I went to a thrift store and found a covered stoneware casserole – I suspect it might have come from a crock pot – and it worked fine. Even covered pyrex bowls seem to work OK.

clarice said...
March 30, 2009 at 12:48 pm

Zoe, the latest batch of deli rye looks perfect..I let it sit longer before putting it into the fridge..several hours–until it had clearly doubled. I let it sit there for a couple of days before touching it. When I took it out I did an envelope fold with light flouring before I stretched it into a ball and I let it sit for more hours until it was no longer cold and my finger made a slight impression when I touched it.I put the cornstarch mixture on it, slashed it and seeded it with the KAF everything seeds and then
I cooked it in a preheated pot for 1/2 hour, took its temp (it was just over 202degrees) left it in for a few more minutes uncovered..and it looks just right.

I am sure if I’d wanted to make it oval, it would have worked. too.

Flour Girl said...
March 30, 2009 at 4:38 pm

Hi Jeff, Zoe, and Clarisse-
Thank you my rye bread gurus !
My husband said this was definitely the best tasting rye bread I have made-now I just have to get the shape right. (And the glaze worked beautifully)
I used Arrowhead Farms organic rye flour,Zoe, which is whole grain, so I added the 2 tsps. gluten. . .maybe I should add a little more gluten? I’ll try drying out the dough a little more next time too, Jeff.
Clarisse, it ws very helpful reading your detailed description of the rye bread prep-do you let it rise on parchment in a skillet , a bowl, or ? The pizza sounds delicious – I’ve only used traditional white flour and olive oil crusts-but I may try it with a little bit of my next batch of peasant dough.
Thank you everybody !

clarice said...
March 30, 2009 at 4:51 pm

For that loaf I followed a hybrid method –I put the loaf on a Wilton cake lifter that had been sprinkled with cornmeal..When the oven and pot were ready, I pushed the dough and plopped it into the pot.
The previous time I let it rest in oiled parchment paper inside a bowl and lifted it into the pot by the paper–I can’t tell that there’s any difference with the bread is baked..Whatever is easiest for you.

zoe said...
March 30, 2009 at 7:03 pm

Hi Clarice,

I’m so glad this batch of rye came out to your liking! it sounds like you have arrived at a perfect system. I am going to try doing the oiled parchment paper, I’ve always just used flour.

I too have to look up the wilton cake lifter? This certainly sounds like something I need for zoebakes.com. ;)

Your pizza sounds outstanding!~

Zoë

zoe said...
March 30, 2009 at 7:05 pm

Hi FG,

Fantastic!!!! So glad you enjoyed the loaf. I think if the dough is slightly drier it will much easier to get the shape you like. Or, you can bake it as Clarice does in the pot, but it will not be the traditional shape. But, it will taste great! ;)

Zoë

clarice said...
March 30, 2009 at 7:46 pm

Zoe, the cake lifter is a metal square 8 in x 8 in that is used to lift layers up. It has a nice hand grip of plastic on one edge..a perfectly flat plate or tray that size with no edges would do the same thing.(The flat part of a traditional French tart pan that separates from the rim after baking would work, too.) It is perfect for the size of the loaves in your book..if you slightly tilt it over the edge of the pot you can just slide the bread in right side up..

zoe said...
March 30, 2009 at 8:52 pm

Hi Clarice,

In all my years in the pastry kitchens I’d never heard of such a thing. We always used the false bottom of a tart pan or cardboard rounds. thanks for showing me something new!

Zoë

clarice said...
March 31, 2009 at 7:20 am

I used to use those, too, but then I saw this gizmo, decided it might work for your loaves and decided to get one.

Flour Girl said...
March 31, 2009 at 2:02 pm

Thanks for all the advice everybody ! On Friday I will use my last batch of rye dough, and after Passover I will make a slightly drier mixture. ( I will probably go into withdrawal-I can’t imagine not baking bread for an entire week :-(
I just made an awesome looking bread-it’s too hot to cut yet, so we’ll see. . .
I used your basic boule dough
made with KA bread flour,
1/2 cup 7-grain cereal (from the bins at Whole Food or Bob’s red mill(not soaked-just dry)
1/2 cup sunflower seeds,
3Tbs. bran,
and a generous amount of fresh rosemary. This is a variation that I’ve often used with the Lahey dough.
I used about 1 1/4 pounds of your 5 min. dough in my 2 3/4 covered pot
I let it rise at cool room temp for 4 hours before baking it covered at 450 for 40 min., then uncovered for 20 min.
I did NOT preheat the pot, but let it rise right in the same pot I baked it in on greased parchment sprinkled with bran ( I did preheat the oven and the TOP of the pot.)
I sprayed a little water on the top of the loaf before covering it to bake.
I know its hard to believe, but it really seems to work well without preheating the pot and going through all the trouble of moving the formed loaf. My husband says he can’t tell the difference-and he is very fussy about crispy crusts.

jeff said...
March 31, 2009 at 2:21 pm

Interesting— Zoe and I are both preferring the crust when these are pre-heated. Later this afternoon I’ll weigh in on the pre-heated (versus cool) covered clay cloche method, which pre-dates the enameled cast-iron pan.

Flour Girl said...
March 31, 2009 at 3:14 pm

Jeff and Zoe-
I don’t believe it ! This is truly one of the best loaves I’ve ever made. The crust is terrific, and the crumb is ALMOST as beautiful as yours. . .One little change- I realize I actually baked it in a Cuisinart 3 qt. pot , not the little Le Creuset 2 3/4. And maybe giving a little spritz to the loaf and preheating the TOP of the pot is making the difference, Jeff. I am probably creating more steam by these little steps. . .

clarice said...
March 31, 2009 at 5:52 pm

Isn’t it fun to play with all these variations to find out what works best for you?How clever to preheat the top of the pot and spritz a little water on , FG.

Flour Girl said...
April 1, 2009 at 4:58 am

Thanks, Clarice ! it just makes it so much simpler to let the bread rise right in the pot. I just can’t believe how wonderful this bread is-even tastier than the Lahey bread when I make it with Jeff and Zoe’s method.
Have you ever tried making rolls with some sort of covered method ? Maybe muffin tins ?

zoe said...
April 1, 2009 at 5:42 am

Hi FG,

Great news! I’m so pleased to hear it.

Yes, preheating the lid will help to get you a nice crisp crust. I will put that step in bold type so that people won’t miss it.

I have not tried misting the bread first, I will give it a shot.

You can do rolls under the a lasagna pan. http://www.artisanbreadinfive.com/?p=510

Thanks, Zoë

Bill said...
April 1, 2009 at 8:05 am

Hi folks, I have a question or two.. first is about the steps shown in this blog. You say to lift the loaf out of the dutch oven with a spatula, remove the parchment and let it cook on a cooling rack. ??? Is the loaf returned to the oven on a cooling rack?? Don’t remember seeing that in the book..

Also, I’m having similar problms with the dough spreading out too much.. probably too wet. I have a batch in the fridge for about 7 days now. IF it can’t be formed and hold reasonable shape, can I still incorporate more flour in that batch? If so, do I just mix it in and let it rest/rise or what? Probably making a mountain out of a molehill :)

clarice said...
April 1, 2009 at 8:59 am

I haven’t , FG. Aside from the lasagna pan, Zoe refers to, I noticed that someone had suggested using the tops of those buffet steamers (which I have). I thought when I got to rolls I’d try that.

(I’m just not going to be able to maintain passover breadless this year).

jeff said...
April 1, 2009 at 9:26 am

Bill: No, meant to read “let it cool on a cooling rack!” Sorry about that, fixed now. Yes, you can incorp more flour; ideally, you’d let it sit for a couple hours after the incorporation.

Other option is to do it in a loaf pan.

John M. said...
April 1, 2009 at 2:19 pm

I tried it using a Staub enameled cast iron casserole. Staub is another French brand, but the metal handle comes standard on it.

Flour Girl said...
April 2, 2009 at 7:05 am

Hi Zoe !
I love your lasagna pan idea! Maybe I’ll invert an old roasting pan . . .
Clarisse- I’m jealous- you even have buffet steamers-you must have the most incredible collection of fabulous kitchen equipment ever !

Bill- here’s how I get the finished loaf out of the pan:
Set the hot pot right on an unheated burner of your stove
Uncover it.
Place a cooling rack beside it.
With one oven mitted hand , tip the hot pot towards the cooling rack while you steady the loaf with your other oven mitted hand
If you use parchment, the hot loaf will tip easily onto the cooling rack upside down.
Simply peel off the parchment and turn your loaf right side up with your mit protected hands and allow to cool on the rack .
I know it can be hard to insert a spatula into the pot if its small. . .
Enjoy !

jeff said...
April 2, 2009 at 9:06 am

John and FG: Thanks for the tips…

Amy said...
April 8, 2009 at 1:25 pm

Love your book!!! My husband and little girl say MMMMM the entire time they eat the bread. What flours can I substitute in your master Boule recipe to mix things up a little. I use the dutch oven method and it works perfect. I will be baking the bread for a large family gathering on Easter. We used to buy our bread from Breadsmith in MN, but now we will be having delicious home baked bread:) Thank you so much for writing this book.

Amy said...
April 8, 2009 at 1:27 pm

I was also wondering what the best way to store yeast is. I bought a big container from Costco and I’m not quite sure how to store it.

jeff said...
April 8, 2009 at 1:33 pm

Thanks Amy! In the book we have lots of recipes with rye, whole wheat, barley, and others. In our next book, on whole grains for the same method, we cover breads with lots and lots of whole grains. Take a look at this post– you need more water if you push the whole grains: http://www.artisanbreadinfive.com/?p=142

I refrigerate my yeast and have never had a problem with loss of rising activity. Sealed jar in the fridge is all I’ve ever done.

Jen said...
April 10, 2009 at 12:56 am

I just tried this method in my old cast iron dutch oven. It worked great! Love the bread!

Jane said...
April 11, 2009 at 9:55 am

A friend showed me the book and mine is on the way.
A question, do you have to use kosher or course salt and can you reduce the salt content? What about lite salt?
Jane

zoe said...
April 11, 2009 at 10:14 pm

Hi Jane,

Here is a post about using salt: http://www.artisanbreadinfive.com/?p=139

You can use table salt, but you will want to decrease the amount.

You can also use lite salt with great results!

happy baking! Zoë

Ellie Wetzel said...
April 12, 2009 at 9:31 am

Love your webside. Maybe you covered this. Too many things to read right now.
My cast iron has the non-stick finish – is that OK to heat at 500 degrees?
Been using your book and have loved every recipe so far. Thanks. Ellie

Cheri said...
April 12, 2009 at 1:06 pm

Hi,

Will I get good results using my All-Clad stainless steel with aluminum bottom dutch oven?

Cheri

Diane said...
April 12, 2009 at 7:36 pm

I’ve been using the dutch oven all along. Also I use sea salt instead of table salt or kosher salt. Also for the vermont cheddar, I crumble the cheese instead of shredding it. I look forward to the new book.

jeff said...
April 13, 2009 at 4:58 am

Ellie: check w/the manufacturer, but my guess is that you CAN NOT heat a non-stick pan to 500 degrees– I could be wrong.

Cheri: That sounds fine, maybe check with the manufacturer about maximum temp. Their website might be easiest way to check.

Diane: Sounds great…

Cheri said...
April 14, 2009 at 1:33 pm

Hi Jeff,

I checked with All-Clad and they say my MC2 dutch oven is safe up to 500 degrees, so I am going to give the dutch oven bread bake a try.

Would vital wheat gluten improve the rise of my rye bread? This last time the crumb and texture was wonderful, but the bread was too spread out/flat. I would like to see some height! Any suggestions anyone?

Cheri

Barb said...
April 14, 2009 at 4:39 pm

Holy crumb!!! I found this method yesterday after mixing up a batch of the Peasant Bread dough from the book. I followed the suggestion of another baker and wrapped the knob of my Rachel Ray enamel cast iron dutch oven with aluminum foil. Totally fine! I would have taken a picture of how lovely this loaf was but…too late…family had the bread knife in hand. The crumb was definitely more dense than the picture but oh so good.
I have been using the basic dough recipe for pizza at least once a week. I have found that rolling the dough out and placing it onto cornmeal dusted parchment paper, then popping it into a hot oven on the stone for just a few minutes sets it up. Then after cooling a bit, I top it and it’s so easy to slide back onto the stone with a pizza peel to finish baking. Never have had a problem with soggy crust or over done. I wish I had checked back to the website sooner….so many great new ideas and recipes. Thanks Jeff and Zoe!!

zoe said...
April 14, 2009 at 8:06 pm

Hi Cheri,

yes, you can certainly try adding a bit of vital wheat gluten and it may help the loaf to rise higher.

Hi Barb,

So glad you are enjoying the bread. If your bread came out a little denser than you like I’d let it rest a little longer before baking next time.

Thanks! Zoë

Ellie said...
April 17, 2009 at 6:35 am

Cusinart has a pan heatable to 500 degrees with a metal handle and at a resonable price. Works great. Bought a 3 quart – good for the small size loaves I make.

jeff said...
April 17, 2009 at 11:58 am

Ellie: Perfect!

Gina said...
April 17, 2009 at 12:21 pm

Great idea! I have an oval enamelled cast iron pot I inherited from my mother. It will be great for a slightly elongated loaf, or two boules side by side, which I often do by the regular method. The boules join slightly, like a nice bum!

Randy said...
April 17, 2009 at 7:47 pm

I have a convection oven…is the enameled cast iron baking method viable in it? Or am I better off using an uncovered loaf pan?

zoe said...
April 17, 2009 at 8:40 pm

Hi Gina,

The pot sounds perfect and your description made me LOL!

Hi Randy,

You can certainly bake with this method in a convection oven. Just be sure to reduce the heat as your oven suggests to reach the right temperature. Generally this means reducing by about 20-25 degrees.

Thanks, Zoë

Pam said...
April 18, 2009 at 1:52 pm

Hi Jeff and Zoe,

I’ve had your book 2 1/2 months and have been baking bread twice a week ever since! I used to make bread in college, and tried the Bittman method recently, but your method is far and away the best. We’re in Los Angeles, used to make the trek to La Brea Bakery – haven’t been back there since I discovered ABI5MAD.

I haven’t got past the master recipe/ peasant/ deli rye/ light ww/ semolina yet because they are SO good. I started with 1 lb boules but my husband insists on larger sandwich loaves, so I’ve gradually worked my way up to a 9×5x3 loaf pan. This requires 2.5 -2.75 lb of refrigerated dough (that amount is just impossible to handle at room temp), and I have been letting it rest in the pan at room temp 2 1/2 – 3 hours before putting it in the oven for 65-70 minutes. The flavor is fantastic and the crumb is very good, but not as open as the smaller loaves. I tried a 12 hour refrigerator rest, baking at 475 F for 40 minutes and turning it back to 450 for 25 minutes when it looked like browning too much. The amount of oven spring was amazing, but the finished bread was slightly more dense than the room temp rise, so I’m going to try a 20 hour refrigerator rest next.

Not enough steam is always an issue for me as my oven vents too efficiently. I use the inverted lasagne pan method for boules and flatbreads and it works perfectly. I am wondering if I can using the ‘dutch oven’ method with my loaf pan. I have a Caphalon 12″ x 4.5″ hard-anodized aluminum braiser that is wide enough and tall enough for the loaf pan, and should be ok at 500 degrees.

Has anyone else tried this?

zoe said...
April 18, 2009 at 7:48 pm

Hi Pam,

I haven’t tried baking a loaf pan in the Dutch oven, but if you have one that is large enough I think you should try it. When you do, please report back!

Thanks! Zoë

Flour Girl said...
April 19, 2009 at 4:11 am

Hi Jeff and Zoe !
Mother’s Day is coming and I’m making my wish list. . .
What are your recommendations on peels and stones ?

King Arthur has a metal peel that looks very nice. . .or is there a wooden one you prefer ?

Both KA and William Sonoma have stones -do you have a favorite ? They both say that there’s are guaranteed against breaking.

I can’t wait for your new book – too bad it won’t be out until October !
I now have 2 buckets of your dough in the fridge at all times . You have really transformed our meals !

jeff said...
April 19, 2009 at 2:04 pm

My favorite peel is the Sassafras, I’ve had the same one for years: http://tinyurl.com/czpque

For the stone, go for any half-inch thick one; we’ve gotten no complaints about the one on Amazon (Old Stone Oven brand): http://tinyurl.com/cly2rl. I’m not certain of the warranty on the Old Stone Oven. Another option is the Williams-Sonoma half-inch thick stone of the same size, which is lifetime guaranteed. I know it’s a good stone and that they don’t give you an argument when it breaks (recently returned one that cracked after 11 years of daily use), so SAVE YOUR RECEIPT. I’m guessing that the warrantteed one on KAF is terrific but I haven’t used it. Price is a factor of course.

Thanks for the kind words!

Flour Girl said...
April 20, 2009 at 6:14 am

Hi jeff !
Thanks for the advice . . .it really helps !
Bad news from KA. Just when I was about to order the makings for your English granary bread ( which I used to buy all the time in London in the 70’s -it is SO wonderful !) They advised me that the malted wheat flakes are no longer available. Not just temporarily, it seems.
So, we will have to come up with some kind of substitute. . .I wonder if we could use some sort of malted wheat cereal. . .Maltex, perhaps ( but you’d have to buy an enormous quantity of it on Amazon -no one sells just one box anymore :-(

Any suggestions ?

jeff said...
April 20, 2009 at 7:25 am

People have tried all sorts of things… I haven’t tried the Maltex but I’m guessing it will work. Or just books the malt sugar a bit. Or order the real thing from England (haven’t done that myself, I have to admit).

Artisan Bread in 5 Minutes a Day: Great book for any home chef | Kitchen Gadget Girl said...
April 22, 2009 at 7:19 am

[...] Rolls and the Pletzel from the same Challah master recipe. From their website, I also tried baking bread in my dutch oven, which worked extremely well. This is good to know, if you do not have a pizza [...]

Pam said...
April 24, 2009 at 8:19 am

Tried the 9×5x3 loaf pan in a ‘dutch oven’ (12 inch round Caphalon braiser) after a 20 hour refrigerator rest, and it was AWESOME – the best sandwich loaf yet!!!
Outstanding caramelization, oven spring, crust, fantastic flavor as always, nice crumb, though not as great as Zoe’s.
I’m going to try a longer rest next to see if it won’t open up a bit more.

I also followed someone’s suggestion here about misting the top of the resting dough to make sure it didn’t dry out, and I think that helped too. I can’t find the original post or I would give them credit!

My husband was VERY enthusiastic about this bread.

I love your book, but I think I love your website even more – I have learned so much from reading about other people’s ideas and solutions.
Thank you for writing this book – it really has changed my life!

zoe said...
April 24, 2009 at 9:34 pm

Hi Pam,

That is so exciting. I have yet to try a loaf pan inside the cast iron pot.

be careful not to over proof the bread by leaving it to rise too long in the refrigerator. Eventually the bubbles created by the yeast gas will collapse or the bread just won’t rise much in the oven.

Thanks, Zoë

Brooke said...
May 6, 2009 at 7:54 am

This is such a fantastic idea. I tried this this weekend and my bread was extremely flat. My cast iron pot is fairly large and I decided to place it on the grill and close the lid with the cast iron lid on it. I figured that the grill can get it MUCH hotter than the oven and I really don’t need anything else heating up the house (I live in Arizona).

I have a few questions… I didn’t used parchment paper. I oiled the pan and then placed the dough inside. So, the dutch oven didn’t heat up before it started baking. Do you think this could have made the dough become long and thin?

Also, how much extra flour did you add to the dough when you used the master recipe? I’m afraid that the reason why it was so runny was because I didn’t add enough flour? Any help you guys could provide would be so helpful!

jeff said...
May 6, 2009 at 11:57 am

Brooke: Best guess for all that spreading– the over-large cast-iron pot. A smaller one would contain the sideways spread.

We do prefer this pre-heated, then putting the parchment-resting loaf in there. I don’t think that’s the explanation for the sideways spread.

1st guess: Not enough flour, or the wrong kind. Use 6.5 cups of unbleached all-purpose and you should be successful.

hecowe said...
May 6, 2009 at 1:58 pm

Bought the book, loved it. I’ve been making a loaf a doy for about three weeks now (including this method — fun!), but my DH really wants a fluffier bread. What do I need to do for my loaves to be a little fluffier? I’ll knead, use dough relaxer, bread flour…but I love this method and don’t want to give it up! (However, I can’t eat all this bread myself, and I suppose he needs to be fed at some point.)

Ellie said...
May 6, 2009 at 3:09 pm

I have been placing my dough on corn meal on parchament paper on counter to rise. When ready to slide on ot stone slips off great. Less handling the dough when raised.

Tried using my convection (optional on my oven) and it works just great. Did remember to lower the heat 25 degrees.

Works with the cast iron as well as on the stone.

zoe said...
May 6, 2009 at 8:52 pm

Hi Hecowe,

When you say fluffier I think of the buttermilk bread or even the brioche of challah recipes. They have a much lighter texture and crumb. Because they are enriched they have a more tender crumb, which your husband may prefer.

If you want to try to get a lighter crumb on the master recipe, try letting it rest longer before you bake it. Up to 1 1/2 hours can often make a big difference.

Hi Ellie,

Great suggestion! So glad you are playing with the different methods.

Thanks, Zoë

Ellie said...
May 9, 2009 at 10:27 am

Semolina was wonderful today. Best bread I have made so far Thank you so much.

Using parchment to rise bread and then put on stone.

I have been using polenta corn meal – is there a difference using corn meal?

jeff said...
May 10, 2009 at 6:26 am

Polenta should work just fine.

Stuart Joseph said...
May 12, 2009 at 10:14 am

Dutch Oven cooking has been around for centuries. It has been used to bake bread over open fires and in fireplaces, which is how our ancestors, pioneers, cowboys, baked and cooked.

The Dutch Oven traditionally had a flat lid with a raised edge so that the cook could put hot coals on the top and not have them roll off.

Originally made from cast iron, they have also been made from graniteware (enameled steel), and cast aluminum.

The Dutch Oven eveolved over time. They had 3 legs for support when placed on the ground or the fireplace, when stoves became more prevelant than fireplaces for cooking, the Dutch Oven lost it’s legs and became flat bottomed so it would sit easier in the oven or the stove top opening in the range.
The flat lid also gave way for the dome shaped lid which also became oven proof glass (Pyrex) since there was no need to pile coals on the top.

The Dutch Oven can also be used for cooking a wide range of things besides bread, like stews and complete meals. You might say that it was the crock pot of it’s day but it needed some attention.

Cast iron was the material of choice as it held the heat better- as stoves became more efficient, the necessity for holding the heat lessened as the oven took over the work.

jeff said...
May 12, 2009 at 10:48 am

Stuart: Thanks for the info. I had to take out your commercial references (links to products) since we can’t vouch for them. Jeff

Dutch Oven Easy said...
May 14, 2009 at 5:33 am

Hi,

This is great post!

i came across your website. and i love the topics since i am dutch oven lover. This is used for many years. It has been a high quality materials that we can trusted.

Thanks!

jeff said...
May 14, 2009 at 6:08 am

Yes, it works nicely…

octony said...
May 19, 2009 at 9:05 am

Maybe this will help someone,I read on a blog were a lady said she had tried all kinds of pots, pans and dishes to bake the bread in. She likes her turkey roasting pan the best. She said it’s light and you can do a bagette in it and you don’t need a pizza stone,a pan for steam and when you put(plop) the bread in the pan you don’t have to hit dead center.

Estelle said...
May 20, 2009 at 4:47 am

Jeff/Zoe:

You mentioned the old European technique of baking inside a closed clay pot. I own a Romertopf clay baker. Can you please give me some tips on how to use this to bake my loaf instead of a dutch oven? Thanks

jeff said...
May 20, 2009 at 11:47 am

Check out my post on that subject at http://www.artisanbreadinfive.com/?p=566. I’ve tested the Sassafras brand cloche (clay pot), available at Amazon at http://tinyurl.com/dhlms5, but I’m sure the Romertopf brand works beautifully too. Jeff

Morgen said...
May 31, 2009 at 7:09 pm

This concept has changed the way I feel about baking bread! I used to curse almost every time because I would not have any success. I have just finished my first boule (with the master recipe) and before cutting into it, it looks like a $6 loaf! I can’t wait to try other styles in the book as well!
For others who do not have a cloche, I used my Corningware round casserole dish fitted with a lid and it worked just fine!

jeff said...
June 1, 2009 at 6:14 am

Thanks Morgen!

Stuart Joseph said...
June 12, 2009 at 9:41 pm

I wasn’t sure if I should post this at Jeff’s article about baking with a Dutch Oven on the grill or Zoe’s article about baking with a Dutch Oven in the kitchen, so I think I will do both.

For those of you wanting to learn all there is to know about Dutch Ovens, recipes, cooking techniques (indoor, outdoor, grills), links to sources, videos, and even a charcoal calculator, check out The International Dutch Oven Society:
http://www.idos.org

I use a Lodge Cast Iron Dutch Oven, griddle, and skillet (frying pan). Their web site has some recipes, techniques, but most importantly the care and feeding of cast iron cookware, which is helpful in keeping it from getting rusty and reclaiming that rusty old Dutch Oven you got at a yard sale.
http://www.lodgemfg.com/

When I have some time, I will suggest that they add AB5 to their link pages.

Vivian said...
June 15, 2009 at 1:18 pm

Hello,

I have a 5 1/2 round LC dutch oven, will I be able to do a 1lb loaf in it? Do I follow the same temp & time?

I also need to purchase a food container, will a 4qt container will able to do the job? Does it matter round/square? I don’t have too much space in the fridge. If not, will halved the recipe will fit in the 4qt container?

Thanks

zoe said...
June 15, 2009 at 9:08 pm

Hi Vivian,

Yes, your 5 1/2 LC Dutch oven will be just perfect for a 1 pound loaf. Just make sure you have the metal replacement knob!

4 quart container is not really big enough for the initial rise of the dough. If you had a 5 or 6 quart container you could switch the dough to a smaller vessel after it rises and collapses. You could certainly make a half batch in a 4 quart.

Enjoy! Zoë

Dutch Oven Cookout said...
July 2, 2009 at 4:49 am

great post…thanks for sharing idea in baking bread using my dutch oven..

Rachel said...
July 17, 2009 at 7:36 pm

Sorry if someone else mentioned this and I didn’t see it, but another cheap alternative to a pizza stone is an unglazed terra cotta tile (you can get one at a hardware store for about three bucks). Wash and dry the tile first, but then just use it like a stone. Sometimes glazes are not okay for food (because of lead content). An unglazed tile is all clay, nothing else can withstand the firing temps, so it’s fine for food. Alton Brown made the suggestion to use the tile on one of his shows. He also suggested using an unglazed large flower pot as a clay oven (just turn upside down to make a dome and place on tile).

jeff said...
July 18, 2009 at 6:50 am

We’ve used tiles took at a cooking class in Phoenix that we did. They’re a bit small but work nicely. Jeff

Jack said...
August 25, 2009 at 6:41 pm

Okay guys, long time lurker, first time question. But first, the set up … this method replicates a wood fired brick oven beautifully. I know because I hand built my own horno, wood fired in the back yard last year in search of the elusive perfect bread.

But I need help. Every boule I shape slumps. Let it rest for the proper amount of time on parchment paper on a peel and when it’s time to meet the heat, invariably I have a chiabta … a clumped flattened mass that spreads in all directions.

This is about six years going and it’s making me slightly crazy. How do I get it retain it’s boule shape???

(btw – I am perfection in following instructions and recipes. live at 5,000 feet, in a semi-arid climate)

zoe said...
August 25, 2009 at 10:46 pm

Hi Jack,

As I read your note I wondered if you lived at a high altitude, you are having all the classic problems with that type of baking. I think that reading this post may give you some good information about baking at 5,000 feet. http://www.artisanbreadinfive.com/?p=144 Let me know if you are still having trouble.

Thanks, Zoë

Jack said...
August 27, 2009 at 12:48 pm

Thank you Zoe.

But … it’s not just the rise, it’s that the dough slumps. Today’s was no different. Cold dough doesn’t rise at all. Even after it hits a hot stone it just squats down and bakes in a squat.

It’s quite depressing. Not as much as the political scene, but this is a lot of years with no rise to my efforts.

zoe said...
August 27, 2009 at 8:14 pm

Hi Jack,

Is the dough rising at all in the bucket right after you mix it? If not, is it possible that your yeast is no good? It doesn’t happen often, but I have run into a few cases where the yeast is old or just a bad batch.

Don’t fret, we will try to work this out. There are many folks baking wonderful loaves at high altitudes, so I know it can be done! We’ll just keep having you experiment until it comes out the way you like, just might take some playing with.

Thanks, Zoë

Jack said...
August 29, 2009 at 12:45 pm

Ms. Zoe, thanks for your kind reply. The very generous folk at Fresh Loaf website are having a thorough examination of what I’m experiencing, and if you’d care to peek – http://www.thefreshloaf.com/node/13342/totally-frustrated-jason039s-quick-ciabatta#comment-81204

BTW – the dutch oven trick works well, but I still don’t have any aeration (holes).

zoe said...
August 30, 2009 at 5:24 am

Hi Jack,

That is wonderful, don’t you just love the internet.

I will stop by and see what you all are coming up with!

Thanks, Zoë

Diane said...
September 4, 2009 at 9:21 am

Thanks for the information on your web site. I have a Lodge 12 dutch oven with legs. I made a wonderful loaf of bread in it. I cooked it with hot coals on top and below. We were camping , and it went really well with the beef stew that I cooked in the other dutch oven I have.

Brian Mullins said...
September 4, 2009 at 11:04 am

I absolutely love a hard crust, but my wife loves a soft crust. I have recently been using the dutch oven method, and really enjoy the crust it creates. Will this method work well with the Soft American-Style bread recipe on page 204? Does the butter in the bread and on the outside create the soft crust, or will the steam in the dutch oven create a hard crust despite the fat content?

Thanks in advance,
Brian

Rachel said...
September 4, 2009 at 1:05 pm

I suggested a using a terracotta tile, but my latest experiement was to use a large ceramic lidded casserole. So far it’s my favorite bread baker– the same effect as using the dutch oven (no need for the water bath), but no knob to worry about and no concern about damaging the enamel by heating up the pot when empty. The lid of the casserole is also easier to manipulate, even with oven mitts on.

jeff said...
September 5, 2009 at 6:51 am

Brian: Yes it will work, but of course lower the oven temperature. I’m guessing that this will create a soft or semi-soft crust, because as you say, fat is the enemy of crispness. Let me know how it turns out. Jeff

Sheryl said...
October 24, 2009 at 8:00 am

Last week I used this method for a crusty white bread and it turned out fantastic. Now my husband wants me to try it with your pumpernickel recipe. Do I still bake for 15 minutes at 500 and then reduce to 450, even though the recipe is to bake it at 400.

zoe said...
October 24, 2009 at 11:00 am

Hi Sheryl,

Because of the additional sugars in the pumpernickel recipe you may want to reduce the heat. Start with it at 450 and then reduce to 400. That should do you well. Just keep an eye on it after you remove the lid to make sure it isn’t getting too dark, which is tricky with such a dark loaf.

Enjoy, Zoë

TxTufTif said...
October 28, 2009 at 7:53 am

I’ve used both the refrigerated dough method and Jim Lahy’s method, using covered 3 qt calphalon pan w/glass lid (good to 500 deg). Using preheated pot and oven to 450 I consistently get an overbrowned bottom of the bread which I then have to saw off using bread knife after bread is cooled. How can I avoid the overbrowned (almost burnt) bottom of my artisan bread? BTW love the methods and the bread and thanks to all that dreamt this stuff up. Haven’t bought bakery or grocery bread in last year!

zoe said...
October 28, 2009 at 3:27 pm

Hi TxTufTif,

I heard this from a reader who was doing this method on her grill over the summer and was having a hard time regulating the heat. First make sure the oven is running at the right temperature with an oven thermometer. She ended up making a “pillow” of tin foil that she laid down on the bottom of the pot to cushion or insulate the bottom of the bread.

I hope this helps and happy baking!

Zoë

TxTufTif said...
October 30, 2009 at 7:10 am

I’ll try that method and let you know how that works. Saw on the Mark Bittman no knead bread website that he complained of the same problem and suggested placing one of those silicone oven pot holders (not a mitt) in oven…but didn’t say where. I had assumed that he meant on the oven rack with the pot on top, but I was sure the silicone oven potholder would just melt away at 450 deg so didn’t try it. Didn’t think of actually putting the silicone oven pot holder (not a mitt) into the interior of the pot. Thanks for jogging my thinking processes and I’ll try both methods and let you know what works.

Thanks for the reply to my question. By the way I made the cinnamon rolls (without the sticky part) from your book and they are awsome….too awsome….so make them infrequently, but did notice how much easier the dough was to handle and form.

TxTufTif said...
October 30, 2009 at 7:11 am

PS Zoe: I do have an oven thermometer in the oven as mine is wildly inaccurate and always always check it to make sure I’m on temperature target. Just a wonderful device.

jeff said...
October 30, 2009 at 12:15 pm

TxTftx: I’m with you– that silicone pad will do poorly way BELOW 500 degrees, or even 450. Don’t do it— I don’t think I’d put it inside the pot either. Jeff

Lynn said...
November 30, 2009 at 8:46 am

Is there any possible way to bake bread this way using only gluten-free ingredients?

zoe said...
November 30, 2009 at 2:57 pm

Hi Lynn,

The Gluten-Free Crusty Boule from the gluten-free chapter of our newest book Healthy Breads in Five Minutes a Day would be wonderful baked in a Dutch oven.

Thanks, Zoë

Jennifer said...
January 5, 2010 at 4:42 pm

I am confused about the refrigerator rise. It makes sence with the 1st loaf but all the others…the bread will already have been in the fridge for days. How can a cold rise do anything?? And also do you let the loaf rest out on the counter first and then put it in the fridge for the cold rise or do you not bother with a counter rest and just form the dough and put it in the fridge for the cold rise?? Thanks!

zoe said...
January 5, 2010 at 8:33 pm

Hi Jennifer,

Once you form the loaf you have to let it rise. You can either do this on the counter or you can loosely cover it and let it rise for several hours in the refrigerator. The rise on the counter happens in about 40+ minutes, but the refrigerator rise happens much slower (about 8 hours). I usually pull my loaf out of the refrigerator and just let it sit at room temperature until the oven preheats.

I hope that helps?

Zoë

Jill said...
January 8, 2010 at 12:20 pm

I just bought your book, and am very new to bread baking. I am excited to try your method to bake bread. I have a very small refrigerator (condo size) and would not have the room to leave the dough in the refrigerator until I can bake all the dough. Is it possible to freeze the dough after it rises for the first 2 hours? Would I divide the dough into the grapefruit sized amounts and place them into ziplock freezer bags to freeze. If I can do this, I plan on thawing them in the refrigerator overnight before letting them rest on the countertop before baking. Let me know if I’m thinking through this correctly.

Thanks!

Jill

zoe said...
January 8, 2010 at 9:51 pm

Hi Jill,

That is exactly what we recommend. The dough will not have time to develop any sour dough like character, but if you leave it in the packet over night it may have more flavor. Give it a try and see what you think.

Thanks, Zoë

Stefanie said...
January 14, 2010 at 12:57 pm

I made a batch of pumpernickel, and I prefer it sweeter. Can I add sugar, honey or more molasses without compromising the recipe? I’m looking for that sweet “restaurant” bread taste.

zoe said...
January 14, 2010 at 3:48 pm

Hi Stephanie,

You may prefer the sweetness that sugar or honey adds. Molasses is not as intensely sweet as the others. If you add more than a couple of tablespoons of honey your dough may start to get soft.

Enjoy, Zoë

Alex said...
January 17, 2010 at 4:36 pm

Hi,
Being German, I have a beautiful Roemertopf glazed clay pot (Bottom is glazed so food doesn’t stick, lid is not glazed and you’re supposed to soak it in water before use to create a perfect steam environment). I usually use that for making roasts. It makes the most wonderful moist mouth-watering roasts and pan-juice gravy).
I would love to use that for baking bread. Unfortunately, you’re not meant to put it in a pre-heated oven. I wonder whether it would be ok to place it in a cold oven and let the empty pot come up to temperature gradually. I suppose I’ma abit worried it might crack when putting a room temperature loaf of bread in it… Do you have any experience with these types of pots?
Cheers, Alex

jeff said...
January 17, 2010 at 8:39 pm

Alex: Check out my post on this subject, at http://www.artisanbreadinfive.com/?p=566. I used the Sassafras brand clay pot, but should work about the same. I don’t put it into a pre-heated oven; rather, I put it in a cold oven and pre-heat for 30 minutes. Then the dough is dropped in. Haven’t had a cracking problem but none of these stonewear items last forever… Jeff

chrissy said...
January 22, 2010 at 5:43 pm

If I read the posts correctly, I saw that some people are using Corningware (casseroles) instead of a dutch oven. I would love to be able to try this since I have their French White set, but I have a few questions.
Do you need to preheat the corningware like you do the dutch oven?
Do I use parchment in the bottom or must it be oiled?
Can I let the dough rise right inside the Corningware?
I am really enjoying your books-I just received the 2nd one for Christmas and I am looking forward to trying out some of the whole wheat recipes. Thanks!

jeff said...
January 22, 2010 at 9:09 pm

Chrissy: Whatever you use, it should be hot in order to get the great oven spring we see with the closed-pot method. Check with the manufacturer to be sure that you can do this pre-heat with an empty pot. Wouldn’t want it cracking. Parchment is great, sometimes I use a thick layer of course whole-grain flour instead. I never oil it, though that might be just as good, especially w/corningwear. You really can’t do an overnight rise right in the baking vessel because of the need to pre-heat.

You’ll find that the method is forgiving. If something sticks to a pot, just leave it in there for about 10 minutes after baking and it basically “steams” itself out. Jeff

chrissy said...
January 22, 2010 at 9:31 pm

Thanks Jeff. I sent an email off to Corningware to see what they have to say. I remembered. too, that I have some small clay pots with a glazed interior that are intended to bake muffins-can I use them to make mini loaves do you think?
Thanks to you and Zoe for answering all the questions here. As a new bread baker, I’m not all that comfortable with just leaping into new techniques without a bit of guidance.

jeff said...
January 23, 2010 at 6:57 am

Chrissy: The clay pots should work well…

Jenny said...
January 25, 2010 at 3:45 am

I love baking your bread in my dutch oven but the other day I burned my wrist dropping my loaf in the pot, and was wondering if i could possibly just place my dough on my baking stone and just turn the bottom part of my dutch oven upside down and place that over the loaf. Do you think this will damage my stone?

I’m really just looking for a way to do this or something similar without having to buy anything, since I’m really poor right now. :) Maybe I should just another ove-glove.

zoe said...
January 25, 2010 at 12:36 pm

Hi Jenny,

I’m sorry to hear that you burned yourself, definitely a potential hazard to this method. The problem with covering your loaf with the cold pot is that it will take a log while for it to heat up and the bread will not get that initial blast of heat that it needs. You are better off using one of these very thin aluminum pans that heats up almost instantly. http://www.artisanbreadinfive.com/?p=510

Hope that works for you? Thanks, Zoë

Jenny said...
January 26, 2010 at 7:37 pm

Thanks Zoe! It’s healing nicely btw:) That sounds like it would work perfectly. Yay, no more burns!…for now…

Lisa said...
January 31, 2010 at 7:09 pm

I thought I was baking bread for more than a decade but after my very first batch I realized I was WRONG!!! This simple loaf stopped my family in their tracks! AWESOME!!! And sooooo easy!!!!!

jeff said...
January 31, 2010 at 10:12 pm

Lisa: So glad it’s working out… Jeff

Ellen said...
February 5, 2010 at 4:16 am

My daughter gave me your book for Christmas and I love it. Being Southern, my favorite bread so far is the Broa – we do love our cornbread. BTW, true southern cornbread is not sweet at all. I never put sugar in it (horrors)!

Last night, I tried your boule in my cast iron dutch oven and it was delicious! I didn’t get the large holes since my dough was a bit dry, but the no matter – the taste was wonderful. My dough was 5 days old and had a wonderful sour dough flavor. I’ve also made your brioche as cinnamon rolls and my family loves them. I think I will try the rest of the boule dough as crusty dinner rolls.

zoe said...
February 5, 2010 at 9:57 am

Hi Ellen,

My step-mother is from Alabama and she makes her cornbread without sugar as well. So tasty!

Enjoy all the bread! Zoë

lirelands said...
February 8, 2010 at 1:56 pm

I was wondering if a Le Creuset 725 quart Doufeu http://www.amazon.com/Creuset-Enameled-Cast-Iron-4-Quart-Doufeu/dp/B0012Q6IES/ref=sr_1_1?ie=UTF8&s=home-garden&qid=1265662458&sr=8-1
would work well for this, there is no top knob to burn off, but I’m not sure if the basting spikes would cause a problem? Enamelled cast iron seems to be the preferred type, right? And 6 to 8 quart size? Thanks for your input!

jeff said...
February 8, 2010 at 9:12 pm

Lirelands: It says there’s a “phenolic lid safe to only 400.” What about the suggestions we put on this post http://www.artisanbreadinfive.com/?p=552

Simpler, and the small one is definitely cheaper. You can use it to make one-pound loaves, or even close to two. Jeff

lirelands said...
February 9, 2010 at 5:20 pm

Jeff,

I’m not sure why that description says “phenolic lid safe to only 400,” because I asked the Le Creuset store (they have a factory store close by here) and they said the lid and handles are enamelled cast iron, just like the others. And if you look at the picture, you can see that there is no knob on it at all. So I have to think that that lingo must be the generic Le Creuset lingo that they put on all of their pots.

Mostly, I was hoping for a two-fer, if I’m going to spend $250-$300, I thought it would be nice to get one that I could use for the bread, as well as braising, etc. And some folks rave about the little dimples on the inside of the top helping to promote condensation, a tight lid maintaining the steam, etc., for more successful braising. And the indented lid is so you can put ice cubes on top to get more condensation when you are braising, which you would omit for the bread baking. I thought that maybe those dimples would be good for braising, but didn’t know if they would be harmful for baking bread? The Staub cocotte has them, too. In the absence of added liquids, would they just be ignored, or would the bread steam condense there and cause a problem?

Mostly, I was just trying to buy one big pot which will be a storage headache, as well as expensive, but that would at least serve two purposes.

Thanks for your help!

jeff said...
February 9, 2010 at 8:01 pm

Linda: Ah, now I see. I think the dimples shouldn’t make much difference, should be fine. Same for the issue with the lid, sounds fine. Hopefully you can look at this before buying it sight unseen? But basically, it should work just fine. Jeff

lisa said...
February 17, 2010 at 4:47 pm

baked my first whole grain loaf last night. turned out beautifully, but my stone that i’ve baked w/ for years broke in 3 places!!
Help! What did i do wrong?? i don’t want to make the same mistake if i get a new stone.
i’m thinking that the 1 cup of water wasn’t enough because it was all gone when the baking was done??
any suggestions are appreciated! thank you!!

jeff said...
February 17, 2010 at 6:08 pm

Lisa: We’ve found that stones do not last forever, though my first one lasted 11 years of frequent baking. It seems clear that the 1/2-inch thick ones are very durable, and the 1/4-inch thick stones are much less so. It’s nothing you did wrong.

Incidentally, you can usually use the broken stone pieces to make breads, all depends on how the crack is shaped and what the resultant pieces look like.

Alternatives to these stones include the newer cast-iron “stones,” or even just a cast-iron skillet, which we’ve found work quite nicely. Or a Dutch Oven http://www.artisanbreadinfive.com/?p=552 or a cloche http://www.artisanbreadinfive.com/?p=566

My guess is the cloches, being ceramic, are eventually going to break like the stones. Iron, certainly not. Jeff

Lisa said...
February 22, 2010 at 5:24 pm

When I first came upon this site I had a little enamal cast iron pot I had purchased from Costco (KItchen Aid) It worked and I then went hunting something larger, and found a 5 quart oval and round at a local store for pennies compared to what the other pot costs and it works wonders!!!! And the handles on both pots are metal, not plastic so I don’t have to worry!

jeff said...
February 22, 2010 at 8:22 pm

Lisa: In general, the standard non-enameled cast-iron are going to be the least expensive. Worth shopping around. Jeff

Lisa said...
February 23, 2010 at 6:34 pm

That’s the great thing!!! I got enameled for under 50 bucks!!! (Food network brand) with a handle that is attached! I would love the other… but it’s not going to happen soon!

Darin said...
February 26, 2010 at 12:32 pm

Hi Zoe and Jeff, I have a 5.5 qt dutch oven. Is that too small for your recipe? I’ll move up in size if that seems best.

Thanks for the great ideas!
Darin

zoe said...
February 26, 2010 at 12:49 pm

Hi Darin,

My philosophy is that you can never have too many Dutch ovens, of all sizes! ;) Having said that, your 5.5qt is absolutely perfect for baking the bread! I have one that size and use it all the time.

Enjoy! Zoë

Lisa said...
February 26, 2010 at 3:43 pm

I’ve made the olive oil dough for pizza tonight. My onions are caramalized and my cheese is shredded…is there any reason I can’t put parchment paper under my pizza instead of cornmeal that smokes at high temps? I use the parchment paper all the time with the dutch oven method.

Lisa said...
February 26, 2010 at 8:26 pm

sorry to answer my own question. It worked great! Easy to transfer to the stone and didn’t smoke, easy to retrieve from the stone and seperate. The dough was perfect and I used tomato sauce for the pizza. My daughter has hated every sauce I’ve made or bought! I scored tonight! Thank you guys!!!!

jeff said...
February 26, 2010 at 9:18 pm

Lisa: Check the paper’s temperature rating and match to your baking temp, should be fine though. Jeff

Debra said...
March 4, 2010 at 4:48 pm

Is this method discribed in your book? I didn’t see it anywhere in it.

zoe said...
March 4, 2010 at 8:57 pm

Hi Debra,

It is described in our second book HBin5, but not in our first one ABin5. That is the beauty of the web, we can continue to add information that didn’t make it into the books.

Thanks, Zoë

Ann said...
March 6, 2010 at 9:40 am

Jeff & Zoe,

I’ve been making your wonderful bread (usually the European Peasant bread, but with a bit more whole grain flour) in my dutch ovens for nearly a year and a half. I love it!

I have a comment, and a question. As far as dutch oven size, I’ve found that I get more oven spring when the dutch oven fits the size of the loaf more closely. A larger DO leaves the bread a bit flatter. My favorite is my Lodge 5 quart for a 1-1/2 lb. boule.

My question: Since I have a stand mixer, and use it to mix my dough, it’s really no trouble at all to knead the dough for a couple of minutes. I have just tried this for the first time and I got more oven spring than ever, and a little bit better texture. If I do this, will the refrigerator life of the dough be shortened?

Thanks for changing my baking life!

jeff said...
March 6, 2010 at 10:37 am

Ann: Like you, I love the small Dutch. My observation is that I can use it to contain sideways spread if the dough has gotten toward the wetter side later in its life. Mine is even smaller than yours, perfect to contain spread in a 1-pound boule.

Nothing wrong with kneading BEFORE the initial rise, as you are doing. I sometimes do the same. Jeff

Dina Hafiz said...
March 21, 2010 at 7:12 am

Hi did anyone try to bake it in a 6 quart oval dutch oven??
does the shape of the pan affect the quality of the bread?
sorry i know it a stupid question but i am new to this.
thanks

jeff said...
March 21, 2010 at 5:26 pm

Dana: You can bake in a much-larger pan– the Dutch Oven in that case does not contain sideways spread but works beautifully. A smaller one (smaller than the width of the finished bread) DOES contain sideways spread, which is nice in case that your dough is on the older side (and has gotten “wetter). Or in case you happened to mix it up too wet.

The larger Dutch Oven works like a mini-oven within the oven; the smaller ones act like a loaf pan. Makes sense? Jeff

arnette said...
April 19, 2010 at 5:38 am

i love your book and since we live on a ranch, being able to bake decent bread is wonderful. i am a cook and not much of a baker so i have some questions. the bread tastes great but the crust is not just crisp but actually quite hard. is there any way to fix that. i have baked it just on the stone and also in the dutch over and it is still pretty hard. thanks ak

jeff said...
April 19, 2010 at 9:06 am

Arnette: the trick to getting a crisp (not hard) crust is to use steam, but you’re doing that– the Dutch oven method is good for that (see below for sites in our domain that can help you refine your technique). What flour are you using? It’s easiest to crisp a white-flour crust. Have you tested your oven temp with a thermometer– must do that; here’s a reasonable thermometer on Amazon: http://bit.ly/czmco2

Baking in a Dutch Oven: http://www.artisanbreadinfive.com/?p=552

Aluminum Roasting Pan for Crust: http://www.artisanbreadinfive.com/?p=510

Cloche baking: http://www.artisanbreadinfive.com/?p=566

Cathi said...
April 25, 2010 at 8:24 pm

My family just demolished my first loaf of ABin5. Used the standard recipe, but baked in a dutch oven. I think we are going to have to watch our waistlines.

I did have one issue with the parchment paper getting too brown which translated to the bottom of the bread. The top was very light brown, but the bottom was smoked from burnt paper. The paper fell to pieces when put in the trash and along the way there. Any thoughts? I’m thinking the oven was too hot. With my oven it’s erratic anytime it’s over 400, so it’s watch and hope every time.

We LOVED the cornmeal on the bottom. Does it work on top also? The flour was okay, but the bottom with the cornmeal was delicious.

zoe said...
April 25, 2010 at 9:19 pm

Hi Cathi,

Are you using an oven thermometer to make sure your oven is at the right temperature? You can try reducing the temperature down by 10-15 degrees, but not too much. If the bottom crust is burning you may want to create a pillow of foil on the bottom of the pot that you will slide the parchment onto. It will insulate the bottom crust a bit.

Thanks, Zoë

Cathi said...
April 26, 2010 at 8:45 pm

Zoe,

Thanks for your reply. Yes, I use a thermometer. Just bought a new one to be sure. The oven will be at temperature and then change. Sometimes up, sometimes down. No apparent pattern. It’s definitely an oven that needs replacing, but the remodel is a few years off. It needed replacing 17 years ago when we moved in. I’ll try the foil pillow trick Tuesday.

jeff said...
April 27, 2010 at 6:06 pm

Cathi: Well, there’s your explanation– must be getting too hot once you start up. Do the best you can till you can upgrade…

Dina said...
April 28, 2010 at 10:30 pm

Yesteday i made the best batch EVER , i baked half a resepi with only 1 tsp yeast let it rise for 4 hours then stored it in the fridge for next day, then followed your instruction for the dutch oven ….and wooow best loaf ever , i made it with tomato soup and it was gone in minutes.

thanks a 1000 time Jeff and Zoe for this new hobby that i have now.

Matt said...
June 6, 2010 at 1:37 pm

Hey Zoe and Jeff. I tried to search in the comments for my question but i couldnt find it. I own 5 lodge cast iron dutch ovens. You know, the heavy heavy thick suckers that you use charcoal to place on top and under. I want to use those but im afraid the thickness of them will somehow discourage the process of steam and a crackling crust.

All our DO’s are the 12 inch diameter ones.

Thanx in advance

Matt

jeff said...
June 6, 2010 at 2:31 pm

Matt: It will work great– may take a little longer to heat up, but I doubt it. Try it exactly as we recommend and see what you think before modifying the preheat.

Matt said...
June 6, 2010 at 6:28 pm

Thanx jeff. Im going to try it out. My only downfall is i do not own a gas grill. All mine are wood fired via lump charcoal, so a nice gradual preheat is gonna be hard. BUT i will try me best to follow your instructions.

Thanx

matt

Matt said...
June 6, 2010 at 7:21 pm

Sorry Jeff. i posted the wrong dutch oven question. i wanted to ask this about the bread you made in the gas grill not the oven. sorry

zoe said...
June 6, 2010 at 8:14 pm

Hi Matt,

The thickness of your DO shouldn’t effect the steam/crust at all. In fact the thickness may help to bake the bread evenly. If you are baking with wood the heat may not be as even as it would with a gas grill. You may want to make a pillow of foil on the bottom of the DO and then put the parchment and bread on top of that. This will help to prevent the bottom crust from burning.

Hope that helps? Thanks, Zoë

Matt said...
June 6, 2010 at 8:27 pm

Thanx Zoe and Jeff for answering my question even though i posted it on the wrong dutch oven thread. haha. I will try the foil trick. i will also try to maintain the temps as best as i can. with the wood fire. ill take pics and post them on my blog and i will let you know how it turns out. i will try 3 different methods and let you all know how it works out. might come in handy for others.

once again, thanx for all the help

Matt

Jolene said...
June 7, 2010 at 12:41 am

Hi, I have a steam oven and I would like to ask if I will need to cover the lid during baking? My oven is using the steam to bake so I am not sure whether I will need to splash water as mention in your book. Would appreciate your advice.

Jolene said...
June 7, 2010 at 6:07 am

Hi Jeff,thk u so much for the quick response.Yes,I think I think U are right about my steam oven.In fact I hv never bake any bread before & I do not own baking stone & Dutch oven.Before I bake,can u suggest baking stone or Dutch oven is better?

jeff said...
June 7, 2010 at 6:11 am

Jolene: Depends on what you mean by a “steam oven.” If you mean the new steam injected ovens, these are designed to replace the need for splashing in water, so you should be fine. You don’t really need the Dutch Oven technique in this case, or could just leave the lid off.

jeff said...
June 7, 2010 at 8:05 am

Jolene: I think they’re equally good, assuming your oven captures steam. Yours is a steam oven in the first place, so I wouldn’t buy the Dutch oven till you’ve tried the open-loaf method with your steam injection. Could even do that on a cookie sheet before buying anything.

Jolene said...
June 7, 2010 at 7:42 pm

Hi Jeff, thank you for your advice. I will try & bake just using a cookie sheet and let you guys know what is the result.

Once again, thank you so much for the reply. :)

Lisa said...
June 24, 2010 at 8:23 am

For the clay pot method, would it work with the stone as a base and a oven safe clay bowl on top?

zoe said...
June 24, 2010 at 8:45 am

Hi Lisa,

Yes, that would be a great way to do it. I have also used a stainless bowl, which is lighter and easier to lift off.

Thanks, Zoe

Christine said...
July 10, 2010 at 6:10 am

I brought your bread camping! We used a Lodge #10 dutch oven and cooked the whole wheat master recipe over coals. I coated the dutch oven with butter (probably could use oil to be healthier!) and shaped the loaf and let it rise in the dutch oven. I then prepared the coals and put 6 on the bottom and 14 on top. It took 45 minutes to bake (rotating oven and lid in opposite directions for even heat) and came out beautifully! The crust is softer than baking in the oven, but still wonderful.

jeff said...
July 10, 2010 at 2:02 pm

Christine: I was hoping someone would write about this… it’s an old technique, I never had the nerve to try it. Thanks for writing!

superfancy said...
July 26, 2010 at 11:04 am

le creuset metal knobs are for sale on their website (broadway panhandler also sells them) less than 10 dollars i think. or as they say, just google it…

many thanks for your good work here.

jeff said...
July 26, 2010 at 11:59 am

Superfancy: Thanks for the tip– and thanks for the kind words. Jeff

Nina said...
July 26, 2010 at 1:18 pm

I’m having trouble finding my posted question from last week. Do I need to remember the exact page I posted it on, or is there an “all posts” page?

zoe said...
July 26, 2010 at 9:27 pm

Hi Nina,

Here is the response I left over at “left the dough on the counter”…

That is odd. Did you use this same method with other loaves and not have this issue? Did you change the brand of parchment? Some brands have more of a waxy coating on them and they tend to stick more.

You can try adding more cornmeal under the loaf, but this may change the texture. The other thing to try is a silpat, the bread will never stick to it and you can reuse it over and over again.

Thanks! Zoë

Write a comment